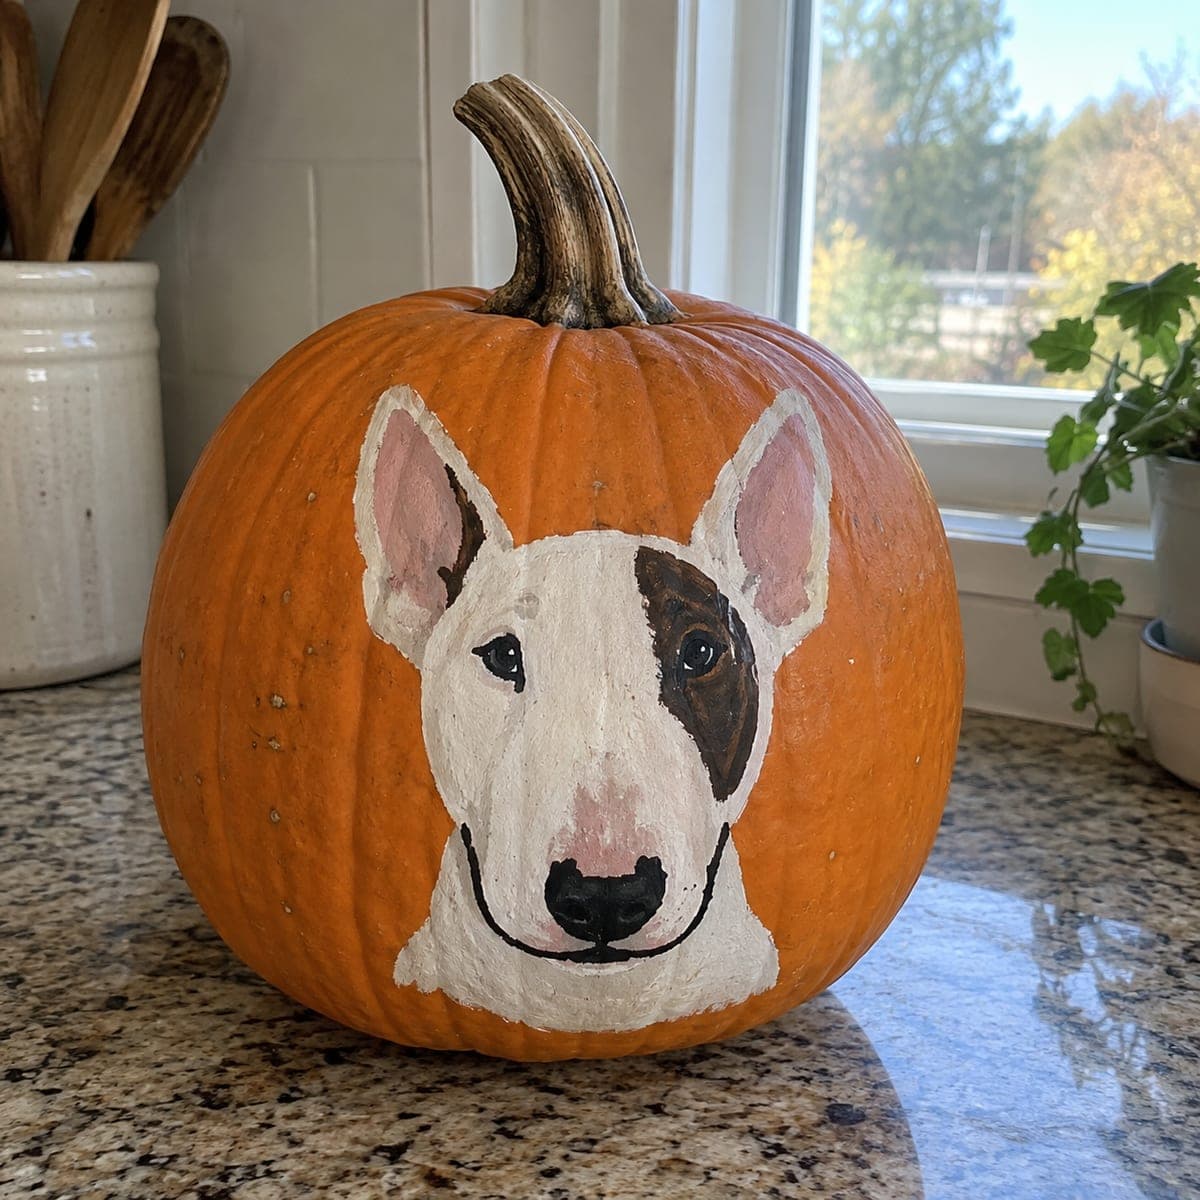
This no-carve pumpkin features a hand-painted bull terrier with the breed's unmistakable egg-shaped head, pink ears, and a brown patch over one eye. White acrylic needs two or three coats to cover orange rind, so build the head shape up gradually before adding the nose, mouth line, and eye details in black. A fine liner brush handles the whiskery finishing touches. Personalize the patch pattern to match your own dog for a porch tribute that lasts all season.
This is an AI-generated concept image: a realistic, carvable design idea rather than a photo of a finished carve. AI concepts are always labeled and sit out the leaderboard and the contest.
The core trick here is building an opaque white dog head over orange rind, which takes two or three thin coats rather than one thick one. Sketch the egg-shaped head first, block in the white, then layer the pink ears, brown eye patch, and black nose and mouth on top. Because it is a no-carve design, everything is done with paint and a fine liner brush, so there is no blade work required.
Written by PumpkinCarvingIdeas.com, inspired by the image above. These are our suggestions, not instructions from the uploader. This approach to the AI concept has not been tested on a real pumpkin.
From pumpkin to porch
1
Clean and sketch
Wipe the pumpkin with a damp cloth and dry it fully so paint grips the rind. Use a pencil or washable marker to draw the bull terrier's long egg-shaped head, upright pointed ears, and muzzle. Keep the head centered on the smoothest front panel where it faces out. Step back and check the shape reads clearly before you commit to paint.
2
Block in the white base
With a flat or round brush, lay down the first thin coat of white acrylic across the whole head shape. Expect the orange to show through at first, which is normal. Let each coat dry, then add a second and if needed a third coat until the white looks solid and even. Thin coats dry faster and crack far less than one heavy layer.
3
Add the ears and eye patch
Mix a soft pink for the inner ears and paint it inside the white ear outlines, leaving a white rim. Paint the brown patch over one eye, letting it curve naturally around where the eye will sit. Keep these colors slightly inside their pencil lines so the white edges stay crisp. Let everything dry before moving on.
4
Paint the nose, eyes, and mouth
Load a smaller brush with black for the rounded nose at the tip of the muzzle. Add the two dark almond eyes, one sitting inside the brown patch. Use a fine liner brush to draw the thin curved mouth line and the soft shading under the nose. A steady hand and a light touch keep these details from going blotchy.
5
Finishing touches
Switch to the fine liner for tiny whisker dots and any soft gray shading along the muzzle and cheeks. Personalize the patch pattern to match your own dog if you like. Once fully dry, seal with a clear matte acrylic spray so the portrait survives porch weather. Let it cure before handling.
6
Stage and photograph
Set the finished pumpkin on a windowsill or porch step with the dog facing your viewers. Because it is painted and not lit from inside, aim for soft daytime light or a nearby lamp rather than a candle. Add a small LED puck beside it at night if you want a gentle glow. Snap your photo straight on so the portrait stays true to shape.
Gather your supplies
Check things off as you get ready.
Work on a stable surface, keep your free hand out of the cutting path, and have an adult handle sharp tools.
Three levels of light
Leave intact
The entire orange rind stays untouched and dark, since this is a painted design with no cutouts.
Peel & shade
For an optional glow, lightly scrape only the muzzle or ear tips to add subtle dimension, though the classic version stays fully painted.
Cut through
No full cutouts are made. If you want interior light, add a small LED beside the pumpkin rather than carving into the painted face.
Use thin coats and let each one dry before adding the next. Two or three light layers cover far better than one thick coat and are much less likely to crack. A quick base coat of white gesso or primer can speed things up if you have it.
What if my egg-shaped head looks lopsided?
Sketch it in pencil first and view it from a few feet back before painting. The bull terrier head is long and narrow with a gentle downward curve, so measure both sides from the center. You can wipe away pencil or washable marker and redraw as many times as you need.
Will the paint survive on my porch all season?
Acrylic holds up well once dry, and a clear matte sealer spray adds real weather protection. Keep the pumpkin out of standing rain and off hot direct concrete when you can. A cool shaded spot helps both the paint and the pumpkin last longer.
Your take belongs here, too.
Changed a detail? Made it simpler? Share a photo of your version and tell the community what worked.
 AI
AI






Comments (0)