Halloween Pumpkin Carving Contest · Starts October 1st · $500 in prizes
← Back to ideas
@ai_concepts
Sep 2, 2026
Bernese Mountain Dog Painted PumpkinAI
0

Bernese Mountain Dog Painted Pumpkin

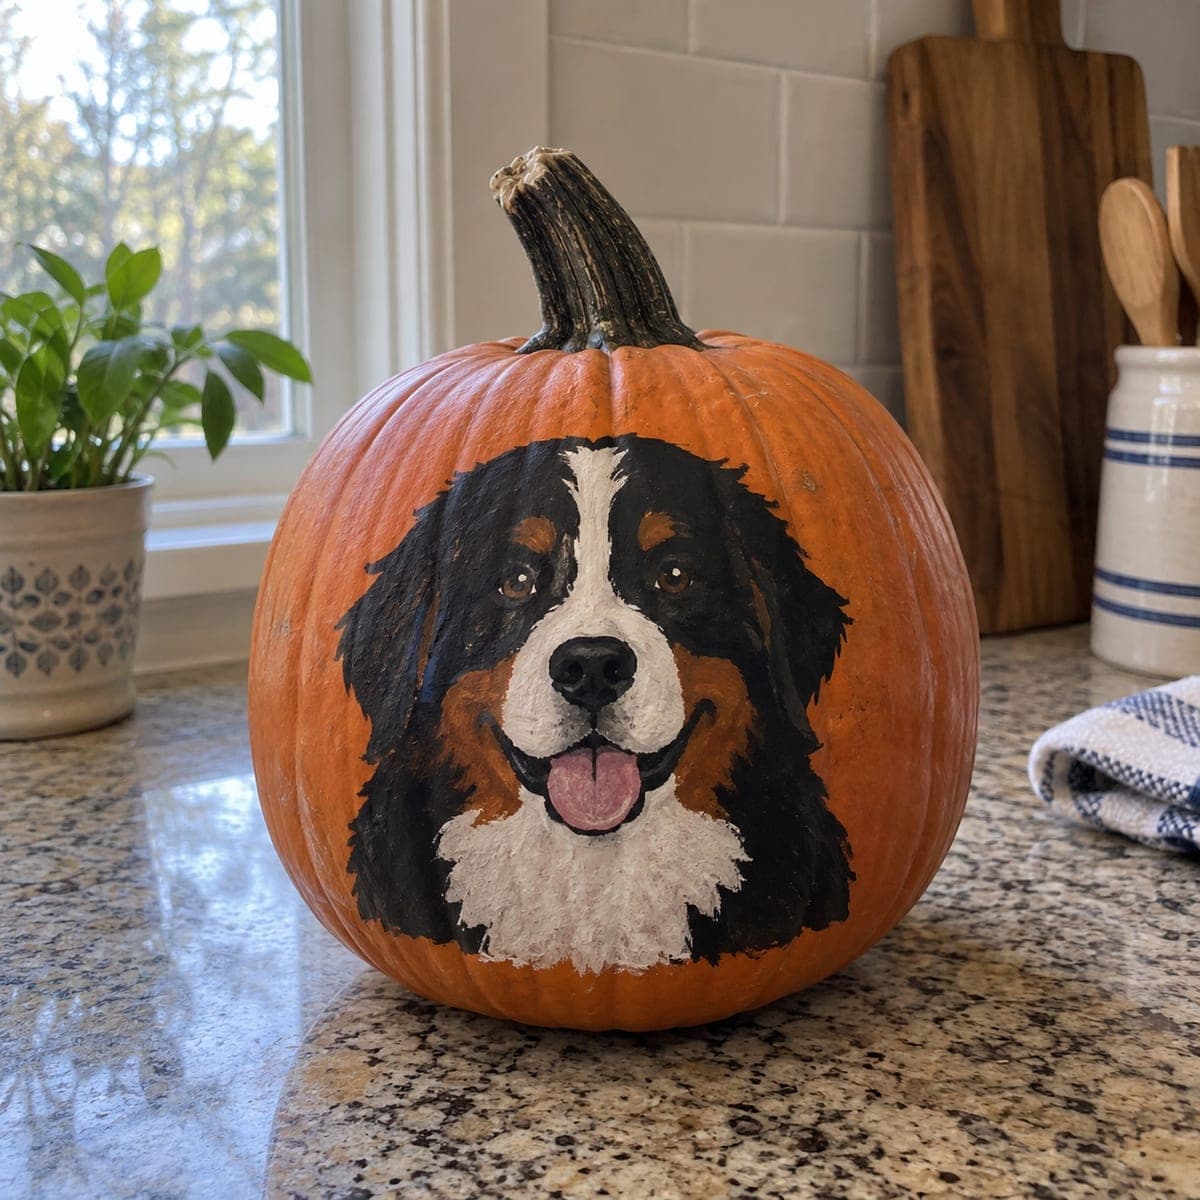
A happy Bernese mountain dog with its tongue out is painted straight onto the pumpkin in classic tricolor black, rust, and white. Acrylic craft paint covers well over pumpkin skin, so block in the black head shape first, then layer the white blaze and chest and finish with the rust eyebrows and cheeks. A dry-brush pass adds fur texture along the edges. No cutting means this pet portrait pumpkin survives on a kitchen counter well past Halloween.

This is an AI-generated concept image: a realistic, carvable design idea rather than a photo of a finished carve. AI concepts are always labeled and sit out the leaderboard and the contest.

No ratings yet · Sign in to rate
Comments (0)

  • No comments yet — be the first.

Save without an account. Sign in to like or comment.

Our tips for carving a similar design

The core trick here is layering acrylic paint light-over-dark so the tricolor markings read clearly: block the big black head shape first, then stack the white blaze, chest, and muzzle on top, and finish with warm rust brows and cheeks. Because nothing gets cut, the whole design lives on the round front of the pumpkin and survives well past Halloween. Save fine fur texture and the pink tongue for last so wet layers do not smear.

Written by PumpkinCarvingIdeas.com, inspired by the image above. These are our suggestions, not instructions from the uploader. This approach to the AI concept has not been tested on a real pumpkin.

From pumpkin to porch

  1. Clean and sketch the head

    Wipe the pumpkin front with a damp cloth and let it dry fully so paint grips. Lightly pencil the rounded outline of the dog's head, the center white blaze, the muzzle, and the chest triangle. Keep marks soft since acrylic will cover them. Working on the flattest part of the front gives you the truest portrait shape.

  2. Block in the black

    Load a medium flat brush with black acrylic craft paint and fill the whole head and floppy ear shapes in one solid pass. Leave the blaze, muzzle, and chest areas bare pumpkin for now. Let this base coat dry completely, then add a second coat if the orange still shows through. A clean, opaque black makes the later white and rust pop.

  3. Layer the white blaze and chest

    Once the black is dry, paint the vertical face blaze, the muzzle, and the fluffy chest in white. It may take two or three thin coats to fully cover the dark base, so dry between each. Keep the edges a little ragged rather than perfectly smooth. Let everything cure before moving on.

  4. Add rust and the face details

    Mix or use a rust brown for the eyebrow dots above each eye and the cheek patches where black meets white. Paint the almond eyes, add a tiny white dot in each for life, and fill the nose black. Then lay in the pink tongue below the muzzle with a soft curve. A fine detail brush keeps these small marks crisp.

  5. Dry-brush the fur

    Dip a nearly dry stiff brush in a slightly lighter shade of each color and flick short strokes along the edges of the black, white, and rust zones. This feathered blending sells the long Bernese coat. Work in the direction the fur grows, outward from the face. Go light, since a little texture reads as a lot.

  6. Seal and stage the photo

    Let all paint dry overnight, then brush on a clear matte acrylic sealer so the portrait resists smudges and kitchen humidity. Set the pumpkin on a counter or shelf in soft daylight for the best photo. Because there are no cuts, skip candles entirely; if you want a glow, tuck a small LED behind it. Wipe gently with a dry cloth to keep it looking fresh for weeks.

Gather your supplies

Check things off as you get ready.

Work on a stable surface, keep your free hand out of the cutting path, and have an adult handle sharp tools.

Three levels of light

  • Leave intact

    The bare orange pumpkin skin around the dog stays untouched as the warm background frame.

  • Peel & shade

    This is a paint project, so there is no peeled glow; a light dry-brushed highlight along the fur edges mimics that soft lift instead.

  • Cut through

    Nothing is cut on this no-carve design, so the brightest accents come from the white blaze and chest catching the room light.

Learn the carving basics

Before you start cutting

Do I really not cut anything on this pumpkin?

Correct, this is a fully painted, no-carve portrait. The Bernese is built entirely from layered acrylic on the pumpkin's surface. That means no candle inside; if you want light, set a small LED behind or beside it.

How do I get white to show over the black base?

Let the black dry completely first, then apply white in two or three thin coats rather than one thick one. Each layer dries opaque and stops the dark base from bleeding through. Patience between coats is the whole secret to a clean blaze and chest.

This is an AI concept image. Will it work on a real pumpkin?

Yes, the technique is sound on any real smooth pumpkin. Acrylic craft paint covers pumpkin skin well as long as you wipe it clean and let it dry first. Seal the finished portrait so it holds up on a counter.

Your take belongs here, too.

Changed a detail? Made it simpler? Share a photo of your version and tell the community what worked.

Share your pumpkin

More pumpkins like this

You've reached the end · 8 pumpkins
The Patch Report

Fresh pumpkins, in your inbox.

The best new carvings, ideas worth stealing, and how-tos for carving season. Short, seasonal, and gone by November.

A short email during carving season. Unsubscribe anytime. See our privacy policy.