Halloween Pumpkin Carving Contest · Starts October 1st · $500 in prizes
← Back to ideas
@ai_concepts
Aug 25, 2026
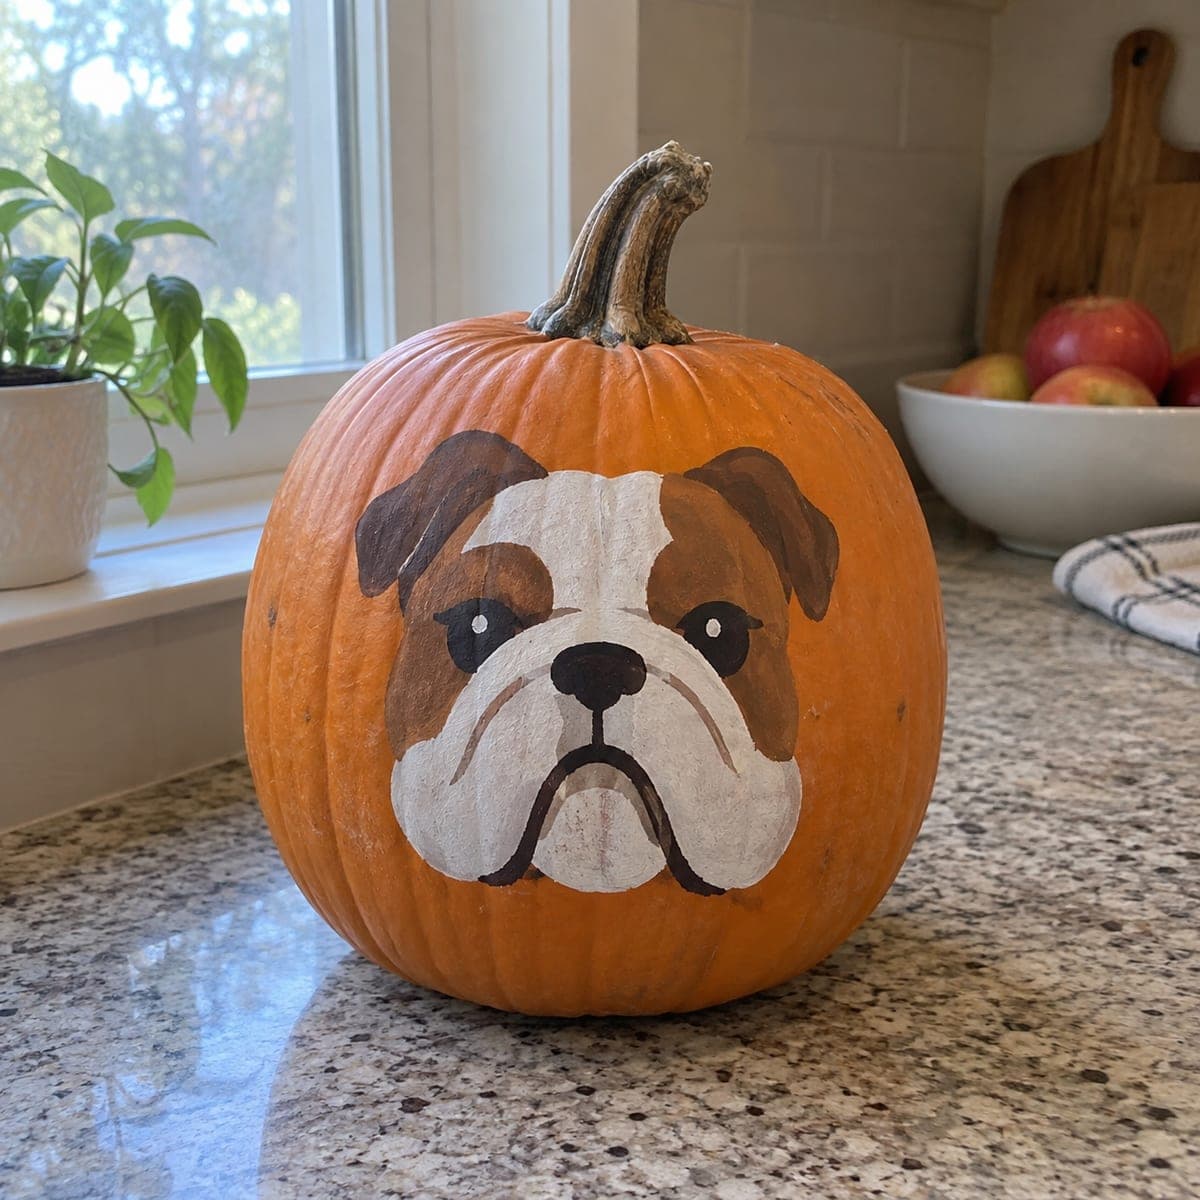
Painted English Bulldog Face No-Carve PumpkinAI
0

Painted English Bulldog Face No-Carve Pumpkin

This no-carve pumpkin wears a grumpy-sweet English bulldog face, with floppy brown ears, a wrinkled white muzzle, and a classic underbite painted in acrylics. Chalk the outline first so the symmetrical jowls match on both sides, then block in the big color shapes before adding the black nose and mouth lines. Because nothing is cut, it lasts for weeks indoors. A fun way for dog owners to put their breed on the porch.

This is an AI-generated concept image: a realistic, carvable design idea rather than a photo of a finished carve. AI concepts are always labeled and sit out the leaderboard and the contest.

No ratings yet · Sign in to rate

Comments (0)

  • No comments yet — be the first.

Save without an account. Sign in to like or comment.

Our tips for carving a similar design

The core trick here is symmetry: chalk a light centerline so both jowls, ears, and eyes mirror each other before any paint goes down. You build the face in layers, blocking the big color shapes first, then dropping in the dark nose and mouth lines last so the details sit crisp on top. Because nothing is cut, this pumpkin stays fresh indoors for weeks.

Written by PumpkinCarvingIdeas.com, inspired by the image above. These are our suggestions, not instructions from the uploader. This approach to the AI concept has not been tested on a real pumpkin.

From pumpkin to porch

  1. Prep and sketch

    Wipe the pumpkin clean and dry so paint grips well. Find the flattest, roundest face of the pumpkin and lightly draw a vertical centerline with chalk or a washable marker. Sketch the rough egg shape of the head, then add the two floppy ears at the top corners and the wide muzzle in the lower center. Step back often to check that both sides match before you commit to paint.

  2. Block in the light base

    Start with the biggest, lightest shapes so mistakes are easy to cover. Paint the white blaze up the forehead, the white muzzle, and the white lower jaw with a medium flat brush. Keep edges a little loose for now since you will tidy them later. Let this first layer dry fully before adding any color on top.

  3. Add the brown patches and ears

    Mix a warm tan and a darker chocolate brown. Paint the two ears, the patches around each eye, and the tan shading along the cheeks, leaving the white muzzle clean. Use the darker brown just inside the ears and along the top edges to give them shape. A dry brush with a tiny bit of tan can soften where brown meets white for that natossblended bulldog look.

  4. Paint the eyes and wrinkles

    Add two small dark almond eyes sitting low and wide, each with a single tiny white dot for a highlight. Use a thin liner brush and thinned brown to suggest the soft wrinkles across the muzzle and forehead. Keep these strokes light and few, since bulldogs read best with just a hint of folds. Let everything dry before the final dark details.

  5. Ink the nose and underbite

    Load a liner brush with black and paint the broad wrinkled nose at the top of the muzzle. Draw the mouth as a wide downturned line, then curve it down into the classic bulldog underbite along the lower jaw. Add short nostril marks and a faint line splitting the muzzle. These dark lines are what make the whole face pop, so go slow and keep the brush tip fine.

  6. Seal and stage

    Once fully dry, brush on a coat of clear matte acrylic sealer to protect the paint from smudges and porch humidity. Set the pumpkin on a shelf or entry table where the face is at eye level. For a soft evening glow you can tuck a battery LED puck beside it, never a candle. Snap a photo in daylight to capture those true bulldog colors.

Gather your supplies

Check things off as you get ready.

Work on a stable surface, keep your free hand out of the cutting path, and have an adult handle sharp tools.

Three levels of light

  • Leave intact

    The bare orange pumpkin skin around the face stays untouched as the natural background.

  • Peel & shade

    This is a no-carve design, so there is no peeling; for a subtle glow you could lightly scuff a thin halo of skin behind the head, but painting alone is the intended look.

  • Cut through

    Nothing is cut on this pumpkin; if you want light you can place an LED beside it rather than opening the shell.

Learn the carving basics

Before you start cutting

How do I keep both jowls and ears symmetrical?

Draw a chalk centerline down the pumpkin first and measure each feature out from it on both sides. Sketch one ear, then mirror its size and angle on the other side before painting. Checking from a few feet back helps you catch a lopsided eye or cheek while it is still easy to wipe off.

What paint works best and will it last?

Acrylic craft paint sticks well to a clean, dry pumpkin and dries fast between layers. Finishing with a clear matte sealer protects the surface from smudges and humidity. Kept indoors or on a covered porch, a painted pumpkin like this can look good for several weeks.

Can I add a real glow without carving?

Yes, but keep it simple. Set a battery powered LED puck or a small string of LED lights next to or behind the pumpkin so the painted face catches the light. Avoid open flames near a solid, uncut pumpkin since heat has nowhere to escape.

Your take belongs here, too.

Changed a detail? Made it simpler? Share a photo of your version and tell the community what worked.

Share your pumpkin

More pumpkins like this

You've reached the end · 8 pumpkins
The Patch Report

Fresh pumpkins, in your inbox.

The best new carvings, ideas worth stealing, and how-tos for carving season. Short, seasonal, and gone by November.

A short email during carving season. Unsubscribe anytime. See our privacy policy.