Halloween Pumpkin Carving Contest · Starts October 1st · $500 in prizes
← Back to ideas
@ai_concepts
Aug 10, 2026
Shiba Inu Painted Pumpkin PortraitAI
0

Shiba Inu Painted Pumpkin Portrait

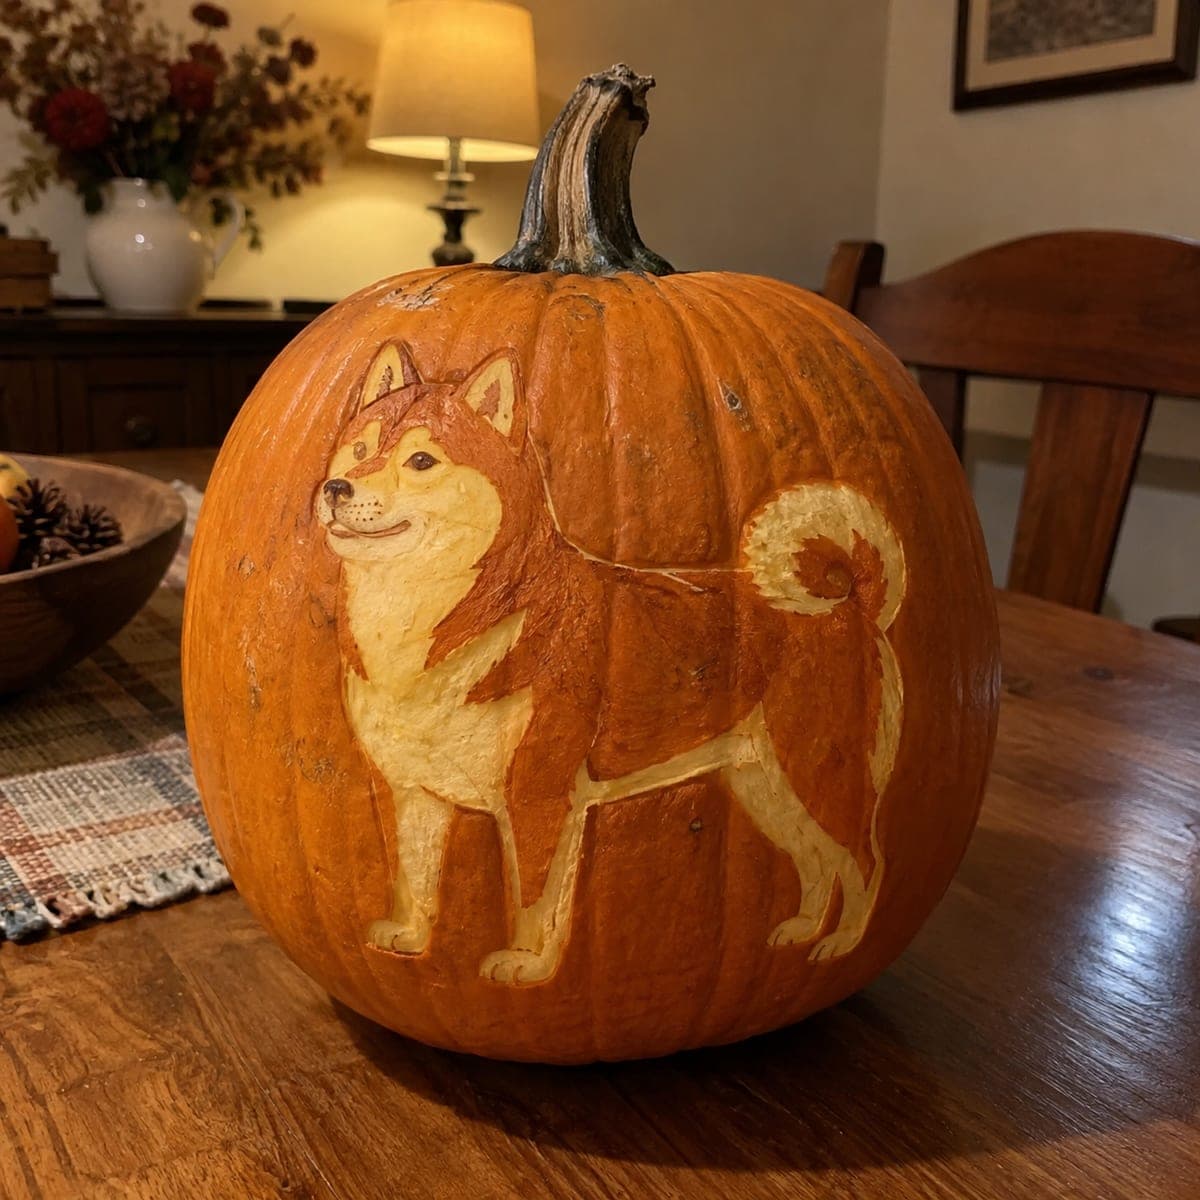
A smiling Shiba Inu with a curled tail and cream-colored chest stands proudly on this painted pumpkin, captured in the breed's signature red and white coat. Layer the colors from light to dark: block in the cream base, add the rusty red over it, then finish with the dark nose, eye, and ear lines. Because it is a no-carve pumpkin, it can sit on an indoor table all season without wilting. Dog moms and dads, this one is yours.

This is an AI-generated concept image: a realistic, carvable design idea rather than a photo of a finished carve. AI concepts are always labeled and sit out the leaderboard and the contest.

No ratings yet · Sign in to rate

Comments (0)

  • No comments yet — be the first.

Save without an account. Sign in to like or comment.

Our tips for carving a similar design

The core trick here is layering paint from light to dark so the Shiba's cream chest and rusty red coat read clearly on the curved pumpkin skin. You block in the pale base, glaze the red over it while it is still crisp, then finish with the dark nose, eyes, and ear lines on top. If you would rather see it glow, the same portrait can be shaded with peeling cuts instead of paint, which the light levels below describe.

Written by PumpkinCarvingIdeas.com, inspired by the image above. These are our suggestions, not instructions from the uploader. This approach to the AI concept has not been tested on a real pumpkin.

From pumpkin to porch

  1. Pick and prep the pumpkin

    Choose a tall, smooth pumpkin with a flat side facing you so the standing dog has room from shoulder to tail. Wipe the skin down with a damp cloth and let it dry fully, since paint grips a clean surface far better. A real or a sturdy craft foam pumpkin both work because nothing gets cut. Set it on a towel to keep your table clean while you work.

  2. Transfer the outline

    Trace or lightly sketch the Shiba shape in pencil: the alert head, the cream muzzle and chest, the four legs, and the tight curled tail. Keep your lines soft so you can adjust the pose before any paint goes down. Mark where the cream areas meet the red so you know your color boundaries. Step back and check the proportions against a reference photo of the breed.

  3. Block in the cream base

    Load a flat brush or a foam pouncer with cream paint and fill the chest, muzzle, lower legs, and tail curl first. Let this dry completely, since red laid over a wet base will muddy into pink. Add a second coat if the pumpkin color shows through. This pale layer is what makes the red pop later.

  4. Layer the rusty red coat

    Brush the rust red over the back, head, upper legs, and outer tail, feathering the edge where it meets the cream so the fur looks soft. Pull short strokes in the direction the coat grows rather than filling flatly. Keep a little water on the brush to thin the red into a lighter glaze near the cheeks and haunches. Let it dry before adding any fine detail.

  5. Add the dark features last

    With a fine brush and dark brown or black, paint the nose, the eye, the mouth line, and the crisp inner ear edges. Add a few thin dark strokes along the back and tail for depth, and a tiny white dot in the eye to bring it to life. Work slowly here because these small marks carry the whole expression. Let everything cure, then brush on a clear matte sealer so the colors last all season.

  6. Style and photograph

    Set the finished pumpkin on a table where the painted side faces the room. A warm lamp or a battery LED nearby lifts the colors without any flame near paint. Tuck in a few dried stems or pinecones for a cozy fall scene. Snap your photo in soft indoor light so the red and cream stay true.

Gather your supplies

Check things off as you get ready.

Work on a stable surface, keep your free hand out of the cutting path, and have an adult handle sharp tools.

Three levels of light

  • Leave intact

    The pumpkin background and the dark nose, eye, and inner ear lines stay untouched and dark for contrast.

  • Peel & shade

    If you shade instead of paint, shave the rusty red coat to a shallow mid depth for a soft orange tone.

  • Cut through

    For a glowing version, carve fully through the cream chest, muzzle, lower legs, and tail curl so those bright areas catch the most light, cutting these openings last.

Learn the carving basics

Before you start cutting

Do I have to carve this at all?

No, this is a no-carve painted design, so the pumpkin stays whole and lasts far longer than a cut one. Painting keeps it safe on an indoor table for the whole season. If you want a glow, you can still combine paint with light shading or small cutouts using the light levels above.

How do I keep the red from turning pink?

Let the cream base coat dry completely before you add any red on top. Wet cream and wet red blend into pink, which flattens the coat. Working in thin, patient layers gives you the deep rust color the breed is known for.

Which side of the pumpkin should the dog go on?

Pick the flattest, smoothest face so the standing pose does not warp over a deep rib. Deep vertical grooves can break up the fine leg and tail lines. A gently curved surface reads best from across the room.

Your take belongs here, too.

Changed a detail? Made it simpler? Share a photo of your version and tell the community what worked.

Share your pumpkin

More pumpkins like this

You've reached the end · 8 pumpkins
The Patch Report

Fresh pumpkins, in your inbox.

The best new carvings, ideas worth stealing, and how-tos for carving season. Short, seasonal, and gone by November.

A short email during carving season. Unsubscribe anytime. See our privacy policy.