Halloween Pumpkin Carving Contest · Starts October 1st · $500 in prizes
← Back to ideas
@ai_concepts
Aug 2, 2026
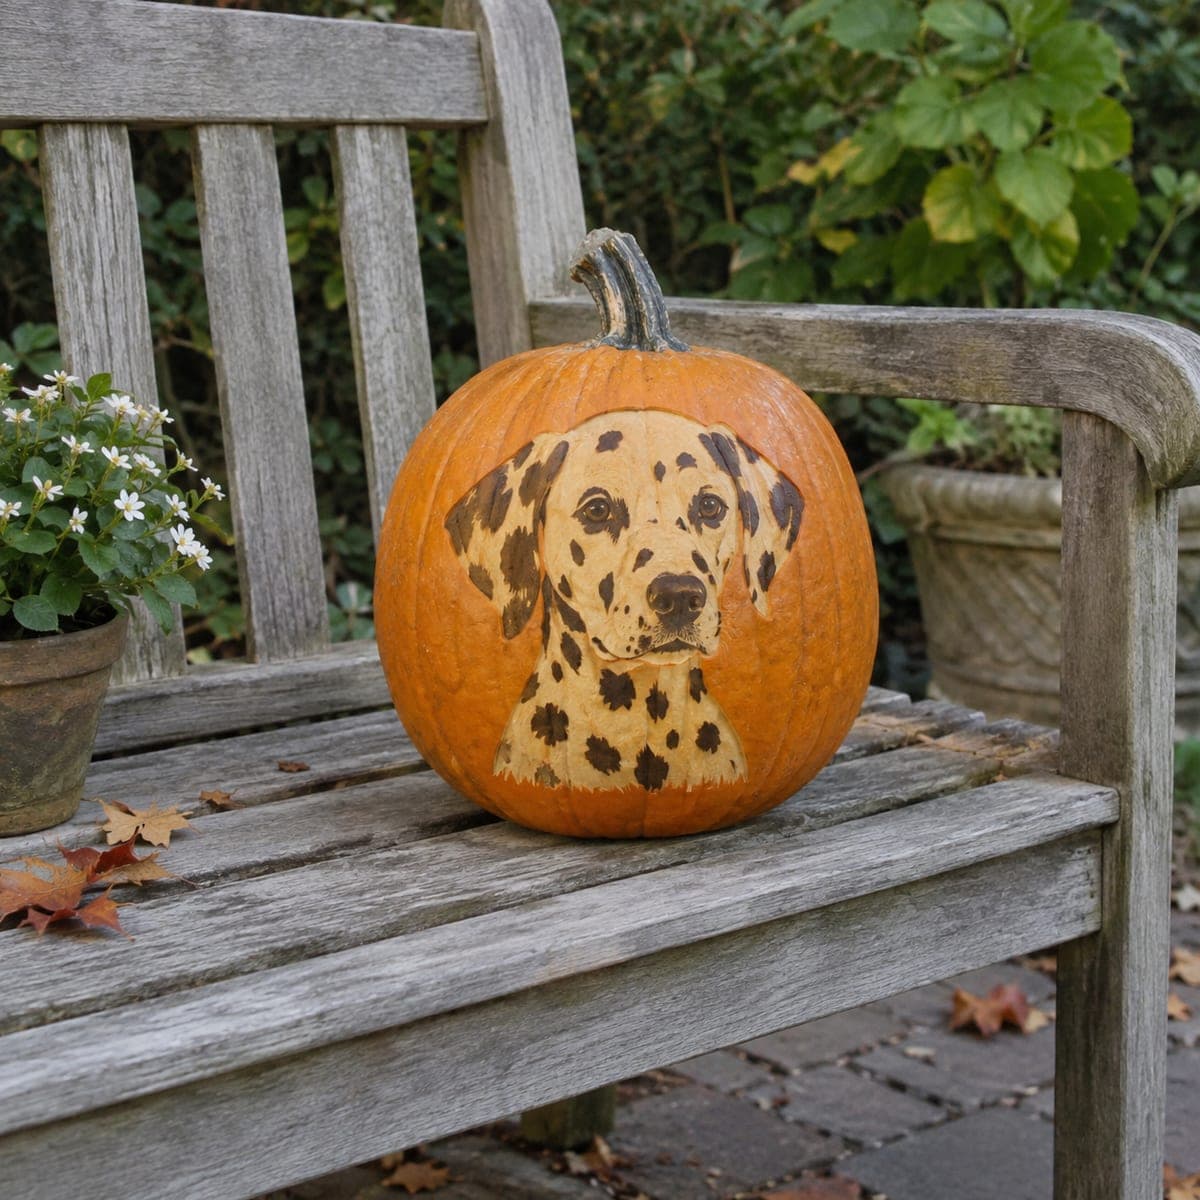
Dalmatian Puppy Portrait No-Carve PumpkinAI
0

Dalmatian Puppy Portrait No-Carve Pumpkin

A soulful Dalmatian gazes out from this no-carve pumpkin, its cream coat and scattered brown spots painted right over the orange shell. Start with a light base coat for the head and chest, let it dry fully, then dab the spots on with a round brush, varying their size so the pattern looks natural. Display it on a garden bench where daylight shows off the details, since no candle is needed.

This is an AI-generated concept image: a realistic, carvable design idea rather than a photo of a finished carve. AI concepts are always labeled and sit out the leaderboard and the contest.

No ratings yet · Sign in to rate

Comments (0)

  • No comments yet — be the first.

Save without an account. Sign in to like or comment.

Our tips for carving a similar design

The core trick here is treating the pumpkin as a canvas, letting the natural orange shell stay as the background while a cream head and chest are painted on top. Spots are added last with a round brush in varied sizes so the pattern reads as fur, not polka dots. Because nothing is hollowed out, the whole thing stays sturdy and is meant for daylight display.

Written by PumpkinCarvingIdeas.com, inspired by the image above. These are our suggestions, not instructions from the uploader. This approach to the AI concept has not been tested on a real pumpkin.

From pumpkin to porch

  1. Pick and prep the pumpkin

    Choose a tall, smooth pumpkin with a broad flat face for the dog's head and chest. Wipe it down with a damp cloth and let it dry completely so paint grips well. A little rubbing alcohol on the painting area helps cut any waxy coating. Set it on newspaper with the best side facing you.

  2. Sketch the portrait lightly

    Trace or draw the Dalmatian's head, ears, and chest with a washable marker or soft pencil. Keep the outline centered on the flat face so both ears have room. Mark the eyes, nose, and the boundary of the cream coat now, before any paint goes down. Step back and check the proportions look balanced.

  3. Lay the cream base coat

    Fill the head and chest with a light cream or off-white acrylic, staying inside your outline. Use thin, even coats and let each one dry fully before adding another so the orange does not bleed through. Two light layers usually cover better than one thick one. Leave the surrounding pumpkin bare for contrast.

  4. Add the eyes, nose, and ears

    Once the base is dry, paint the dark ears, the black nose, and the soft brown eyes. Add a tiny white dot in each eye to bring the gaze to life. Keep a fine brush and a damp cotton swab handy to clean up any stray edges. Let these features set before the final step.

  5. Dab on the signature spots

    Load a round brush with dark brown and dab spots across the coat, varying their size and spacing so the pattern looks natural. Cluster a few near the ears and scatter smaller ones down the chest. Resist making them uniform, since real Dalmatian spots are irregular. Let everything dry hard, then seal with a clear matte spray if you want weather resistance.

  6. Stage it and photograph

    Set the finished pumpkin on a garden bench or step where daylight rakes across the surface and shows the brushwork. No light goes inside, since this is a solid painted piece. Add a few fall leaves or a potted mum nearby for a cozy frame. Shoot in soft morning or late afternoon light for the best color.

Gather your supplies

Check things off as you get ready.

Work on a stable surface, keep your free hand out of the cutting path, and have an adult handle sharp tools.

Three levels of light

  • Leave intact

    The bare orange shell around the portrait, left as the background color

  • Peel & shade

    The cream base coat over the head and chest, giving a soft glow of lighter tone against the orange

  • Cut through

    Nothing is cut on this no-carve design, so the pumpkin stays whole and solid

Learn the carving basics

Before you start cutting

Do I need to put a light inside?

No. This is a painted, no-carve design meant to be seen in daylight, so there is no cutout and no candle. If you display it after dark, aim a small LED spotlight at the face from the front rather than lighting it from within.

How do I keep the spots from looking like uniform dots?

Vary the size, spacing, and roundness as you dab them on, and cluster a few while scattering others. Turning the brush slightly between dabs gives softer, more natural edges. Look at a photo of a real Dalmatian for reference so the pattern feels random.

Will the paint survive outdoors?

Acrylic holds up reasonably well, but rain and frost will eventually dull it. A clear matte sealer spray after everything dries adds real protection. Bring the pumpkin indoors during storms and it should look fresh for a couple of weeks.

Your take belongs here, too.

Changed a detail? Made it simpler? Share a photo of your version and tell the community what worked.

Share your pumpkin

More pumpkins like this

You've reached the end · 8 pumpkins
The Patch Report

Fresh pumpkins, in your inbox.

The best new carvings, ideas worth stealing, and how-tos for carving season. Short, seasonal, and gone by November.

A short email during carving season. Unsubscribe anytime. See our privacy policy.