Halloween Pumpkin Carving Contest · Starts October 1st · $500 in prizes
← Back to ideas
@ai_concepts
Aug 6, 2026
Doberman Face Painted No-Carve PumpkinAI
0

Doberman Face Painted No-Carve Pumpkin

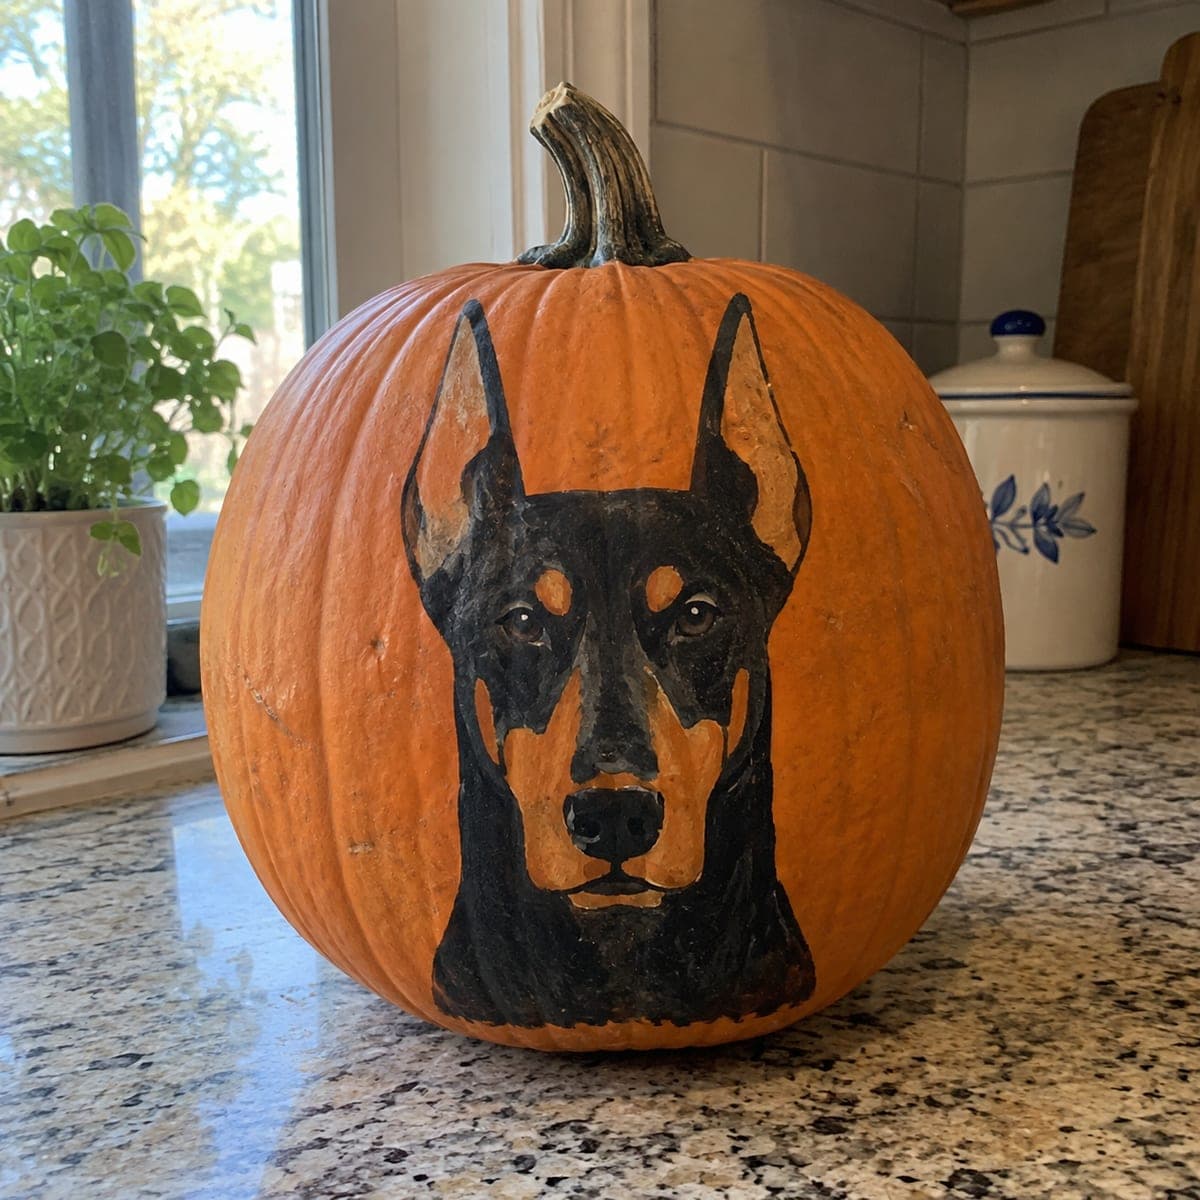
A bold Doberman Pinscher portrait is painted on a pumpkin using black and tan acrylic paint, capturing the breed's sharp features, erect ears, and alert gaze directly on the uncut orange surface. This no-carve dog pumpkin idea skips the knife entirely, making it safe for older kids to try with parental help on the fine details. Block in the dark areas first, then add the tan markings wet-on-dry for clean edges. The finished piece doubles as fall kitchen decor long after Halloween.

This is an AI-generated concept image: a realistic, carvable design idea rather than a photo of a finished carve. AI concepts are always labeled and sit out the leaderboard and the contest.

No ratings yet · Sign in to rate
Comments (0)

  • No comments yet — be the first.

Save without an account. Sign in to like or comment.

Our tips for carving a similar design

The whole trick here is letting the bare orange skin do the work as the tan markings while black acrylic shapes the face around it. You plan the layout in pencil first, block in the large black masses, then add the tan and highlights wet-on-dry so the edges stay crisp. Because nothing is cut, this is a paint-only project that holds up as fall decor for weeks.

Written by PumpkinCarvingIdeas.com, inspired by the image above. These are our suggestions, not instructions from the uploader. This approach to the AI concept has not been tested on a real pumpkin.

From pumpkin to porch

  1. Pick and prep a smooth pumpkin

    Choose a tall, rounded pumpkin with a clean front panel and few ribs so the face reads clearly. Wipe the surface with a damp cloth and let it dry fully, since acrylic grips better on clean, dry skin. Set it on a towel so it does not roll while you work. Keep the stem intact, since it frames the top of the design nicely.

  2. Sketch the portrait lightly

    Use a pencil or a washable marker to rough in the two erect ears, the muzzle, and the eyes, keeping the head centered on the front. Lean on a printed Doberman stencil if freehand feels tricky, taping it in place and tracing the main outlines. Remember that the orange skin will become the tan cheeks, brows, and muzzle, so only outline where black will go. Step back often to check that the ears and eyes stay symmetrical.

  3. Block in the black areas first

    With black acrylic and a medium flat brush, fill the large dark shapes: the top of the head, the outer muzzle, the neck, and the ear edges. Work from the center outward and let this base coat dry completely before touching it again. A second coat gives you the deep, solid black that makes the tan pop. Leave the brow spots, inner muzzle, and lower face as bare orange for now.

  4. Add tan markings wet-on-dry

    Once the black is dry, load a smaller brush with tan or light brown and paint the two eyebrow dots, the muzzle sides, and the chest markings over or beside the black. Painting onto a dry base keeps these edges clean instead of muddy. You can also let some bare pumpkin show through as the natural tan tone to save paint. Build the tan in thin layers rather than one thick pass.

  5. Paint the eyes, nose, and fine detail

    Switch to a fine liner brush for the alert eyes, adding a dark iris with a tiny white dot for the catch light that gives the gaze its spark. Fill the nose black with two small nostril highlights, then add short tan and dark strokes along the muzzle to suggest fur. Keep the lines thin and confident, and let each color dry before adding the next on top. This detail stage is where an adult should handle the steadiest work if kids are helping.

  6. Seal and stage your finished pumpkin

    Let everything cure for a few hours, then brush on a thin coat of clear matte acrylic sealer to protect the paint from smudges and moisture. Set the pumpkin on a counter or shelf where the portrait faces the room. Since nothing is cut, skip candles entirely; if you want a glow, tuck a small LED puck beside it rather than inside. Snap your photo in soft daylight so the black and tan contrast shows.

Gather your supplies

Check things off as you get ready.

Work on a stable surface, keep your free hand out of the cutting path, and have an adult handle sharp tools.

Three levels of light

  • Leave intact

    The black-painted head, ears, muzzle, and neck read as the darkest areas of the portrait.

  • Peel & shade

    The bare orange skin left showing becomes the natural tan brows, cheeks, and muzzle without any paint.

  • Cut through

    Nothing is cut on this no-carve design; for a brighter accent you could instead dab tan highlights or set an LED puck beside the pumpkin.

Learn the carving basics

Before you start cutting

This is a no-carve idea, so do I need any knife work at all?

No, the entire design is painted onto the uncut orange surface. That makes it a good project for older kids with an adult handling the finest brush lines. If you want a lit version later, you could carve a simple opening in the back for an LED, but it is not needed.

How do I keep the tan markings from turning muddy against the black?

Let the black base coat dry completely before adding any tan, which is the wet-on-dry method. Painting a dry color over a dry base keeps the edges sharp instead of bleeding together. Build the tan in thin layers and use a smaller brush for the crisp borders around the brows and muzzle.

Will the paint last as kitchen decor after Halloween?

Acrylic holds up well on a clean, dry pumpkin, and a thin coat of clear matte sealer helps protect it from smudges and humidity. Keep the pumpkin out of direct sun and off damp surfaces so it does not soften. A firm, blemish-free pumpkin will look good for several weeks.

Your take belongs here, too.

Changed a detail? Made it simpler? Share a photo of your version and tell the community what worked.

Share your pumpkin

More pumpkins like this

You've reached the end · 8 pumpkins
The Patch Report

Fresh pumpkins, in your inbox.

The best new carvings, ideas worth stealing, and how-tos for carving season. Short, seasonal, and gone by November.

A short email during carving season. Unsubscribe anytime. See our privacy policy.