Halloween Pumpkin Carving Contest Β· Starts October 1st Β· $500 in prizes
← Back to ideas
@ai_concepts
Jul 9, 2026
Great Pyrenees Dog Painted Pumpkin PortraitAI
0

Great Pyrenees Dog Painted Pumpkin Portrait

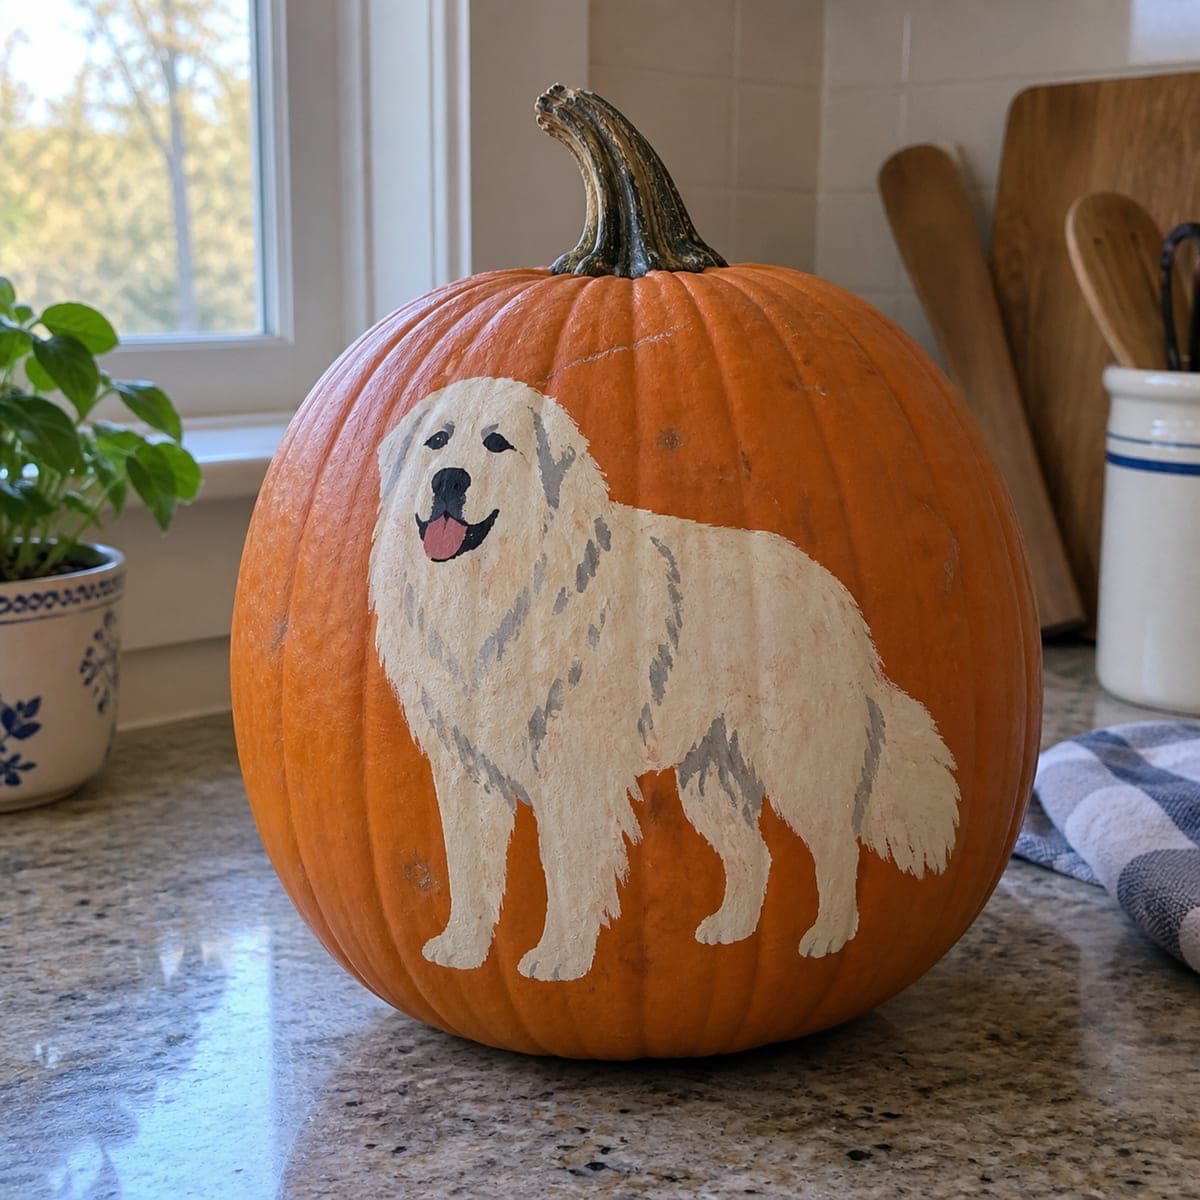
A full-body Great Pyrenees, tongue out and plume tail raised, stands proudly on this hand-painted pumpkin. Building a white dog on orange rind takes patience: block the silhouette in two coats of white, then shade the coat with thin washes of gray and cream so the fur reads fluffy instead of flat. Feather your brushstrokes in the direction the hair grows along the legs and tail. A great no-carve tribute pumpkin for big-dog households.

This is an AI-generated concept image: a realistic, carvable design idea rather than a photo of a finished carve. AI concepts are always labeled and sit out the leaderboard and the contest.

No ratings yet Β· Sign in to rate

Comments (0)

  • No comments yet β€” be the first.

Save without an account. Sign in to like or comment.

Our tips for carving a similar design

The trick here is building a bright white dog on top of dark orange rind, which means blocking the whole silhouette in solid white first and only then shading the fur. Work paint over carving so the pumpkin stays whole and sturdy, then let thin gray and cream washes do the fluffy coat texture. Plan your layers from opaque base to light feathering so the dog reads dimensional instead of flat.

Written by PumpkinCarvingIdeas.com, inspired by the image above. These are our suggestions, not instructions from the uploader. This approach to the AI concept has not been tested on a real pumpkin.

From pumpkin to porch

  1. Prep and sketch the pose

    Wipe the pumpkin clean and dry so paint grips the rind. Choose the flattest, most vertical face for the dog and lightly pencil the full-body outline, tongue out and tail raised. Keep the shape large enough to fill the belly of the pumpkin without wrapping around the curve. Step back and check the proportions before you commit to paint.

  2. Block the white silhouette

    Fill the entire dog shape with a first coat of white acrylic and let it dry fully. Orange will bleed through, so add a second coat once the first is dry to get a clean, opaque base. Keep your edges crisp with a smaller brush around the legs and tail. Resist shading until this base is solid, since gray on thin white just looks muddy.

  3. Shade the coat with thin washes

    Thin gray paint with water into a soft wash and lay it into the shadow areas along the chest, legs, and under the tail. Use short feathered strokes that follow the direction the fur grows. Blend a little cream wash into the mid areas so the coat looks warm and layered. Build these washes gradually because it is easier to add another pass than to lift color off.

  4. Add the face details

    Paint the black nose and eyes with a fine brush, keeping them small and evenly spaced. Add the pink tongue with a soft edge and a thin white highlight for a wet shine. Darken the mouth line and eye rims just enough to give the face expression. Let each color dry before adding the next so they stay clean.

  5. Feather the fur highlights

    Load a nearly dry brush with pure white and flick light strokes over the chest ruff, tail plume, and outer edges of the coat. These bright feathered marks sit on top of the gray shading and sell the fluffy look. Keep the strokes long and airy on the tail and shorter on the legs. Seal the finished paint with a clear matte spray if you want it to survive damp porch air.

  6. Style and photograph

    Set the pumpkin somewhere the dog faces your main viewing angle. Since this is a no-carve piece, tuck a small battery LED string or a warm lamp nearby rather than lighting from inside. Add a few real leaves or a plaid cloth for a cozy backdrop. Snap your photo in soft daylight to keep the whites true.

Gather your supplies

Check things off as you get ready.

Work on a stable surface, keep your free hand out of the cutting path, and have an adult handle sharp tools.

Three levels of light

  • Leave intact

    The orange rind all around the dog stays untouched as the dark background.

  • Peel & shade

    For an optional soft glow, lightly scrape a thin halo just outside the dog before painting so a faint ring lights up.

  • Cut through

    No cutouts are needed on this painted design, though you could add a small vent hole in back for an LED if you want interior light.

Learn the carving basics

Before you start cutting

How do I keep the white from looking see-through over orange?

Orange rind is strong, so a single coat almost never covers it. Lay down two full coats of white and let each dry completely before the next. Only start shading once that base is truly opaque.

How do I make the fur look fluffy and not flat?

Use thin watered-down washes for the gray shadows and feather them in the direction the hair grows. Then dry-brush pure white highlights on top of the shading along the ruff and tail. The contrast between soft shadow and crisp highlight is what reads as fluff.

Since it is not carved, how should I light it?

Never put a flame inside a mostly solid pumpkin. Set a battery LED string or a warm lamp beside it to make the paint glow. If you really want inside light, cut a small vent in the back only and drop in an LED puck.

Your take belongs here, too.

Changed a detail? Made it simpler? Share a photo of your version and tell the community what worked.

Share your pumpkin

More pumpkins like this

You've reached the end Β· 8 pumpkins
The Patch Report

Fresh pumpkins, in your inbox.

The best new carvings, ideas worth stealing, and how-tos for carving season. Short, seasonal, and gone by November.

A short email during carving season. Unsubscribe anytime. See our privacy policy.