Halloween Pumpkin Carving Contest · Starts October 1st · $500 in prizes
← Back to ideas
@ai_concepts
Sep 25, 2026
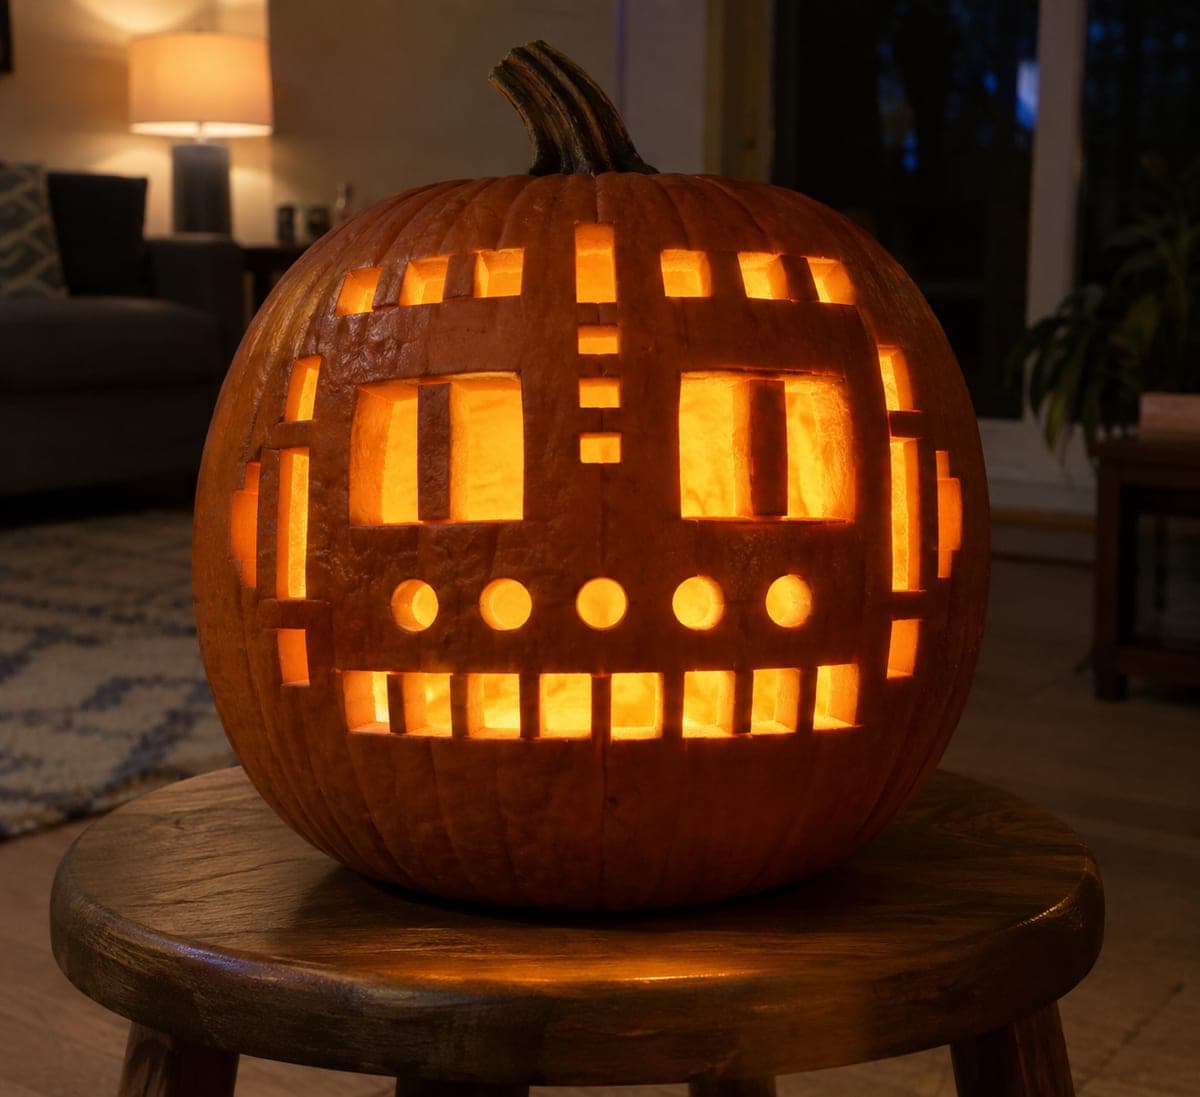
Robot Face Expert Pumpkin Carving Idea for KidsAI
0

Report this carving

Tell us what is wrong. Reports are private.

Robot Face Expert Pumpkin Carving Idea for Kids

Two rectangular eye windows each split by a thick vertical rind bar, a row of eight square mouth holes, six circular control holes, and twelve small rectangles ringing the forehead and cheeks give this expert pumpkin carving idea for kids a cheerful robot face. All the retained gridwork is broad and continuous, joined to the outer shell so there are no fragile isolated sections. Map every rectangle, square, and circle on paper with exact dimensions before transferring the design, since consistent sizing is what makes the robot aesthetic work.

No ratings yet · Sign in to rate

Comments (0)

  • No comments yet — be the first.

Save without an account. Sign in to like or comment.

Our tips for carving a similar design

This design is an exercise in consistent geometry: the robot aesthetic only works if every rectangle, square, and circle is the correct size on a regular grid. All retained rind must be broad and connected to the outer shell with no isolated floating bars. Mapping the full layout on paper with exact dimensions before transferring to the pumpkin is the single most important step.

From pumpkin to porch

  1. Draft the layout on graph paper

    Draw the pumpkin face to scale on graph paper and place the rectangular eye windows, the row of eight square mouth holes, the six circular control holes, and the twelve forehead and cheek rectangles on the grid. Confirm every retained bar connects to the outer shell on at least one side and note the cutting order before you begin.

  2. Transfer the design

    Print the layout, tape it to the pumpkin, and prick key corners and centers through the paper with a transfer stylus. Connect prick marks with a fine washable marker. Take extra care with the eye window rectangles since their vertical rind bars are the most structurally critical elements in the whole design.

  3. Hollow the pumpkin

    Scoop the interior from a back lid to about three-quarters of an inch wall thickness on the face panel. Consistent thinness is important for clean cuts on the many small holes, where a thick wall makes it harder to maintain straight edges and sharp corners.

  4. Cut the eye windows and mouth row

    Begin with the rectangular eye windows, cutting each pane section while leaving the thick central vertical rind bar attached top and bottom. Then cut the eight square mouth holes one by one, leaving solid rind between each adjacent pair. Work slowly at corners to keep them sharp and square.

  5. Cut control holes and border rectangles

    Cut the six circular control holes using a punch or drill bit for clean circular edges, then cut the twelve small border rectangles around the forehead and cheeks. These border holes are close to the pumpkin edge, so cut them last when the face panel has been relieved of tension by the larger central cuts.

  6. Light and display

    A cool white or blue-white LED suits the robot aesthetic better than warm amber. Display at eye level so viewers can appreciate the geometric precision. Under even illumination the rectangular eyes, dotted mouth, and border detail read convincingly as circuitry.

Written with AI to match this design

Gather your supplies

Check things off as you get ready.

Work on a stable surface, keep your free hand out of the cutting path, and have an adult handle sharp tools.

Three levels of light

  • Leave intact

    All retained rind gridwork including the central eye window bar and borders between mouth squares stays dark

  • Peel & shade

    None

  • Cut through

    Both rectangular eye pane sections, all eight square mouth holes, all six circular control holes, and all twelve border rectangles glow at full brightness

Learn the carving basics

Before you start cutting

How do I cut a sharp right-angle corner on the rectangular holes?

Make two straight cuts that approach the corner from opposite sides rather than trying to pivot the saw blade at the corner point. A small detail knife cleans up the last millimeter at each corner. The sharper the corners, the more robotic the face reads.

The central eye bar feels thin. How wide should it be to stay intact?

The vertical bar dividing each rectangular eye window should be at least three-quarters of an inch wide and must connect solidly to both the top and bottom edge of the eye rectangle. A thinner bar will snap when the second pane is cut. Widen it on your template before transferring if the proportions look too fine.

Can I substitute some rectangular holes with drilled circles for a faster version?

Replacing the twelve border rectangles with small drilled circles removes most of the complex cutting while keeping the face recognizably robotic. The eye windows and mouth squares are the design's core elements and should stay as rectangles. This substitution brings the project from expert down to hard.

Your take belongs here, too.

Changed a detail? Made it simpler? Share a photo of your version and tell the community what worked.

Share your pumpkin

More pumpkins like this

You've reached the end · 8 pumpkins
The Patch Report

Fresh pumpkins, in your inbox.

The best new carvings, ideas worth stealing, and how-tos for carving season. Short, seasonal, and gone by November.

A short email during carving season. Unsubscribe anytime. See our privacy policy.