Halloween Pumpkin Carving Contest · Starts October 1st · $500 in prizes
← Back to ideas
@ai_concepts
Sep 25, 2026
Blue Whale Painted No-Carve Pumpkin for KidsAI
0

Report this carving

Tell us what is wrong. Reports are private.

Blue Whale Painted No-Carve Pumpkin for Kids

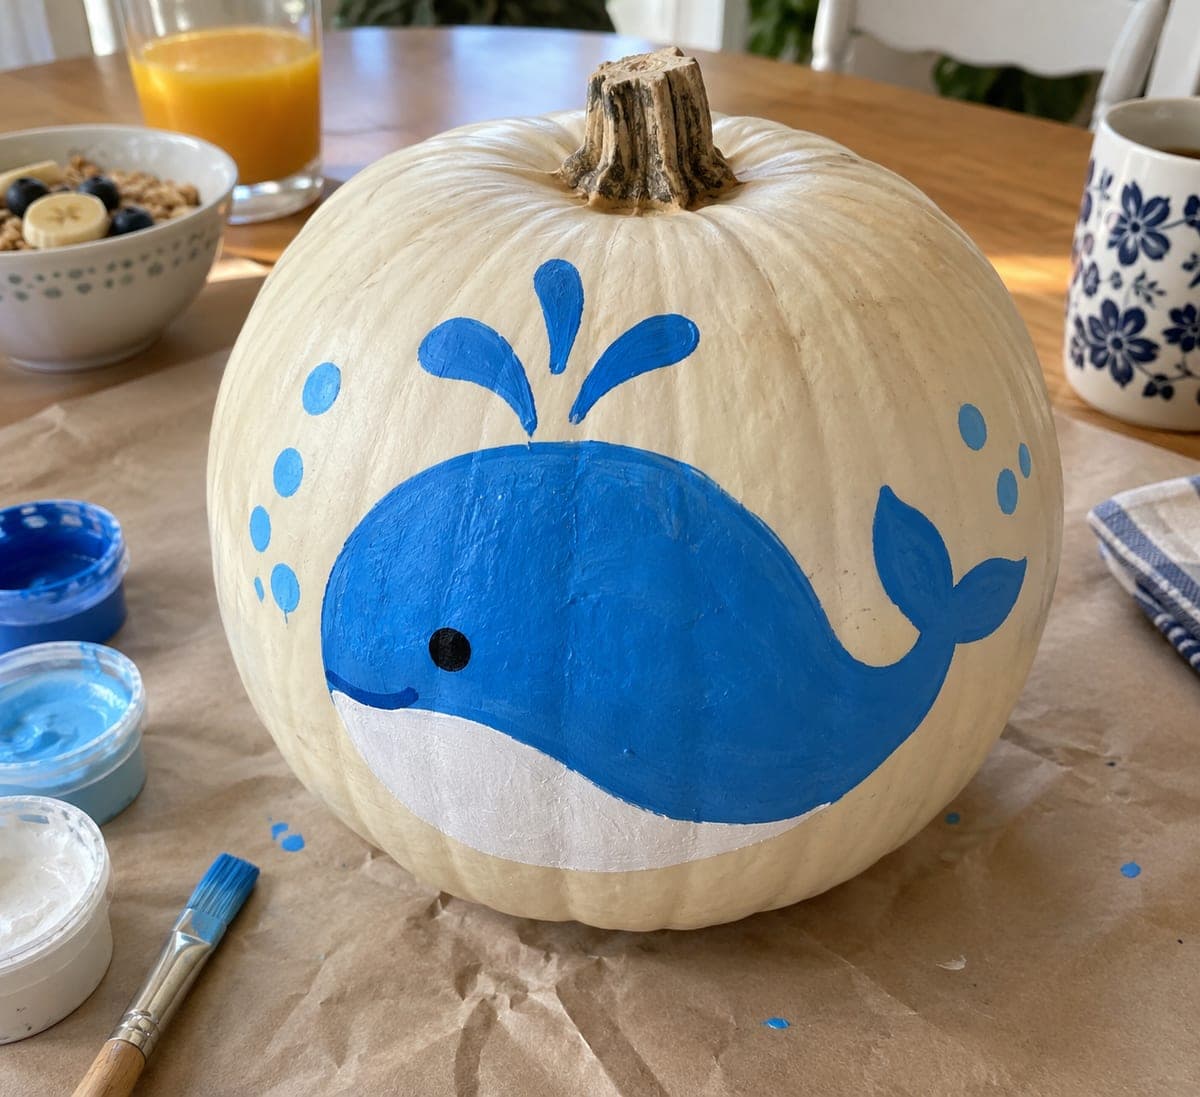
A friendly blue whale with a broad oval body, forked tail, white belly, black dot eye, three blue water-spout strokes, and six blue bubbles sits on a pale natural pumpkin in this beginner-friendly no-carve pumpkin idea for kids. Three flat colors keep the painting approachable for young crafters. Paint the large blue body shape first as the base, add the white belly as an overlapping stripe once it dries, and finish with the small details last. The pumpkin sits naturally like a whale resting at the surface, no display stand needed.

No ratings yet · Sign in to rate

Comments (0)

  • No comments yet — be the first.

Save without an account. Sign in to like or comment.

Our tips for carving a similar design

Three flat colors and simple broad shapes are the entire design strategy. The big blue oval body goes on first as the base layer, the white belly stripe overlaps it once dry, and all the small details come last. The pumpkin rests horizontally on its flat base like a whale at the ocean surface, requiring no stand.

From pumpkin to porch

  1. Wipe and dry the pumpkin

    Clean the pale or natural pumpkin surface with a damp cloth and let it dry completely. A pale or white variety gives the blue whale the best contrast. An orange pumpkin works but needs three coats of blue rather than two to achieve a vivid, opaque color.

  2. Paint the blue body

    Sketch the large oval whale body with a washable marker, including the forked tail at one end. Fill the entire shape with medium blue acrylic using a wide flat brush. Apply two coats, letting the first dry before the second. Keep the body wide and rounded rather than sleek.

  3. Add the white belly stripe

    Once the blue body is fully dry, paint a wide oval area of white acrylic across the lower half of the whale body for the belly. The belly should overlap the blue on both edges so the transition looks natural. A slightly irregular edge reads more organic than a perfectly clean line.

  4. Paint the eye and water spout

    Add one small black dot eye near the head end. Then paint three short upward-curved blue strokes above the head for the water spout. Short loose strokes look more like spraying water than a straight column of paint.

  5. Dot the bubbles and seal

    Use the handle end of a round brush dipped in blue paint to dot six small bubble circles around the whale. Once all paint is dry, apply a clear acrylic sealer spray and let the pumpkin cure before moving it. Display with the whale belly-side down so it rests naturally on its flat base.

Written with AI to match this design

Gather your supplies

Check things off as you get ready.

Work on a stable surface, keep your free hand out of the cutting path, and have an adult handle sharp tools.

Three levels of light

  • Leave intact

    The pale rind background remains visible around the whale as the ocean surface

  • Peel & shade

    None, this design leaves the shell completely intact

  • Cut through

    None, display in natural light or use a directed spotlight from the front

Learn the carving basics

Before you start cutting

What if I only have an orange pumpkin?

Apply a base coat of white paint over the whale body area first and let it dry before painting blue on top. This prevents the orange from tinting the blue and keeps the whale color vivid. The bubble dots can pick up the orange background as a warm accent if you leave a small gap between each bubble and the body.

How do I make the forked tail look right?

A whale tail is a horizontal V-shape at the narrow end of the body. Paint the two tail flukes as two teardrop shapes pointing left and right from the tail base, with a small notch between them. Sketch lightly in washable marker before painting so you can adjust proportions before committing.

Can kids paint this project themselves?

Yes, this is a strong kids craft project. The body shape is simple enough for children aged 4 and up to fill in with a wide brush. An adult can sketch the outline and add the fine dot eye and water spout strokes while the child handles the large color areas and the bubble dots.

Your take belongs here, too.

Changed a detail? Made it simpler? Share a photo of your version and tell the community what worked.

Share your pumpkin

More pumpkins like this

You've reached the end · 8 pumpkins
The Patch Report

Fresh pumpkins, in your inbox.

The best new carvings, ideas worth stealing, and how-tos for carving season. Short, seasonal, and gone by November.

A short email during carving season. Unsubscribe anytime. See our privacy policy.