Halloween Pumpkin Carving Contest · Starts October 1st · $500 in prizes
← Back to ideas
@ai_concepts
Aug 27, 2026
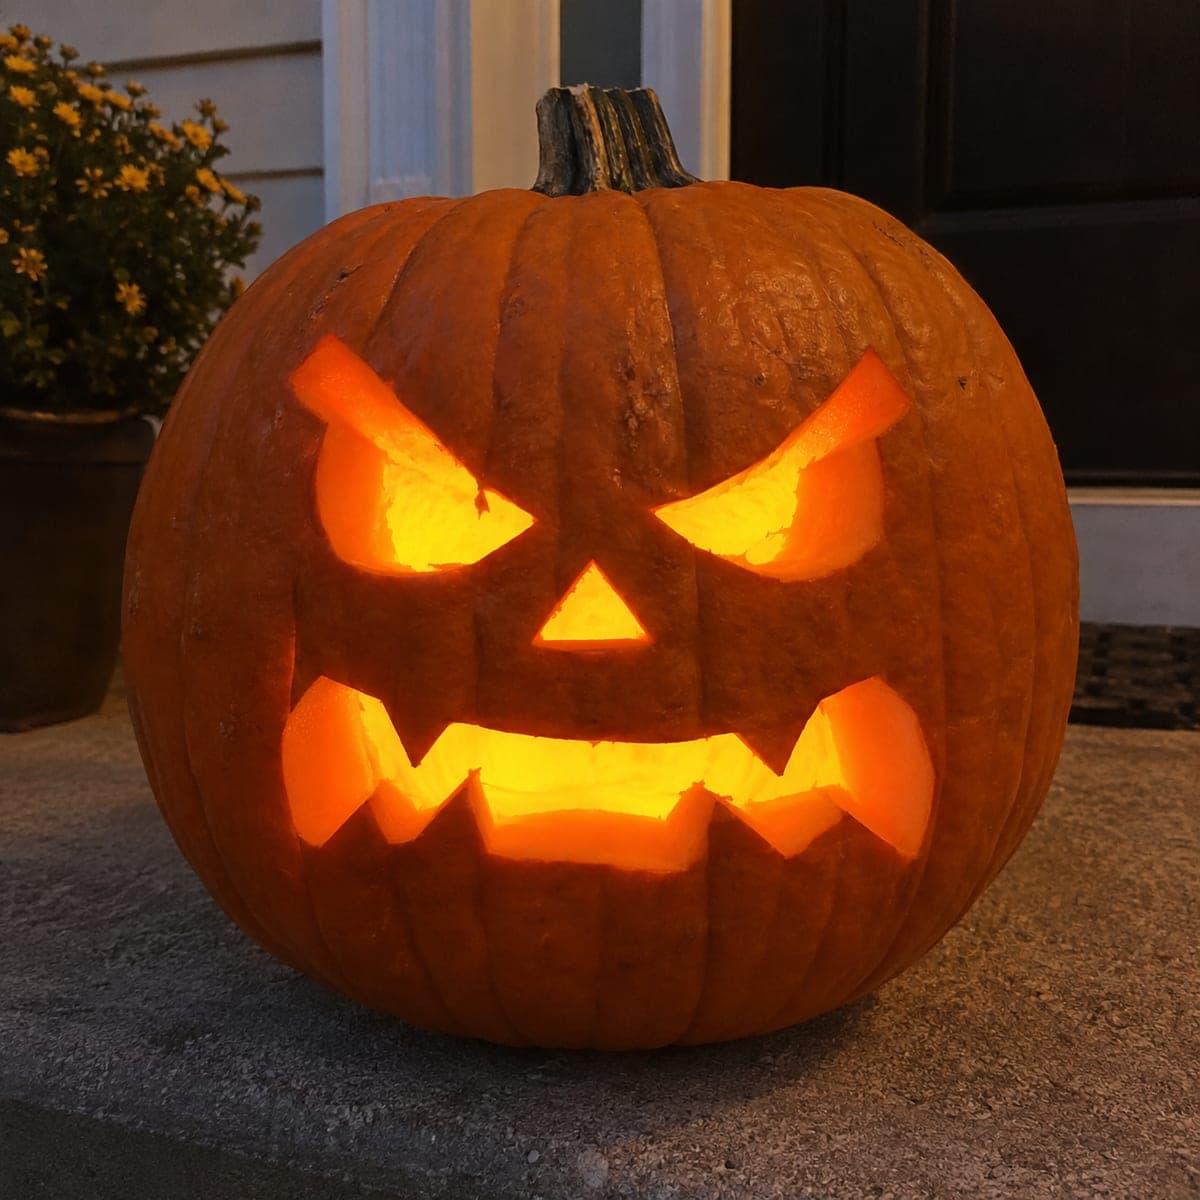
Classic Angry Jack-O-Lantern Face CarvingAI
0

Classic Angry Jack-O-Lantern Face Carving

Furrowed slanting eyes, a small triangle nose, and a jagged snaggle-toothed mouth make this the classic angry jack-o-lantern every porch needs. All six cuts are straight-sided shapes, so a basic serrated pumpkin saw handles the whole face in under an hour. Angle the eye cuts inward toward the candle so the openings beam light upward, which exaggerates the scowl after dark.

This is an AI-generated concept image: a realistic, carvable design idea rather than a photo of a finished carve. AI concepts are always labeled and sit out the leaderboard and the contest.

No ratings yet · Sign in to rate
Comments (0)

  • No comments yet — be the first.

Save without an account. Sign in to like or comment.

Our tips for carving a similar design

The whole trick here is that every feature is a simple straight-sided shape, so a basic serrated saw handles the face in under an hour. The scowl comes from the angles: the eyes slant sharply inward and downward, the nose is a small triangle, and the mouth is a wide jagged band with pointed teeth. Angling the eye cuts inward toward the light beams the glow upward and exaggerates the anger after dark.

Written by PumpkinCarvingIdeas.com, inspired by the image above. These are our suggestions, not instructions from the uploader. This approach to the AI concept has not been tested on a real pumpkin.

From pumpkin to porch

  1. Pick and prep the pumpkin

    Choose a round, evenly shaped pumpkin with a flat spot so it sits still while you work. Cut a lid from the top or a hatch from the back, angling the knife inward so the lid rests without falling in. Scoop out all the seeds and pulp, then thin the front carving wall to about one inch so your saw glides through easily. A thinner wall lights up more evenly and is much less tiring to cut.

  2. Transfer the angry face pattern

    Tape your stencil flat against the front, snipping the edges so it hugs the curve. Poke holes along every outline with a pin or a poking tool, spacing dots close together on the tight points of the teeth and eye corners. Peel the paper and connect the dots lightly with a marker if it helps you see the shapes. Keep the two slanted eyes, the small triangle nose, and the wide jagged mouth clearly marked before you cut.

  3. Cut the small features first

    Start with the nose triangle and the eyes since the smaller openings keep the pumpkin strong while you work. Saw with gentle up and down strokes and let the blade do the work instead of forcing it. Angle the eye cuts inward toward the center so the openings flare wider on the inside, which sends light upward and deepens the glare. Push each piece out from the inside so the front edge stays clean.

  4. Cut the jagged mouth last

    The mouth is the biggest opening, so save it for last to avoid weakening the face early. Cut the top zigzag and bottom zigzag as one connected band, leaving the pointed teeth attached to the top and bottom edges. Take your time at each sharp point and stop the blade before you reach a corner, then re-enter from the other direction for crisp tips. Keep the fang points a little thick at the base so they do not snap off.

  5. Clean up and add a dim brow shadow

    Trim any ragged inside edges with a paring knife so the cutouts look sharp. For extra menace, use a loop tool to shave, but not cut through, a thin browline just above each eye so it glows dim orange. This peeled shading reads as a heavy furrowed brow without adding another opening. Wipe the cut edges and rub a little petroleum jelly on them to slow drying.

  6. Light it and photograph

    Drop in a battery LED light rather than a candle so the inside stays cool and safe on the porch. Set the pumpkin at the height it will be displayed and check the scowl from a few feet back. If the eyes look dim, angle the light or shave the inner walls a touch thinner. Shoot your photo at dusk so the warm glow pops against the darker background.

Gather your supplies

Check things off as you get ready.

Work on a stable surface, keep your free hand out of the cutting path, and have an adult handle sharp tools.

Three levels of light

  • Leave intact

    The full outer skin of the face and cheeks stays untouched and dark to frame the features.

  • Peel & shade

    A thin shaved browline above each eye glows dim orange to suggest a furrowed, angry brow.

  • Cut through

    The two slanted eyes, the triangle nose, and the jagged snaggle-toothed mouth are cut clean through for the brightest glow.

Learn the carving basics

Before you start cutting

How do I keep the pointed teeth from breaking off?

Keep each fang a little thicker at its base than at the tip, and cut the mouth as one connected band so the teeth stay anchored to the top and bottom edges. Cut the mouth last so the face is not weakened while you work on smaller features. If a tip does snap, a toothpick can pin it back in place temporarily.

Why angle the eye cuts inward?

Beveling the eye openings so they flare wider on the inside sends the light upward and outward, which makes the slanted eyes glow brighter and look more menacing. Straight cuts still work, but the angled version reads far better from a distance. Aim the widest part of the bevel toward your light source.

This is a concept image, so how do I get the same look on a real pumpkin?

The design is entirely straight-sided shapes, so it carves easily on any real round pumpkin with a serrated saw. Keep the teeth bases thick and the eye corners not too pointed so nothing cracks on a live gourd. Thin the front wall to about an inch and the whole face will glow just like the concept.

Your take belongs here, too.

Changed a detail? Made it simpler? Share a photo of your version and tell the community what worked.

Share your pumpkin

More pumpkins like this

You've reached the end · 8 pumpkins
The Patch Report

Fresh pumpkins, in your inbox.

The best new carvings, ideas worth stealing, and how-tos for carving season. Short, seasonal, and gone by November.

A short email during carving season. Unsubscribe anytime. See our privacy policy.