Halloween Pumpkin Carving Contest · Starts October 1st · $500 in prizes
← Back to ideas
@ai_concepts
Sep 7, 2026
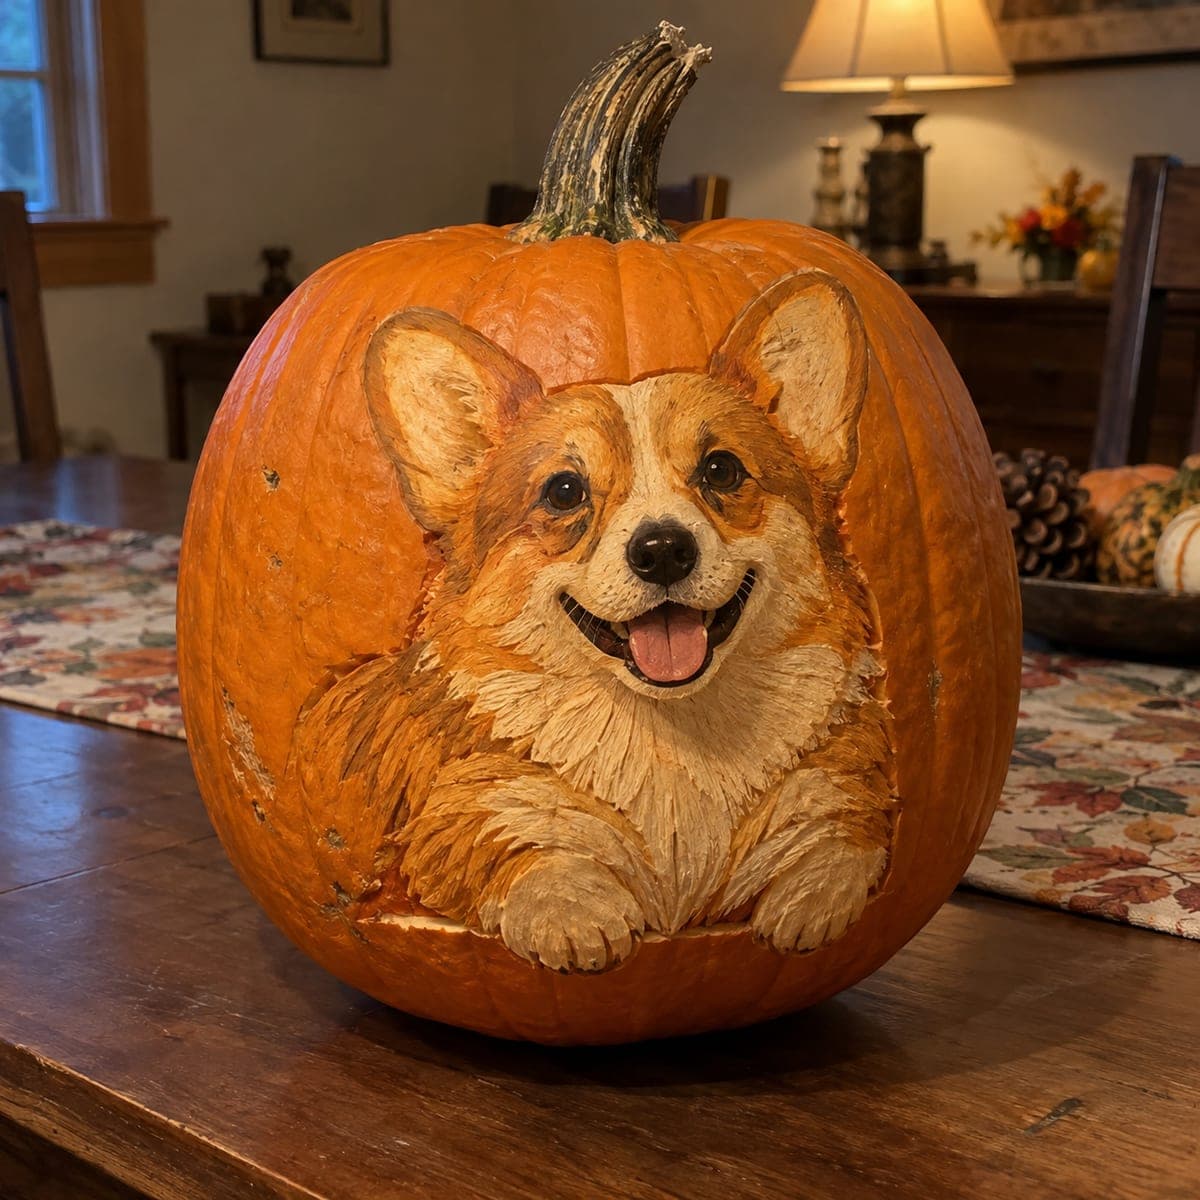
Corgi Peeking Over the Edge Painted PumpkinAI
0

Corgi Peeking Over the Edge Painted Pumpkin

An exuberant corgi with a lolling tongue and bright eyes is painted on this pumpkin in realistic detail, the warm golden-and-white fur colors built up with acrylic paints directly on the pumpkin's orange skin. This no-carve pumpkin idea is perfect for dog lovers and makes a charming fall centerpiece that lasts all season without drying out. Sketch the corgi's wide-set ears and blocky face in pencil first, then layer the fur tones from light to dark using a dry-brush technique for texture. A matte varnish coat after the paint dries keeps the image crisp through the holiday.

This is an AI-generated concept image: a realistic, carvable design idea rather than a photo of a finished carve. AI concepts are always labeled and sit out the leaderboard and the contest.
No ratings yet · Sign in to rate

Comments (0)

  • No comments yet — be the first.

Save without an account. Sign in to like or comment.

Our tips for carving a similar design

The core trick here is a portrait built mostly with paint, layering warm golden and white fur tones from light to dark with a dry brush so the coat looks fluffy. To match the raised look in the concept, you can add very shallow relief by peeling thin skin in the fur and cheek areas, which gives the paint something to grip and catches side light. Plan the face first, keep the ears and paws attached to the wall, and save any deeper cuts for the very end.

Written by PumpkinCarvingIdeas.com, inspired by the image above. These are our suggestions, not instructions from the uploader. This approach to the AI concept has not been tested on a real pumpkin.

From pumpkin to porch

  1. Pick and prep your pumpkin

    Choose a large, tall pumpkin with one broad, smooth side facing you and a sturdy stem for character. Wipe the skin clean and dry so pencil and paint will stick. Since this is a surface design, there is no need to gut the pumpkin, which helps it last longer. Set it on a towel so it will not roll while you work.

  2. Sketch the corgi in pencil

    Lightly draw the blocky head, wide-set triangular ears, and the two front paws peeking over an imaginary ledge. Keep the eyes level and the black nose centered, with the open smile and tongue just below. Step back often to check the proportions before you commit. Pencil wipes off with a damp cloth if you need to redraw.

  3. Peel shallow texture in the fur

    An adult should use a small loop or gouge to scrape away only the top skin in the chest ruff, cheeks, and paw areas, going no deeper than an eighth of an inch. Work in short strokes that follow the direction the fur grows to build a soft, layered feel. Leave the ears, nose, and eye areas as smooth skin for now. Stay well inside your pencil lines so the shape stays crisp.

  4. Build fur color from light to dark

    Start with your lightest cream and white on the muzzle, chest, and paw fronts, then dry-brush golden tan over the head and ears in thin, flicking strokes. Add deeper rust and brown in the shadows around the ears, eyes, and under the chin to give the face depth. Let each layer dry before adding the next so the tones stay clean. Keep a little water nearby but use the brush nearly dry for that hairy texture.

  5. Add the face details

    Paint the nose glossy black with a small highlight dot, then the dark eyes with a tiny white catchlight to bring them to life. Fill the open mouth with a soft pink tongue and a darker line for the smile. These small marks do most of the personality work, so take your time and use a fine brush. Let everything dry fully.

  6. Seal and stage it

    Once the paint is completely dry, brush on a thin matte varnish to protect the portrait and keep it looking sharp all season. Set the finished pumpkin on a fall runner as a centerpiece, and add a battery LED nearby if you want a warm glow. Take your photo in soft evening light to show off the fur texture. Keep it out of direct sun and heat so the colors last.

Gather your supplies

Check things off as you get ready.

Work on a stable surface, keep your free hand out of the cutting path, and have an adult handle sharp tools.

Three levels of light

  • Leave intact

    The untouched orange skin around the corgi stays as the dark background.

  • Peel & shade

    The shallow-scraped fur in the chest ruff, cheeks, and paws reads as soft, warm texture that holds the lighter paint.

  • Cut through

    No deep cutouts are needed, so keep the pumpkin wall intact and let paint do the shaping.

Learn the carving basics

Before you start cutting

Do I need to carve all the way through for this design?

No. This is a paint-forward portrait, so the pumpkin wall stays intact and lasts much longer. The only optional carving is very shallow skin peeling to fake fur texture, which never goes deeper than about an eighth of an inch.

How do I get the fur to look fluffy instead of flat?

Use the dry-brush method, meaning you load the brush then wipe most of the paint off before you stroke. Flick short strokes in the direction the fur grows and build several thin layers from light to dark. The scraped texture underneath helps break up the color for a realistic coat.

Will the painted pumpkin last through the season?

Because it is not gutted, it can stay fresh for several weeks in a cool spot. A matte varnish coat over dry paint protects it from scuffs and moisture. Keep it out of direct sun and away from heat vents to slow any shriveling.

Your take belongs here, too.

Changed a detail? Made it simpler? Share a photo of your version and tell the community what worked.

Share your pumpkin

More pumpkins like this

You've reached the end · 8 pumpkins
The Patch Report

Fresh pumpkins, in your inbox.

The best new carvings, ideas worth stealing, and how-tos for carving season. Short, seasonal, and gone by November.

A short email during carving season. Unsubscribe anytime. See our privacy policy.