Halloween Pumpkin Carving Contest · Starts October 1st · $500 in prizes
← Back to ideas
@ai_concepts
Jul 26, 2026
Dachshund Full Body Shaded Carving PumpkinAI
0

Dachshund Full Body Shaded Carving Pumpkin

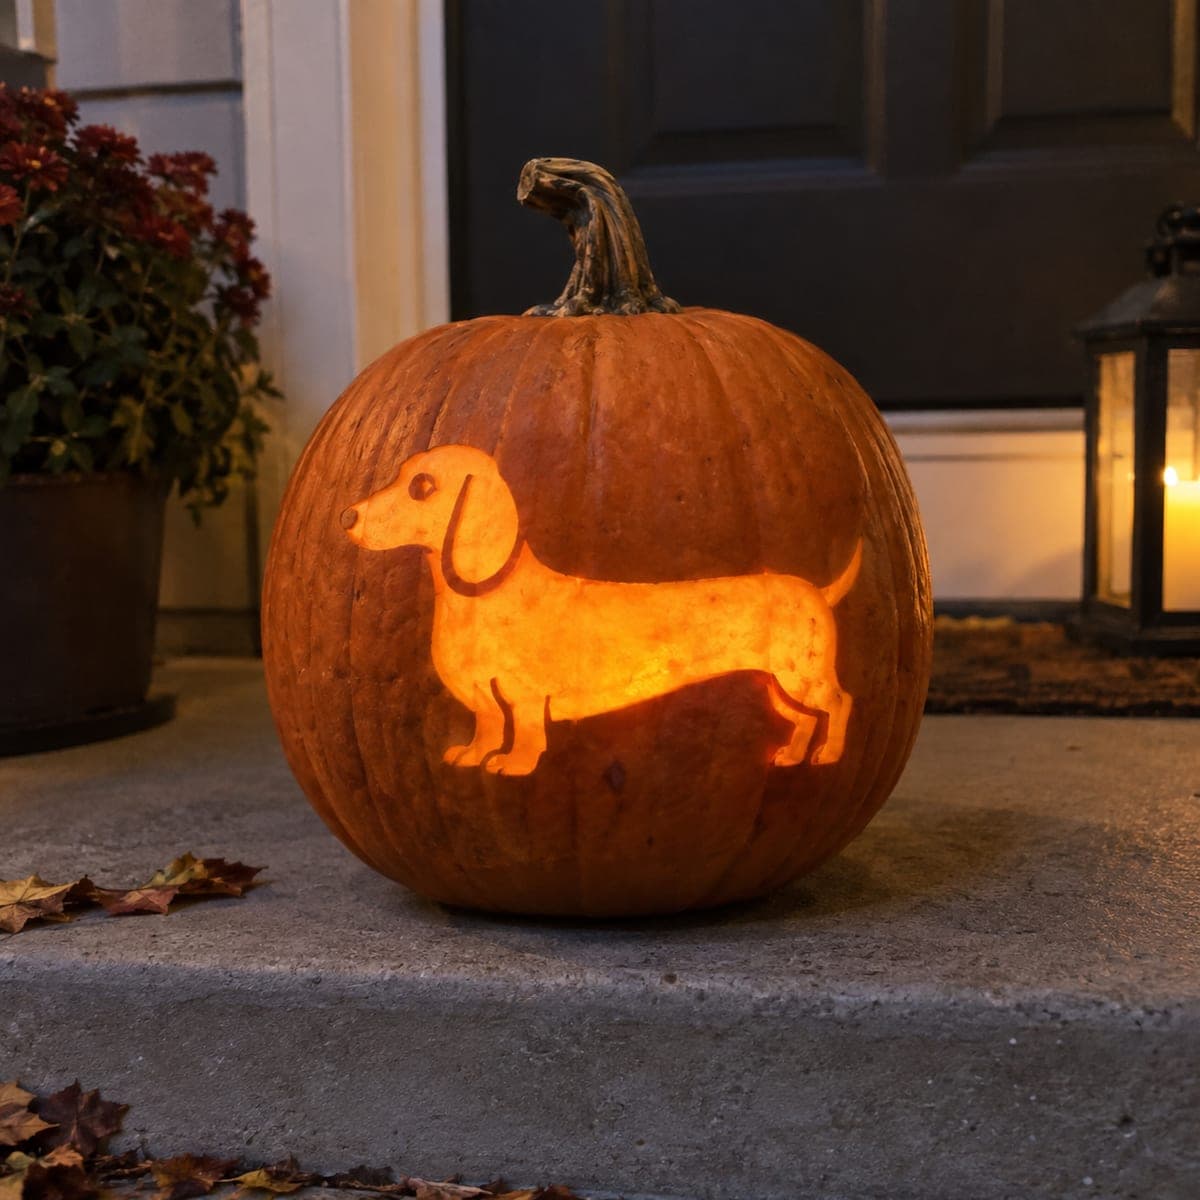
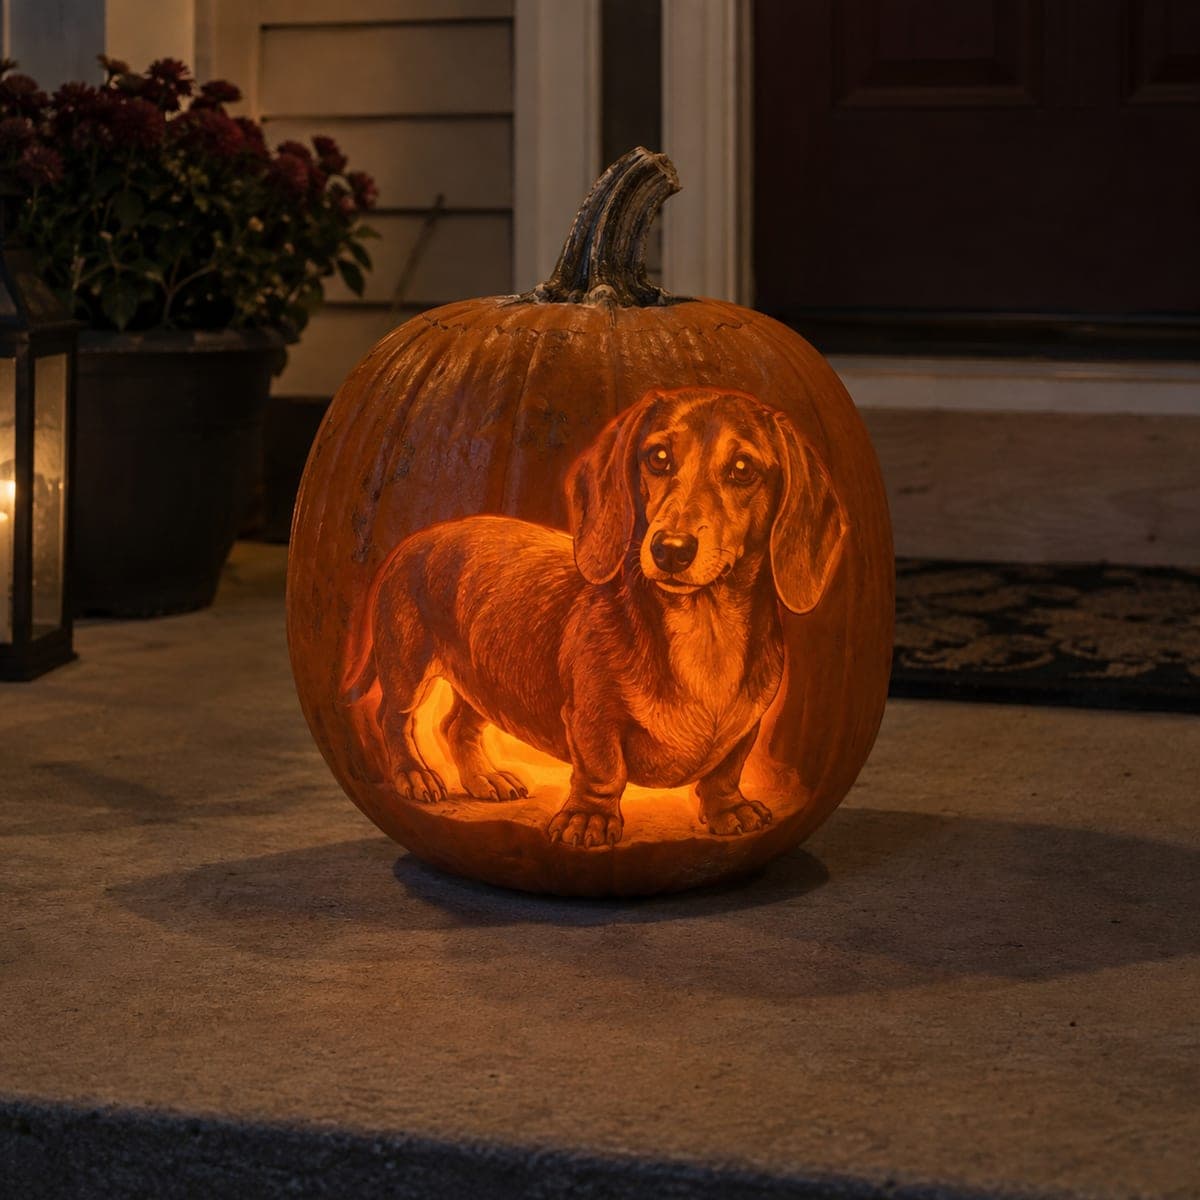
A full-body dachshund is carved in detailed shading on a pumpkin, the dog's long low body, floppy ears, and smooth coat captured in etched relief that radiates warm light at night. The short legs and elongated torso fit naturally onto the pumpkin's curved surface. Shading the ears slightly deeper than the body helps define the breed's characteristic silhouette from a distance. A charming dog pumpkin carving idea that makes an ideal display piece for any wiener-dog household.

This is an AI-generated concept image: a realistic, carvable design idea rather than a photo of a finished carve. AI concepts are always labeled and sit out the leaderboard and the contest.

No ratings yet · Sign in to rate

Comments (0)

  • No comments yet — be the first.

Save without an account. Sign in to like or comment.

Our tips for carving a similar design

The core trick here is skin-shading, not cutting all the way through. You remove the outer skin at different depths so the dog's smooth coat, floppy ears, and stubby legs glow in graded tones while the background stays dark. Plan the whole design as layers of light, saving any true cutouts for the brightest highlights only.

Written by PumpkinCarvingIdeas.com, inspired by the image above. These are our suggestions, not instructions from the uploader. This approach to the AI concept has not been tested on a real pumpkin.

From pumpkin to porch

  1. Pick and prep the pumpkin

    Choose a tall, wide pumpkin with a smooth, blemish-free front so the long body has room to spread across the curve. Cut a lid or a bottom access hole and scoop the inside until the front wall is about one inch thick. A thinner wall lets the shaded areas glow evenly. Wipe the surface dry before you transfer the pattern.

  2. Transfer the dachshund pattern

    Tape a full-body dog stencil flat against the front, clipping the edges so it hugs the curve. Poke the outline and the main shading boundaries with a pin or a transfer tool, marking the ears, torso, legs, and eye area. Peel the paper and connect the dots with a washable marker. Step back to confirm the long silhouette reads clearly before any blade touches the pumpkin.

  3. Etch the outline and details

    With a small detail loop or a lino-style gouge, lightly score the outline of the dog and the key lines for the ears, legs, and facial features. Keep these cuts shallow so nothing detaches. This step locks in the drawing so your shading has clean edges. Have an adult handle all sharp tools and cut slowly away from your holding hand.

  4. Shade the coat in layers

    Use a ribbon or scoop tool to peel away the outer skin across the body, starting shallow and going a little deeper where the coat is darkest. Leave the floppy ears slightly deeper than the body so the breed's shape stands out from a distance. Work in small strokes that follow the direction of the fur. Take breaks to hold a light behind the wall and check how the tones balance.

  5. Brighten the highlights

    Scrape the thinnest layer of skin off the brightest spots: the top of the back, the chest, and a soft glow under the belly and legs. For the eyes and any tiny catchlights, you can cut a little deeper or fully through in one or two small spots for a spark. Save these delicate touches for last so the surface stays sturdy. Keep highlight cutouts small so the wall does not weaken.

  6. Light it and photograph

    Drop in a battery LED puck or string, never a candle, and warm-white light flatters the orange tones best. Set the pumpkin at eye level on a porch step and dim the surrounding lights. Take your photo at dusk when there is still a hint of blue in the sky for contrast. A light coat of petroleum jelly on the cut edges slows drying and keeps the shading crisp for a few extra days.

Gather your supplies

Check things off as you get ready.

Work on a stable surface, keep your free hand out of the cutting path, and have an adult handle sharp tools.

Three levels of light

  • Leave intact

    The background around the dog and the darkest edges of the ears stay as untouched skin.

  • Peel & shade

    The main body, legs, and face get skin-peeled to varying depths for the soft mid glow of the coat.

  • Cut through

    Only the eye catchlights and a few tiny highlight sparks are cut fully through for the brightest points.

Learn the carving basics

Before you start cutting

This is a concept image, so can a real pumpkin actually look like this?

Yes, with patience. The look comes almost entirely from shading depth rather than open cuts, so it is very achievable on a real pumpkin. Just accept that hand shading gives a slightly softer, more textured result than a rendered image, which is part of its charm.

How do I keep the long thin body from looking flat?

Vary your shading depth so the back and chest read brighter than the lower belly and legs. Shading the ears a touch deeper than the body, as the design suggests, gives the silhouette that unmistakable dachshund shape. Checking with a light behind the wall as you go is the best way to judge contrast.

What if I accidentally cut through while shading?

Small slips happen. A tiny hole in a bright area often just adds a highlight and can be left alone. If it lands in a dark spot, you can back it with a scrap of pumpkin skin or a dab of clear tape from the inside so light does not leak where you do not want it.

Your take belongs here, too.

Changed a detail? Made it simpler? Share a photo of your version and tell the community what worked.

Share your pumpkin

More pumpkins like this

You've reached the end · 8 pumpkins
The Patch Report

Fresh pumpkins, in your inbox.

The best new carvings, ideas worth stealing, and how-tos for carving season. Short, seasonal, and gone by November.

A short email during carving season. Unsubscribe anytime. See our privacy policy.