Halloween Pumpkin Carving Contest · Starts October 1st · $500 in prizes
← Back to ideas
@ai_concepts
Sep 14, 2026

Shaggy Dog Portrait With Open Mouth PumpkinAI
0

Shaggy Dog Portrait With Open Mouth Pumpkin

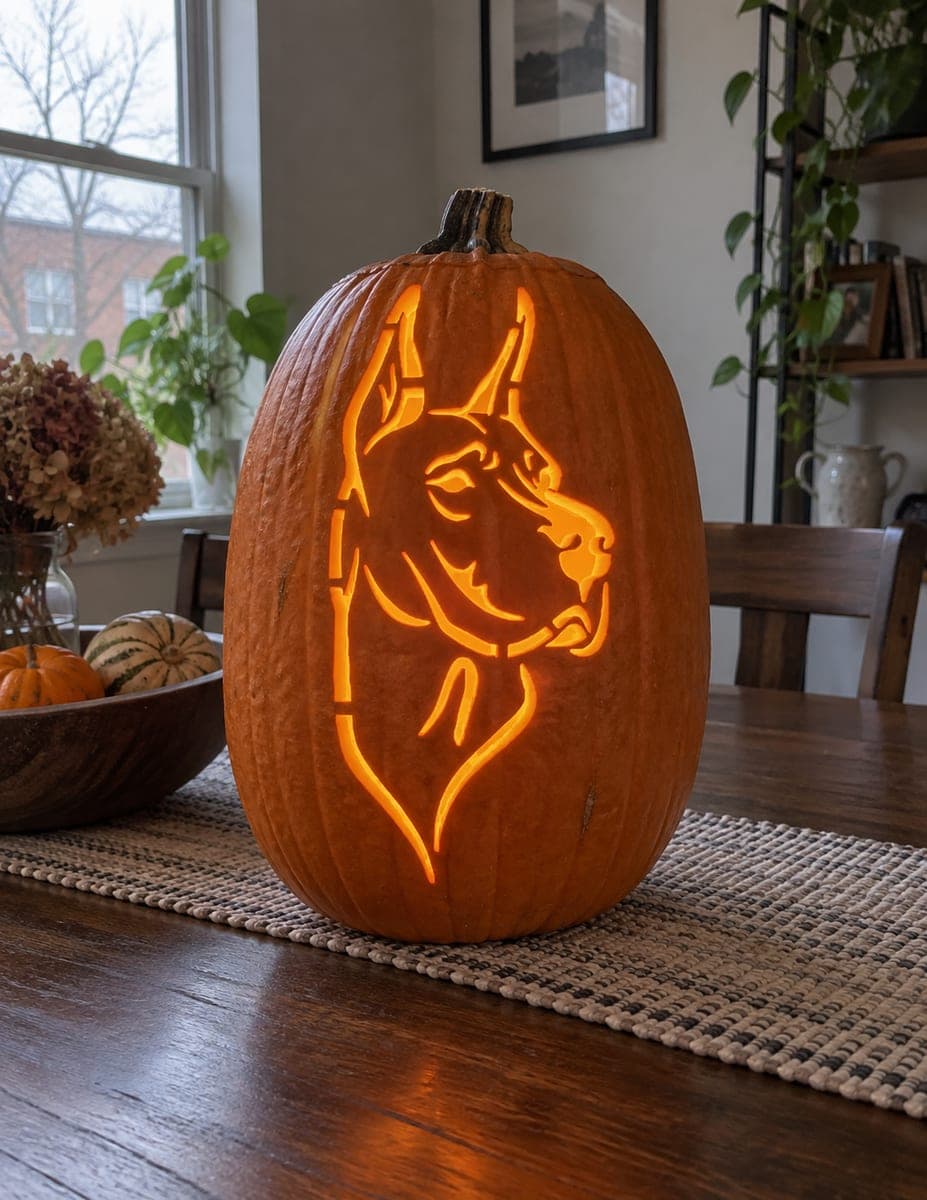
A Rottweiler-style dog face fills the tall pumpkin with a cutout portrait: round eyes with small circle pupils, a broad curled muzzle, and flowing fur lines radiating outward from the face, all pierced through the rind and glowing orange. The thin fur-line cuts around the face perimeter are fragile, so work from the center outward and cut the muzzle and eye circles before tackling the narrow outer hair strands. Use a very fine pumpkin saw or linoleum blade on the outermost fur lines to avoid snapping the slender rind bridges.

This is an AI-generated concept image: a realistic, carvable design idea rather than a photo of a finished carve. AI concepts are always labeled and sit out the leaderboard and the contest.

No ratings yet · Sign in to rate

Comments (0)

  • No comments yet — be the first.

Save without an account. Sign in to like or comment.

Our tips for carving a similar design

The core trick here is reading the dog's face as a network of connected light shapes rather than a solid picture, so the rind bridges between the fur lines hold everything together. You carve the big, stable center shapes first, then work outward to the thin hair strands last. Since this is an AI concept image, treat it as a plan for how you could build a similar portrait, keeping every slender fur line attached at both ends.

Written by PumpkinCarvingIdeas.com, inspired by the image above. These are our suggestions, not instructions from the uploader. This approach to the AI concept has not been tested on a real pumpkin.

From pumpkin to porch

  1. Pick a tall pumpkin and open the back

    Choose a tall pumpkin with a smooth, flat front face wide enough for the full portrait. Cut a round access hole in the back or bottom rather than the top so the front stays clean. Scoop the inside until the front wall is about one inch thick, scraping the carving area a little thinner so light passes evenly. A thinner wall makes the fine fur lines far easier to cut.

  2. Transfer the portrait

    Print the dog stencil sized to fill the pumpkin's face and tape it flat, snipping darts around the curves so it hugs the surface. Poke closely spaced dots along every line with a pushpin or transfer tool, following the eyes, muzzle, and each fur strand. Pull the paper and connect the dots lightly with a marker so you can see the whole map. Double check that each fur line still touches skin at both ends before you cut.

  3. Cut the eyes and muzzle first

    Start with the round eye openings and the small circle pupils, keeping a thin ring of skin so the pupil floats inside the eye. Move to the broad curled muzzle and nose shapes, which are your largest, most stable cutouts. Use a fine pumpkin saw and let the blade do the work with gentle strokes. Save these central shapes as your anchor before touching anything fragile.

  4. Work the inner fur shapes

    Carve the medium light shapes framing the face and cheeks, moving from the center outward. Keep the bridges of skin between neighboring cuts intact, since they hold the whole portrait rigid. If a piece feels wobbly, leave a small uncut tab and trim it later. Clear the loose plugs gently by pushing them inward, not by prying at the surface.

  5. Finish the outer fur strands

    Save the narrow radiating hair lines around the perimeter for last, when the rest of the design is set. Switch to a very fine pumpkin saw or a linoleum blade and take short, patient strokes so you do not snap the slender rind bridges. Support each strand with a finger just beside the cut as you go. If one breaks, a toothpick pushed through both pieces can splint it back.

  6. Light it and photograph

    Drop in one or two battery LED lights, warm white or amber, and aim them toward the front wall for an even glow. Set the pumpkin at eye level on a counter and dim the room to make the eyes and muzzle pop. Take your photo from straight on so the portrait reads clearly. Mist the cut edges with water and refrigerate overnight between displays to keep the fur lines from curling.

Gather your supplies

Check things off as you get ready.

Work on a stable surface, keep your free hand out of the cutting path, and have an adult handle sharp tools.

Three levels of light

  • Leave intact

    The muzzle folds, brow ridge, and the skin bridges between fur lines stay uncut and dark to define the face.

  • Peel & shade

    Shallow-scrape the cheeks or a soft halo around the face for a dim glow that separates the dog from the background.

  • Cut through

    Cut fully through the eyes, pupils, open mouth, and the radiating fur strands so they blaze the brightest orange.

Learn the carving basics

Before you start cutting

How do I keep the thin outer fur lines from breaking?

Carve them absolutely last, after every other shape is finished and the pumpkin face is rigid. Use a very fine saw or linoleum blade with short, light strokes and support the strand with a fingertip right beside the cut. Make sure each line stays attached to skin at both ends so it never becomes a loose sliver.

Should I cut every fur line all the way through?

No, mixing depths makes the portrait look more like fur. Cut the boldest strands fully through for bright light and just skin-peel some of the finer ones for a softer glow. This shading contrast keeps the face from looking like a flat cutout.

What size and shape pumpkin works best?

Pick a tall, upright pumpkin with a large, relatively flat and smooth front panel so the long face and radiating fur have room to spread. Deep ribs will distort the fur lines, so smoother is better. Thinning the front wall to about an inch also makes the delicate strands much easier to cut cleanly.

Your take belongs here, too.

Changed a detail? Made it simpler? Share a photo of your version and tell the community what worked.

Share your pumpkin

More pumpkins like this

You've reached the end · 8 pumpkins
The Patch Report

Fresh pumpkins, in your inbox.

The best new carvings, ideas worth stealing, and how-tos for carving season. Short, seasonal, and gone by November.

A short email during carving season. Unsubscribe anytime. See our privacy policy.