Halloween Pumpkin Carving Contest · Starts October 1st · $500 in prizes
← Back to ideas
@ai_concepts
Sep 6, 2026
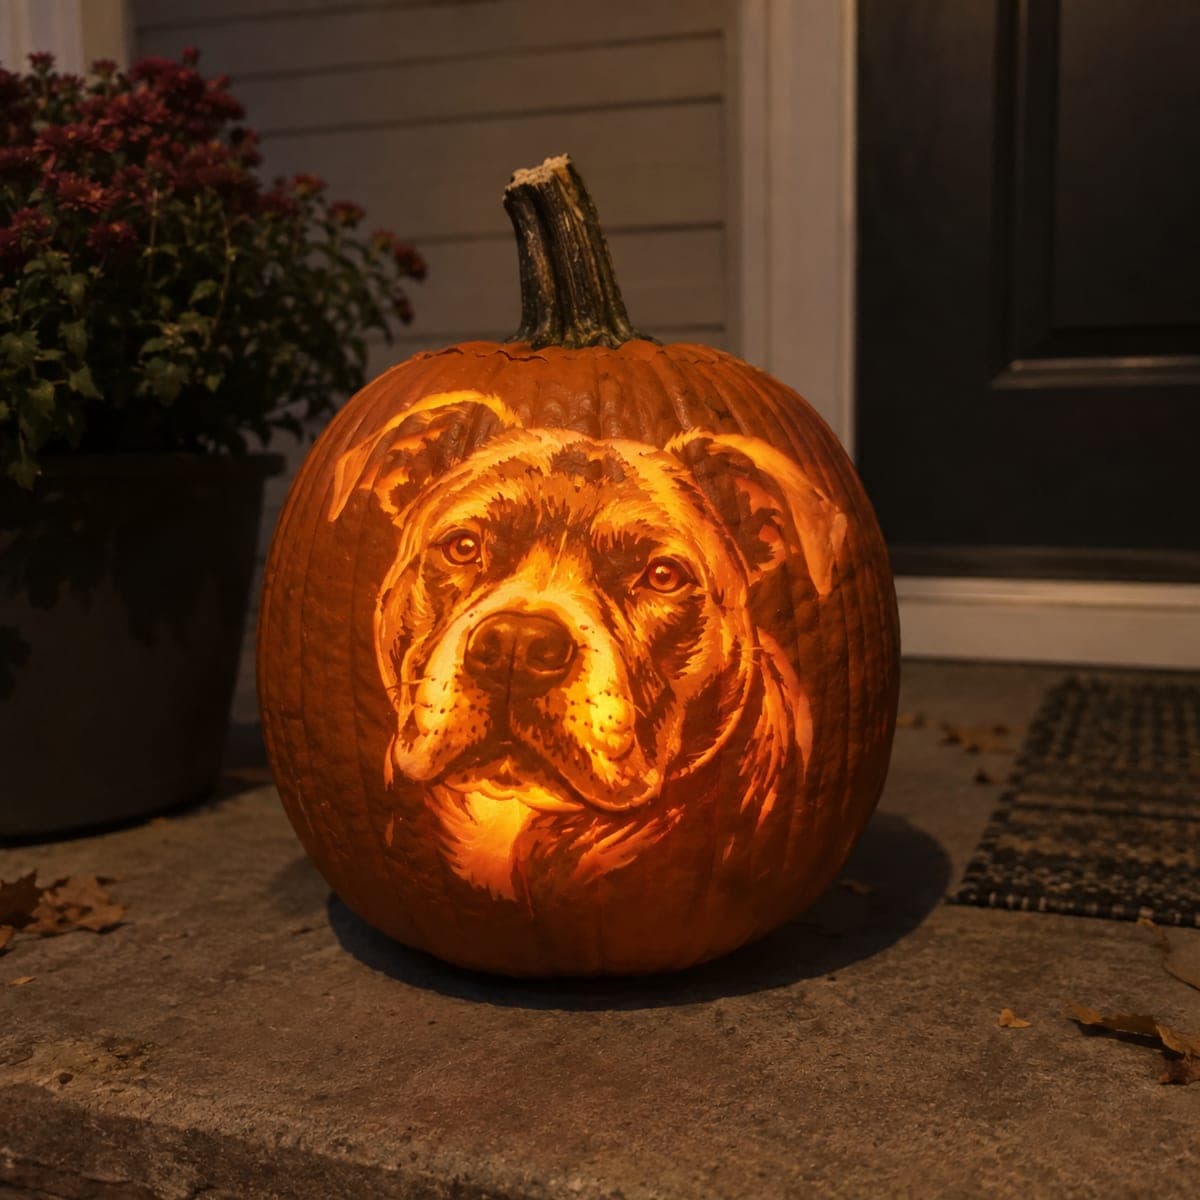
Realistic Pit Bull Portrait Relief PumpkinAI
0

Realistic Pit Bull Portrait Relief Pumpkin

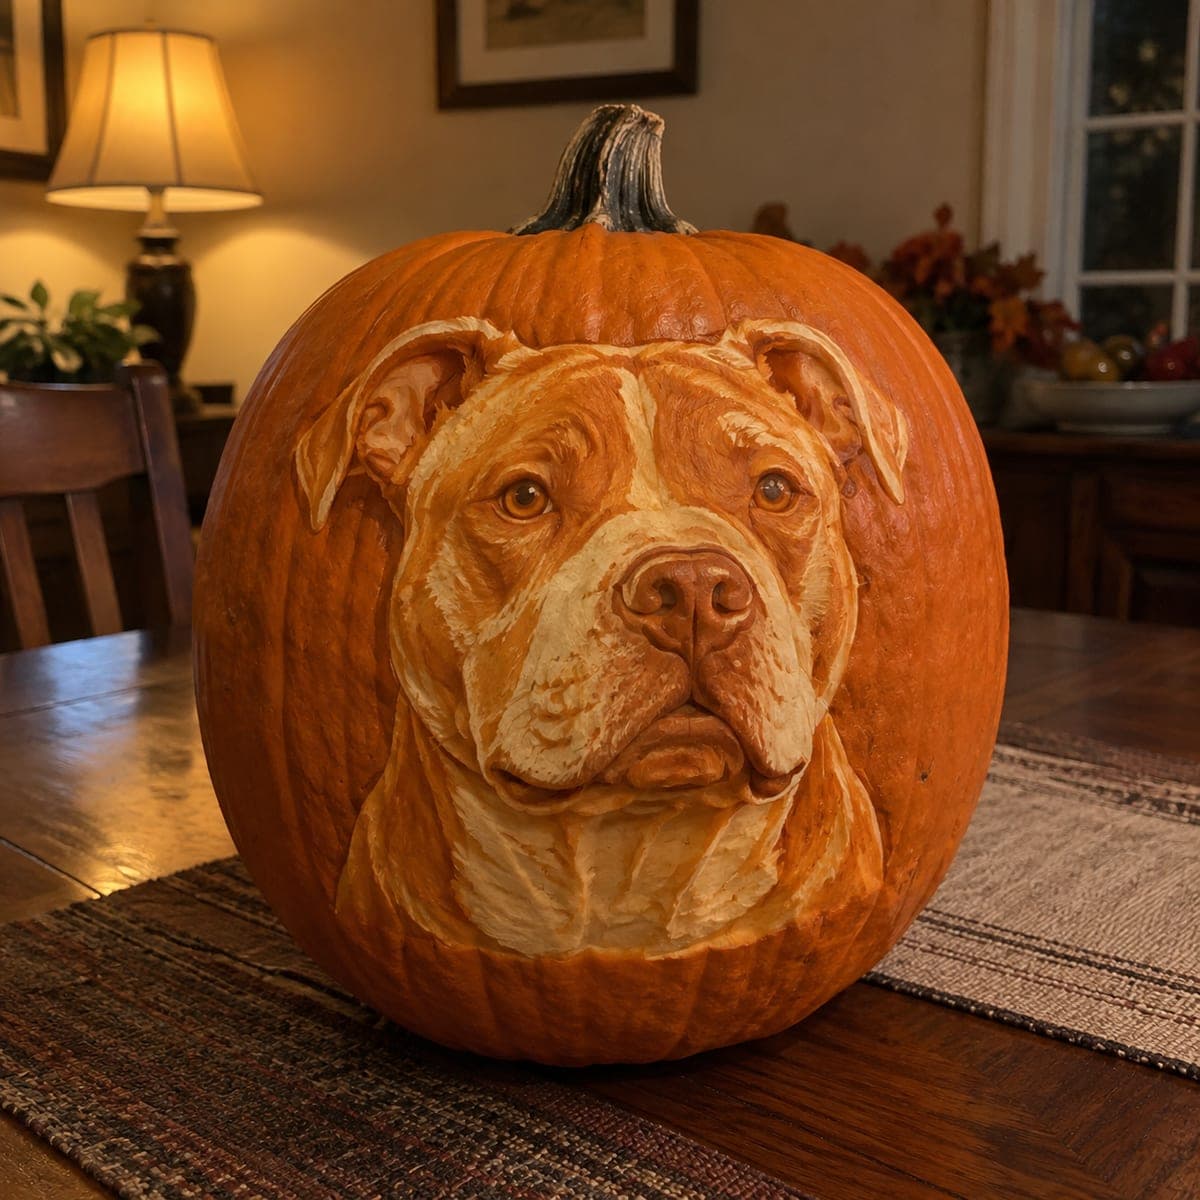
This unlit relief carving turns a pumpkin into a lifelike pit bull portrait, with soulful eyes, a broad muzzle, and folded ears sculpted in layers of peeled flesh. Every value shift comes from carving depth, so the palest cream areas are shaved deepest and the skin is left intact for the darkest markings. Work from a reference photo of your own dog, block in the big shapes with a ribbon loop tool, then refine fur texture last. Display it indoors where it will not soften in the sun.

This is an AI-generated concept image: a realistic, carvable design idea rather than a photo of a finished carve. AI concepts are always labeled and sit out the leaderboard and the contest.

No ratings yet · Sign in to rate
Comments (0)

  • No comments yet — be the first.

Save without an account. Sign in to like or comment.

Our tips for carving a similar design

The core trick here is value through depth, not cutouts. You leave the skin intact for the darkest markings, peel to varying depths for the mid tones, and shave down to the pale flesh for the brightest cream areas like the muzzle and chest. Block in the big head, muzzle, and ear shapes first, then save fur texture and the fine eye detail for the very end.

Written by PumpkinCarvingIdeas.com, inspired by the image above. These are our suggestions, not instructions from the uploader. This approach to the AI concept has not been tested on a real pumpkin.

From pumpkin to porch

  1. Prep the pumpkin and transfer your reference

    Pick a tall, smooth pumpkin with an even front face and no deep ribs. Wipe it clean and dry, then tape your dog portrait pattern flat across the front. Poke through the main outlines with a pin or transfer tool so you have dots marking the head, muzzle, ears, and eyes. Since this is a relief carving you do not gut the pumpkin or cut a lid, so keep the wall fully intact for strength.

  2. Block in the big shapes

    With a ribbon loop tool, shave away the background around the head so the portrait sits slightly raised. Work in broad passes and establish the largest forms first: the dome of the skull, the broad muzzle, and the folded ears. Keep everything shallow at this stage so you have room to go deeper later. Step back often to check that the head reads as a whole before you commit to detail.

  3. Establish your value map

    Decide which areas stay dark, mid, and bright, then carve to match. Leave the skin untouched on the darkest markings around the ears and the shadowed sides of the face. Peel a thin layer for the tan mid tones across the cheeks and forehead. Shave deepest on the pale cream muzzle, blaze, and chest so those areas glow lightest against the rest.

  4. Sculpt the muzzle, nose, and eyes

    Round the broad muzzle with smooth loop passes, then deepen the two nostril hollows and the crease under the nose. For the eyes, carve shallow rounded domes and leave a small raised catchlight of intact skin so they look wet and alert. Keep the brow ridges slightly raised above the eyes to give that soulful expression. Go slowly here since the eyes and nose carry the whole likeness.

  5. Add fur texture and refine edges

    Switch to a small detail loop or a V gouge and pull short directional strokes to suggest fur, following the way the coat lies on a real dog. Vary the depth so the texture catches shadow. Clean up the ear folds and the transition between the raised head and the carved-away background. Soften any hard tool marks with light final passes.

  6. Seal, display, and photograph

    Since this design relies on subtle shading rather than a glow, display it unlit indoors and out of direct sun so it holds shape. Rub the carved surfaces with a little petroleum jelly to slow drying and keep the cream tones bright. Set it near a warm side lamp so raking light rakes across the relief and pops the texture. Photograph it the same day for the sharpest detail.

Gather your supplies

Check things off as you get ready.

Work on a stable surface, keep your free hand out of the cutting path, and have an adult handle sharp tools.

Three levels of light

  • Leave intact

    Untouched skin stays for the darkest markings around the ears and the shadowed edges of the face.

  • Peel & shade

    A thin peel gives the tan mid tones across the cheeks, forehead, and lower ears.

  • Cut through

    No full cutouts here; the deepest shaved areas, the pale muzzle, blaze, and chest, read as the brightest cream.

Learn the carving basics

Before you start cutting

Do I need to hollow this pumpkin or add a light?

No. This is a relief carving that reads by carved depth and shadow, not by internal light. Keep the wall fully intact for strength and display it unlit under a warm side lamp so raking light shows off the texture.

How do I get the pale cream muzzle to look so much lighter than the rest?

Depth controls value. The deeper you shave into the flesh, the paler and more yellow it looks, so the muzzle, blaze, and chest are carved deepest. Leave the skin fully intact where you want the darkest tan markings.

This is an expert design. How can I improve my odds?

Work from a clear reference photo of a real dog and block in the big shapes before touching any detail. Get the placement of the eyes, nose, and muzzle right first, since likeness lives there. Save fur texture for the very last step so early passes do not smear your detail.

Your take belongs here, too.

Changed a detail? Made it simpler? Share a photo of your version and tell the community what worked.

Share your pumpkin

More pumpkins like this

You've reached the end · 8 pumpkins
The Patch Report

Fresh pumpkins, in your inbox.

The best new carvings, ideas worth stealing, and how-tos for carving season. Short, seasonal, and gone by November.

A short email during carving season. Unsubscribe anytime. See our privacy policy.