Halloween Pumpkin Carving Contest · Starts October 1st · $500 in prizes
← Back to ideas
@ai_concepts
Sep 11, 2026
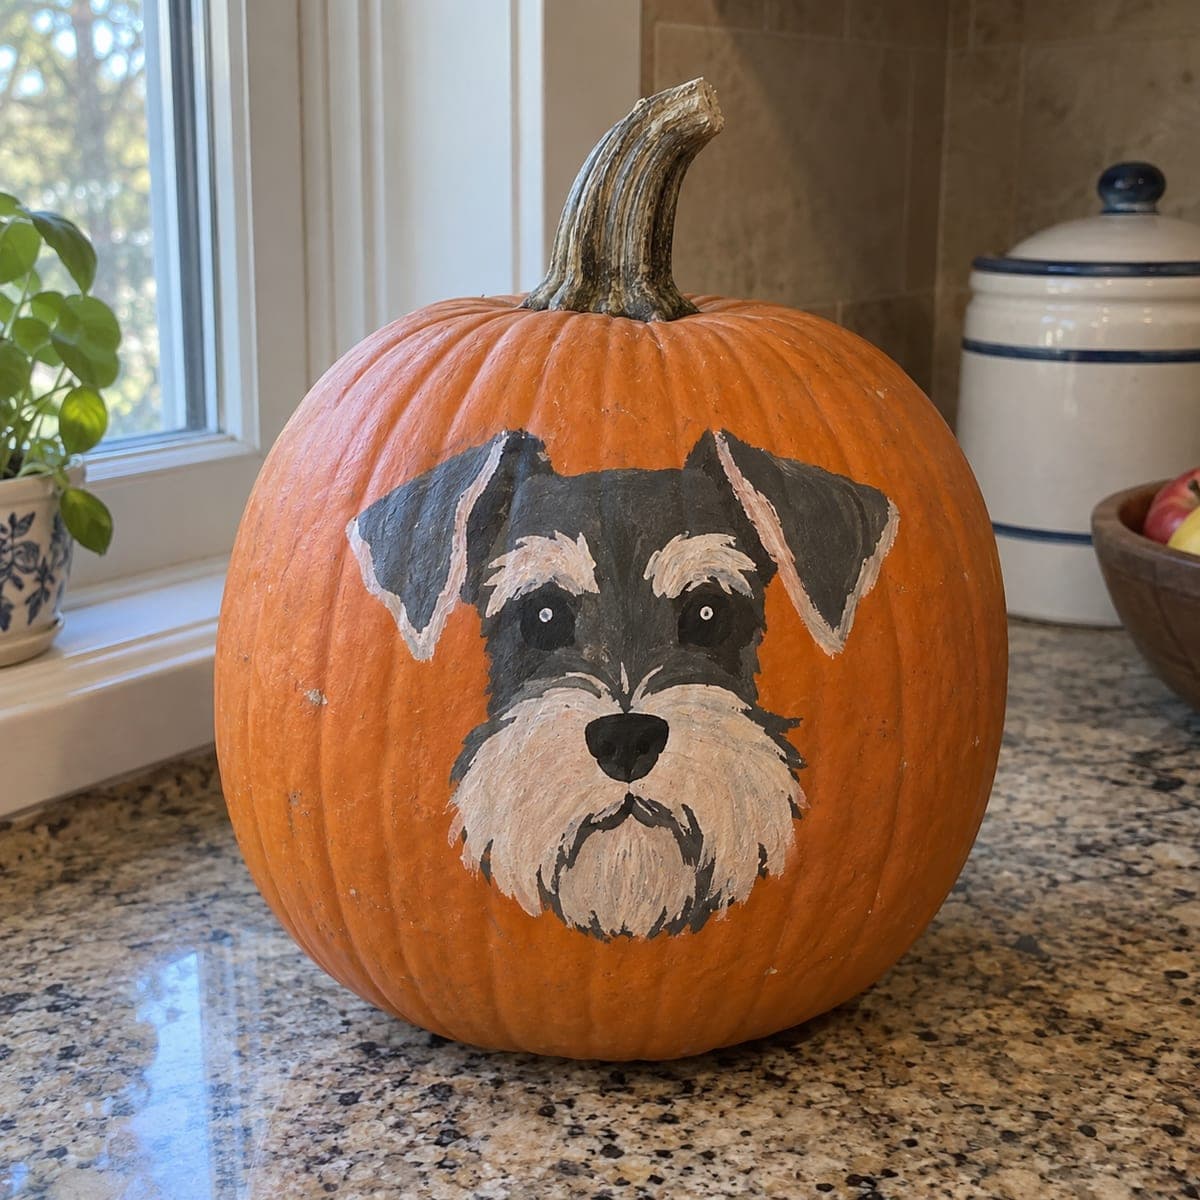
Schnauzer Dog Portrait Etched Jack-O-LanternAI
0

Schnauzer Dog Portrait Etched Jack-O-Lantern

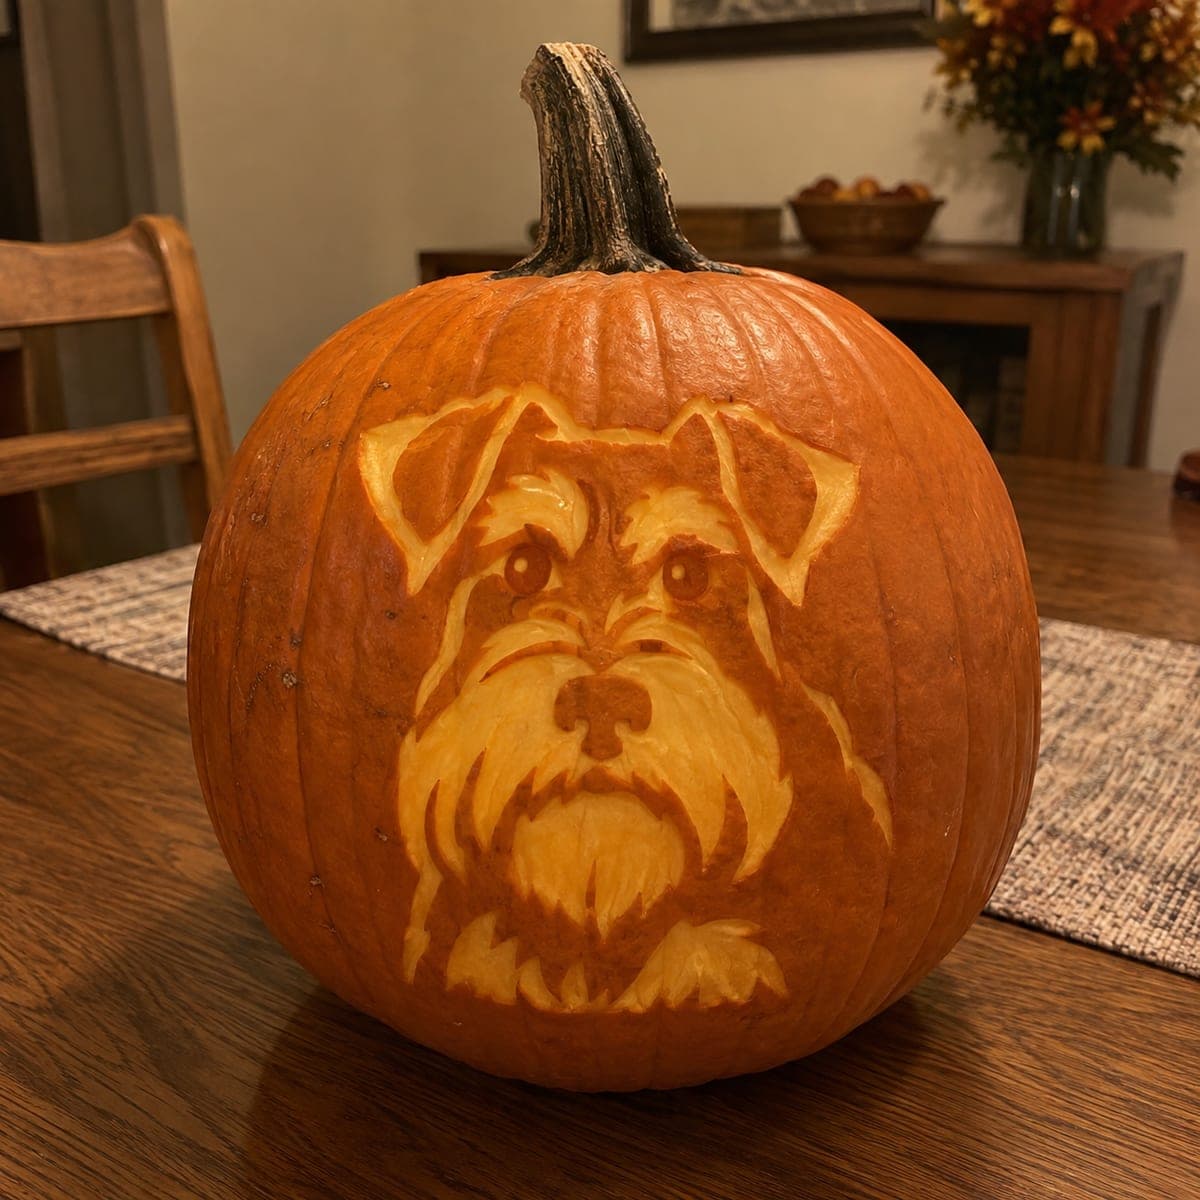
A miniature schnauzer with bushy eyebrows, a broom of a beard, and perked folded ears is etched into this pumpkin in warm layered tones. The breed's wiry face furnishings are the highlight, carved in long downward strokes that get deeper toward the chin. Keep the dark nose and eyes as untouched skin for contrast, and this pet portrait pumpkin glows beautifully on a dining room table.

This is an AI-generated concept image: a realistic, carvable design idea rather than a photo of a finished carve. AI concepts are always labeled and sit out the leaderboard and the contest.

No ratings yet · Sign in to rate
Comments (0)

  • No comments yet — be the first.

Save without an account. Sign in to like or comment.

Our tips for carving a similar design

This design is built almost entirely with etching and skin peeling rather than full cutouts, so the schnauzer's wiry beard and eyebrows read as soft fur in warm layered tones. The core trick is controlling depth: shave the skin lightly for dim glow and dig deeper only where the fur strokes reach the chin. Plan your light values first, then work from the darkest untouched areas outward so you never over-cut a spot you meant to keep dark.

Written by PumpkinCarvingIdeas.com, inspired by the image above. These are our suggestions, not instructions from the uploader. This approach to the AI concept has not been tested on a real pumpkin.

From pumpkin to porch

  1. Transfer the portrait and plan your values

    Since this is a concept rendering, start by picking a real pumpkin with a broad, smooth face for the etching. Tape a schnauzer stencil to the front and poke transfer dots along every fur line, the ear folds, eyes, and nose. Before cutting, shade the printout into three zones so you know what stays dark, what gets peeled, and what gets cut. A clear plan keeps a shading portrait like this from turning muddy.

  2. Open a lid and clean the wall

    Cut a lid from the bottom or the back rather than the top so the natural stem stays intact for looks. Scoop the pulp and scrape the inside of the front wall down to about one inch thick. A thinner, even wall lets light pass through your peeled areas evenly. Adults should handle the saw and any deep cuts throughout.

  3. Protect the darkest features first

    Leave the nose and both eyes as completely untouched skin so they stay dark for contrast. Outline them with a fine detail knife so surrounding cuts do not creep into them. Working around these anchors first gives you a stable reference for the whole face. Cut slowly and keep your free hand behind the blade.

  4. Peel the mid-tone fur and muzzle

    Use a loop or ribbon tool to shave the skin off the beard, eyebrows, and cheek fur, removing just the orange rind to reveal the pale flesh beneath. Vary how much you take away: lighter shaving stays dim, deeper scooping glows brighter. Follow the fur direction in long downward strokes so the texture looks natural. Keep bridges of skin between clumps of fur so the beard holds together.

  5. Deepen the chin and ear accents

    Toward the bottom of the beard, carve deeper into the flesh to make the chin the brightest fur area, letting the muzzle fade upward. If you want a few crisp highlights, cut fully through only in small slivers along the lower beard tips, saving these openings for last so the face stays strong. Round the edges of each cut so the light feathers softly instead of showing hard lines. Step back often and check the balance under a lamp.

  6. Light it and photograph

    Drop in a battery LED puck, warm white looks best for this cozy portrait. Set it low and toward the back so the peeled fur glows and the dark nose and eyes pop. Photograph in a dim room with the pumpkin on a table for that warm indoor feel. Mist the cut edges and refrigerate between showings to keep the fur detail crisp.

Gather your supplies

Check things off as you get ready.

Work on a stable surface, keep your free hand out of the cutting path, and have an adult handle sharp tools.

Three levels of light

  • Leave intact

    The nose and both eyes stay as untouched dark skin for contrast.

  • Peel & shade

    The eyebrows, cheek fur, and upper muzzle get skin-peeled for a soft mid glow.

  • Cut through

    Only small slivers along the lower beard tips are cut through for the brightest accents.

Learn the carving basics

Before you start cutting

How do I keep the bushy beard from looking like a blob?

Vary your carving depth and follow the fur direction with long downward strokes. Lighter shaving stays dim while deeper scooping glows brighter, and that contrast is what separates individual clumps. Leave thin ridges of skin between the strokes so each tuft reads as its own piece of fur.

Should I cut all the way through anywhere?

Mostly no. This portrait lives on skin peeling and shading, so almost everything is surface work. Save any full cutouts for a few small slivers at the beard tips, and do them last so the delicate face stays supported while you carve.

What light works best for a warm pet portrait like this?

Use a battery LED puck in warm white rather than a candle, since an open flame can scorch the thin peeled areas and is a fire risk indoors. Place it low and toward the back so the glow rises through the fur. Warm white keeps the layered orange tones cozy on a dining table.

Your take belongs here, too.

Changed a detail? Made it simpler? Share a photo of your version and tell the community what worked.

Share your pumpkin

More pumpkins like this

You've reached the end · 8 pumpkins
The Patch Report

Fresh pumpkins, in your inbox.

The best new carvings, ideas worth stealing, and how-tos for carving season. Short, seasonal, and gone by November.

A short email during carving season. Unsubscribe anytime. See our privacy policy.