Halloween Pumpkin Carving Contest · Starts October 1st · $500 in prizes
← Back to ideas
@ai_concepts
Jul 20, 2026
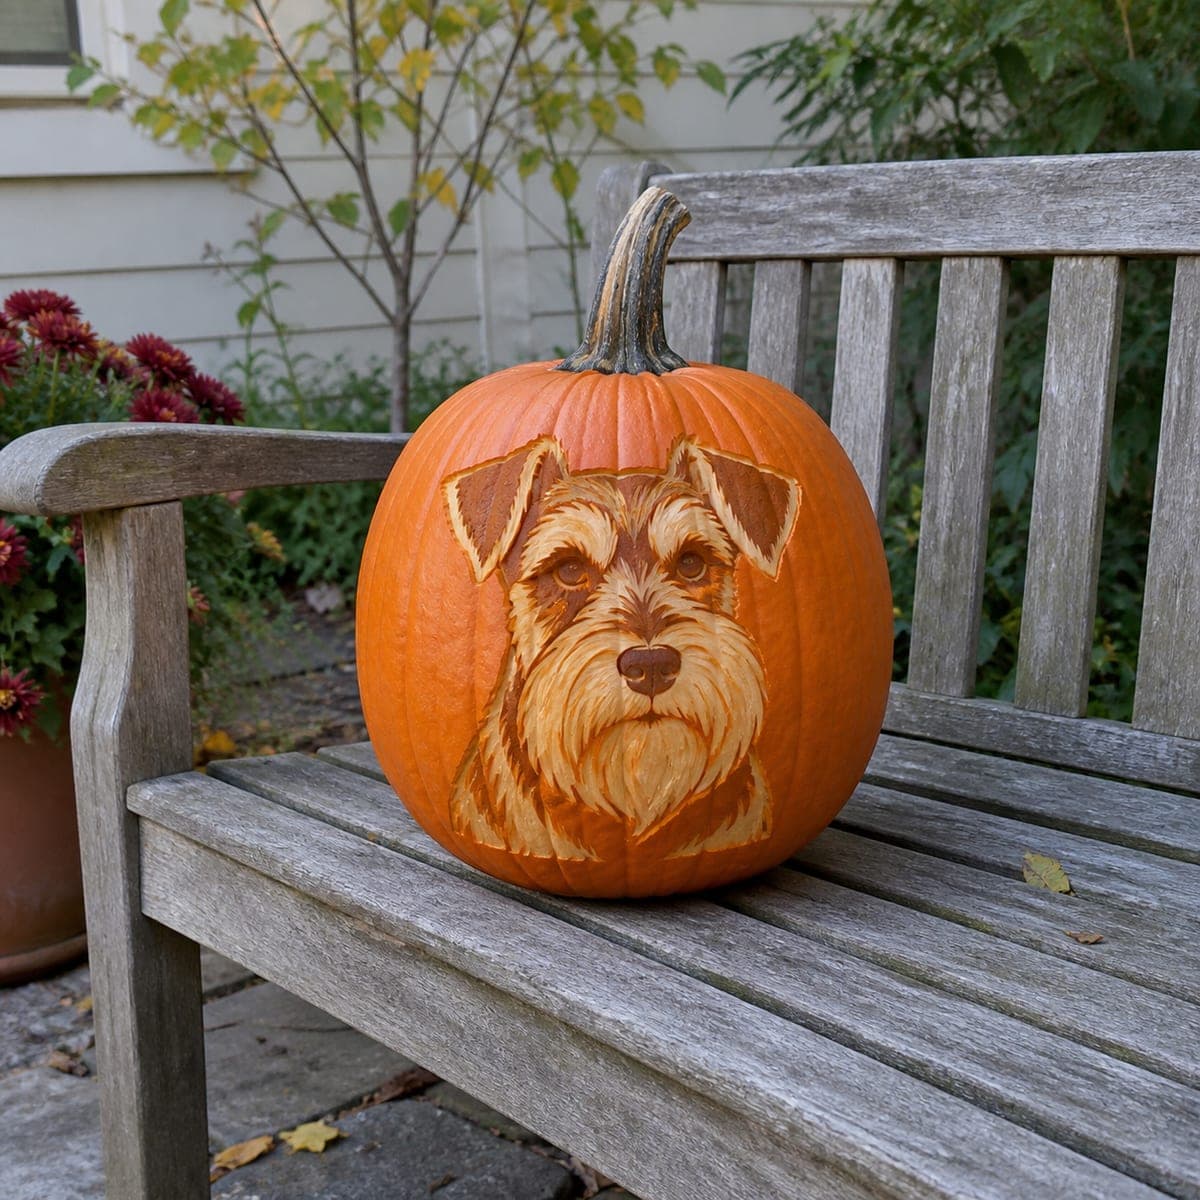
Miniature Schnauzer Portrait Etched PumpkinAI
0

Miniature Schnauzer Portrait Etched Pumpkin

A miniature schnauzer stares out from this etched pumpkin portrait, its wiry beard and eyebrows built from directional peeling strokes in two tones. The deeper cuts read as dark fur while shallow skin removal creates the pale muzzle, so vary your pressure rather than your tools. Pin-transfer a photo-based pattern to keep the proportions right, and start with the eyes; if they land correctly the rest of the face follows. A great gift-style carving for schnauzer owners.

This is an AI-generated concept image: a realistic, carvable design idea rather than a photo of a finished carve. AI concepts are always labeled and sit out the leaderboard and the contest.

No ratings yet · Sign in to rate
Comments (0)

  • No comments yet — be the first.

Save without an account. Sign in to like or comment.

Our tips for carving a similar design

This design is a surface portrait built almost entirely from shading, not cutouts, so the whole trick is varying how deep you scrape rather than switching tools. Deep cuts read as dark fur and shallow skin removal creates the pale beard and muzzle, and the directional strokes give the wiry coat its texture. A pin-transferred, photo-based pattern keeps the proportions honest, and the eyes anchor everything else.

Written by PumpkinCarvingIdeas.com, inspired by the image above. These are our suggestions, not instructions from the uploader. This approach to the AI concept has not been tested on a real pumpkin.

From pumpkin to porch

  1. Prep the pumpkin and transfer the pattern

    Pick a large pumpkin with a smooth, evenly colored front and wipe it clean. Since this is a concept image, you are recreating the look, so print a schnauzer portrait pattern sized to fit the face area. Tape it flat and use a pin or a poking tool to transfer the key outlines, the eyes, brows, ears, muzzle, and beard edges. Leave the shell walls fully intact because this portrait is etched into the surface, not hollowed.

  2. Start with the eyes

    The eyes make or break a pet portrait, so carve them first while the surface is fresh. Peel the skin lightly around each eye to create the pale ring, then leave small untouched dots for the dark pupils so they read as alert and focused. Keep both eyes level and the same size by checking against your transferred marks. If the eyes land right, the rest of the face falls into place.

  3. Map the tones with skin peeling

    Work out from the eyes and remove skin at two clear depths. Shallow scraping gives a dim orange glow for the pale muzzle, cheeks, and light brow hairs, while deeper scraping into the flesh creates the brighter, lighter fur. Leave large sections of untouched skin for the dark ear tips and the shadowed patches around the face. Step back often to judge the balance between light and dark before committing to more removal.

  4. Build the wiry beard and brows

    Use short, directional strokes that all follow the way the fur grows, downward on the beard and outward on the eyebrows. Vary your pressure to layer light strokes over darker peeled areas so the coat looks textured rather than flat. Keep the strokes fine and overlapping near the chin where the beard is fullest. Patience here is what sells the schnauzer's scruffy character.

  5. Refine contrast and clean the edges

    Compare your work to the reference and deepen a few key shadows, the inner corners of the eyes, under the nose, and between the ears. Tidy any ragged peel edges with a fine loop tool so the transitions look intentional. Resist the urge to cut all the way through, since even the nose stays as a scraped surface here. A little extra contrast now reads clearly once it is lit.

  6. Light it and photograph

    Set a battery LED puck inside, or place the pumpkin in front of a small LED so light rakes across the etched surface. Because this is a shaded portrait rather than a cutout, side lighting or soft backlighting shows the texture best. Try it at dusk on a bench or step and take your photo before the surface starts to dry. Mist the carving lightly and refrigerate overnight to keep it looking fresh.

Gather your supplies

Check things off as you get ready.

Work on a stable surface, keep your free hand out of the cutting path, and have an adult handle sharp tools.

Three levels of light

  • Leave intact

    Untouched dark skin for the ear tips, deep eye shadows, and the darkest fur patches framing the face

  • Peel & shade

    Shallow skin removal for the pale muzzle, cheeks, and the soft glow of the beard and brows

  • Cut through

    No full cutouts here; this is an etched surface portrait, so keep the shell intact and let depth do the work

Learn the carving basics

Before you start cutting

Do I need to cut all the way through anywhere?

No, this is a shading project, so the shell stays intact everywhere. All the detail comes from peeling skin at different depths, from a light scrape for a dim glow to a deeper scrape for brighter fur. Keeping the wall solid also makes the carving stronger and longer lasting.

How do I get the two-tone fur without switching tools constantly?

Vary your pressure instead of your tools. A light pass removes only the outer skin for a soft orange tone, while a firmer pass into the flesh creates the lighter, brighter fur. One loop tool can handle both depths once you get a feel for it.

What light works best for an etched portrait like this?

Use a battery LED rather than a candle, since flames dry and darken the thin scraped areas fast. Side or raking light shows the beard texture better than a light straight behind the face. Test a few positions after dark and pick the one that gives the most depth.

Your take belongs here, too.

Changed a detail? Made it simpler? Share a photo of your version and tell the community what worked.

Share your pumpkin

More pumpkins like this

You've reached the end · 8 pumpkins
The Patch Report

Fresh pumpkins, in your inbox.

The best new carvings, ideas worth stealing, and how-tos for carving season. Short, seasonal, and gone by November.

A short email during carving season. Unsubscribe anytime. See our privacy policy.