Halloween Pumpkin Carving Contest · Starts October 1st · $500 in prizes
← Back to ideas
@ai_concepts
Aug 14, 2026
Shiba Inu Etched Pumpkin Carving PortraitAI
0

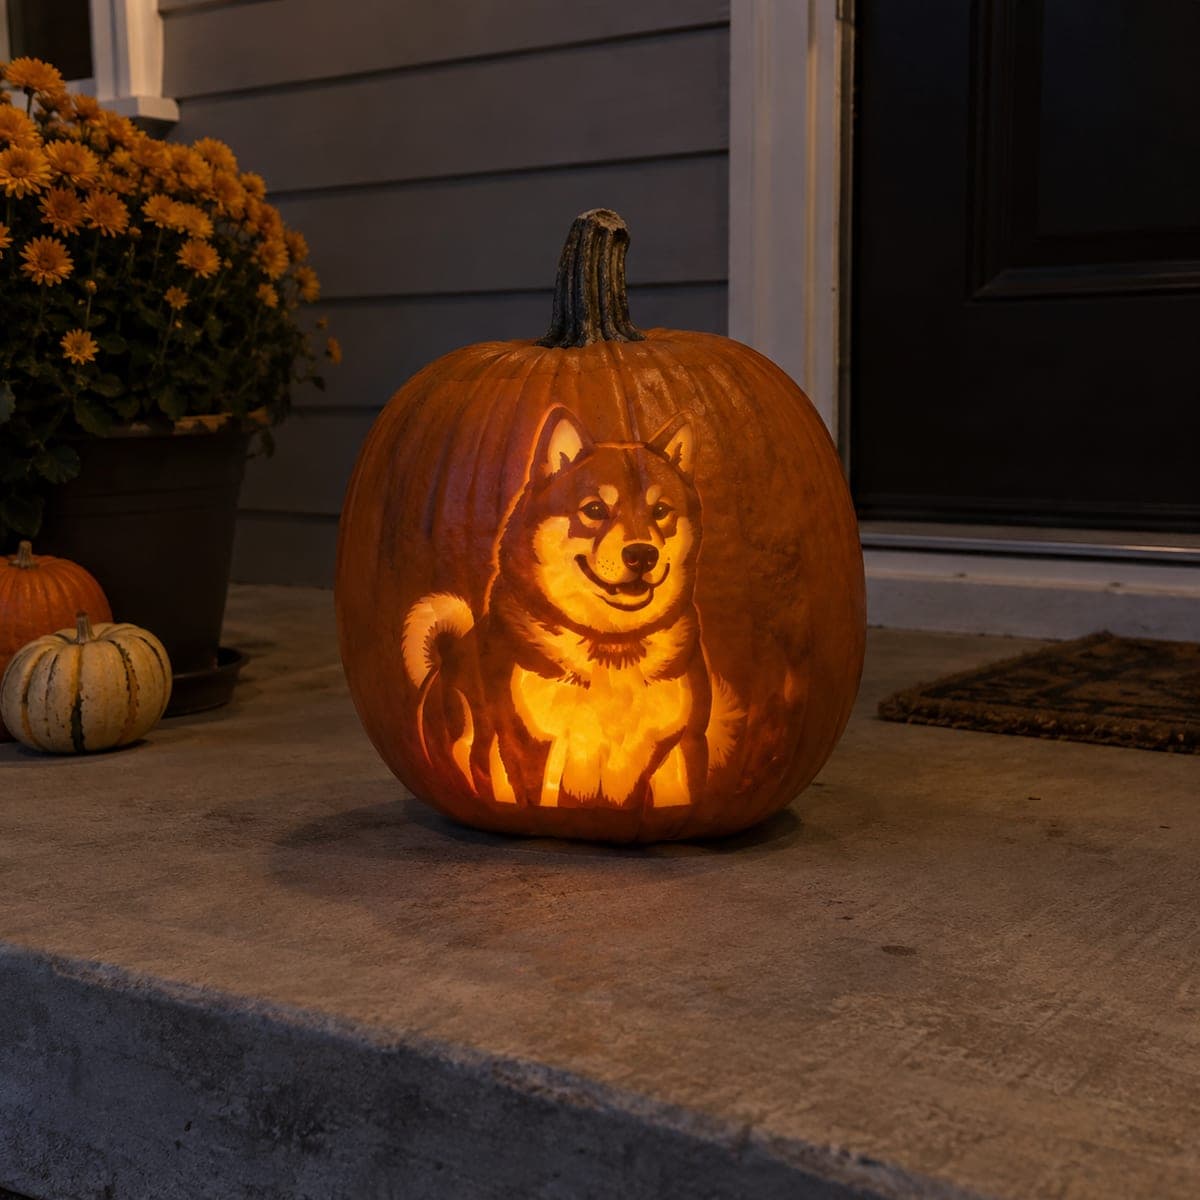
Shiba Inu Etched Pumpkin Carving Portrait

A Shiba Inu sits alert on this backlit pumpkin, its curled tail, pricked ears, and cream chest markings carved in warm glowing layers. The breed's naturally orange coat is a perfect match for pumpkin light, making this a smart pumpkin carving idea for Shiba owners. Etch the white facial markings and chest thinnest for brightness, keep the body a medium depth, and outline the curled tail cleanly since it is the breed's signature.

This is an AI-generated concept image: a realistic, carvable design idea rather than a photo of a finished carve. AI concepts are always labeled and sit out the leaderboard and the contest.

No ratings yet · Sign in to rate

Comments (0)

  • No comments yet — be the first.

Save without an account. Sign in to like or comment.

Our tips for carving a similar design

The core trick here is depth control, using three tones of light to sculpt a Shiba Inu out of the pumpkin skin. You would peel the cream face and chest markings thinnest so they glow brightest, hold the orange body at a medium depth for a softer glow, and leave the outline and dark facial details as untouched skin. This is a shading portrait, not a cut-through design, so the whole dog stays as one connected shape.

Written by PumpkinCarvingIdeas.com, inspired by the image above. These are our suggestions, not instructions from the uploader. This approach to the AI concept has not been tested on a real pumpkin.

From pumpkin to porch

  1. Prep and open the pumpkin

    Pick a tall pumpkin with a wide, fairly flat front to hold the portrait. Have an adult cut a lid from the back rather than the top so the front stays smooth and unbroken. Scoop the walls on the carving side down to about one inch thick using a sturdy scraper. A thinner wall makes shading and etching far easier and lets more light pass through.

  2. Transfer the stencil

    Tape your Shiba Inu stencil flat against the front, clipping the paper edges so it hugs the curve. Poke the outlines with a pin or transfer tool, marking the curled tail, pricked ears, chest, and facial markings as separate zones. Mark which areas are darkest, medium, and brightest before you remove the paper. A quick pencil shading map on the skin keeps you from over-cutting later.

  3. Score the outlines first

    Use a fine detail blade to lightly score the dog's full silhouette and the inside lines of the tail, ears, and collar area. These scored lines act as walls that stop your shading from bleeding into the background. Keep the curled tail outline crisp since it is the breed's signature shape. Do not cut through at this stage, just define edges.

  4. Peel the bright markings

    With a ribbon or lino tool, shave the skin off the face blaze and chest markings until you reach the pale flesh just under the surface. Go slow and check the glow by holding the pumpkin up to a light. These thinnest areas will read as the cream Shiba coat. Leave a hair more thickness on the muzzle and eye edges so the features stay defined.

  5. Shade the body at medium depth

    Remove only the outer orange skin across the body and curled tail, leaving more wall than the bright markings. This medium layer gives the warm orange coat that matches Shiba fur. Vary the depth slightly along the fur direction to suggest fluff. Keep the eyes, nose, mouth line, and inner ear shadows as fully untouched skin so they stay dark.

  6. Light it and photograph

    Set a battery LED puck or string inside, never a candle, since the thin etched areas can scorch. Test in a dark room and touch up any spots that look flat by peeling a little more. If the face is too dim, shave those markings slightly thinner. Photograph at dusk on a porch step so the warm glow reads against a dark background.

Gather your supplies

Check things off as you get ready.

Work on a stable surface, keep your free hand out of the cutting path, and have an adult handle sharp tools.

Three levels of light

  • Leave intact

    Eyes, nose, mouth line, inner ear shadows, and the silhouette outline stay as untouched dark skin.

  • Peel & shade

    The cream face blaze and chest markings are shaved thinnest for the brightest glow.

  • Cut through

    No full cutouts on the dog itself; keep it a shaded portrait so the shape stays connected and strong.

Learn the carving basics

Before you start cutting

Should I cut all the way through anywhere on this design?

This is a shading portrait, so almost everything stays as peeled or scored skin rather than open holes. If you want a little extra pop, you could cut through only tiny background accents well away from the dog. Keeping the body solid prevents the curled tail and ears from breaking off.

How do I keep the curled tail from looking muddy?

Score its outline cleanly first so it separates from the body, then shade the inside at the same medium depth as the coat. Leave a thin untouched line where the tail curls over the back to read as a shadow gap. That crisp edge is what makes it clearly a Shiba tail.

This is a concept image, so is it actually carvable?

Yes, a design like this is realistic because it relies on surface shading rather than fragile cutouts. Keep your wall around one inch, work in three depth tones, and leave the dark features as solid skin. Nothing thin is left unsupported, so it holds up on a real pumpkin.

Your take belongs here, too.

Changed a detail? Made it simpler? Share a photo of your version and tell the community what worked.

Share your pumpkin

More pumpkins like this

You've reached the end · 8 pumpkins
The Patch Report

Fresh pumpkins, in your inbox.

The best new carvings, ideas worth stealing, and how-tos for carving season. Short, seasonal, and gone by November.

A short email during carving season. Unsubscribe anytime. See our privacy policy.