Halloween Pumpkin Carving Contest · Starts October 1st · $500 in prizes
← Back to ideas
@ai_concepts
Aug 8, 2026
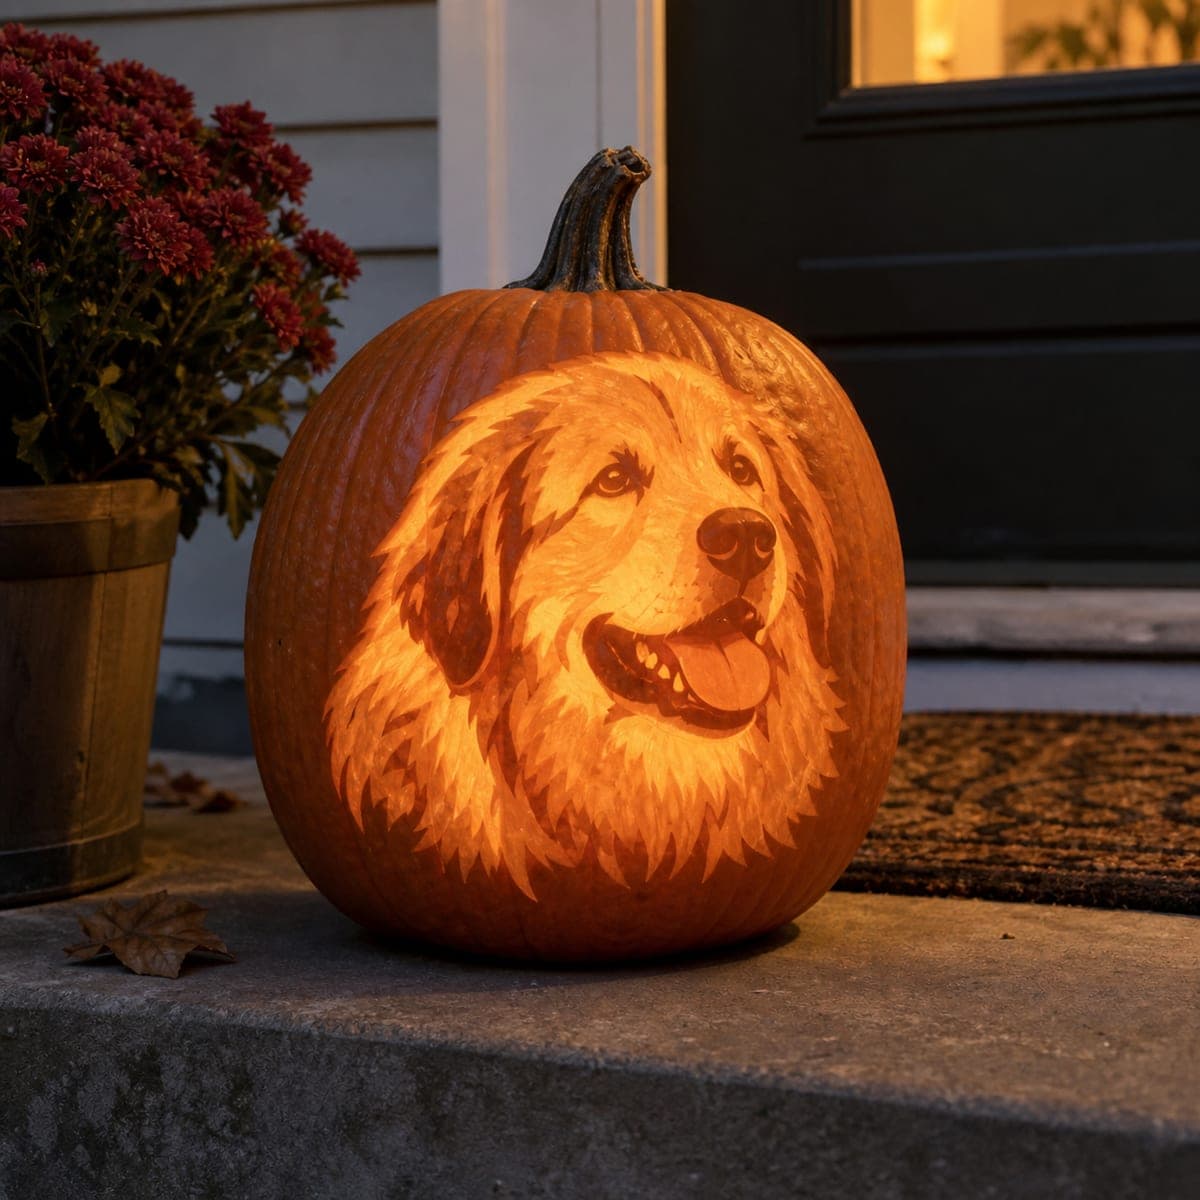
Happy Golden Retriever Etched Pumpkin PortraitAI
0

Happy Golden Retriever Etched Pumpkin Portrait

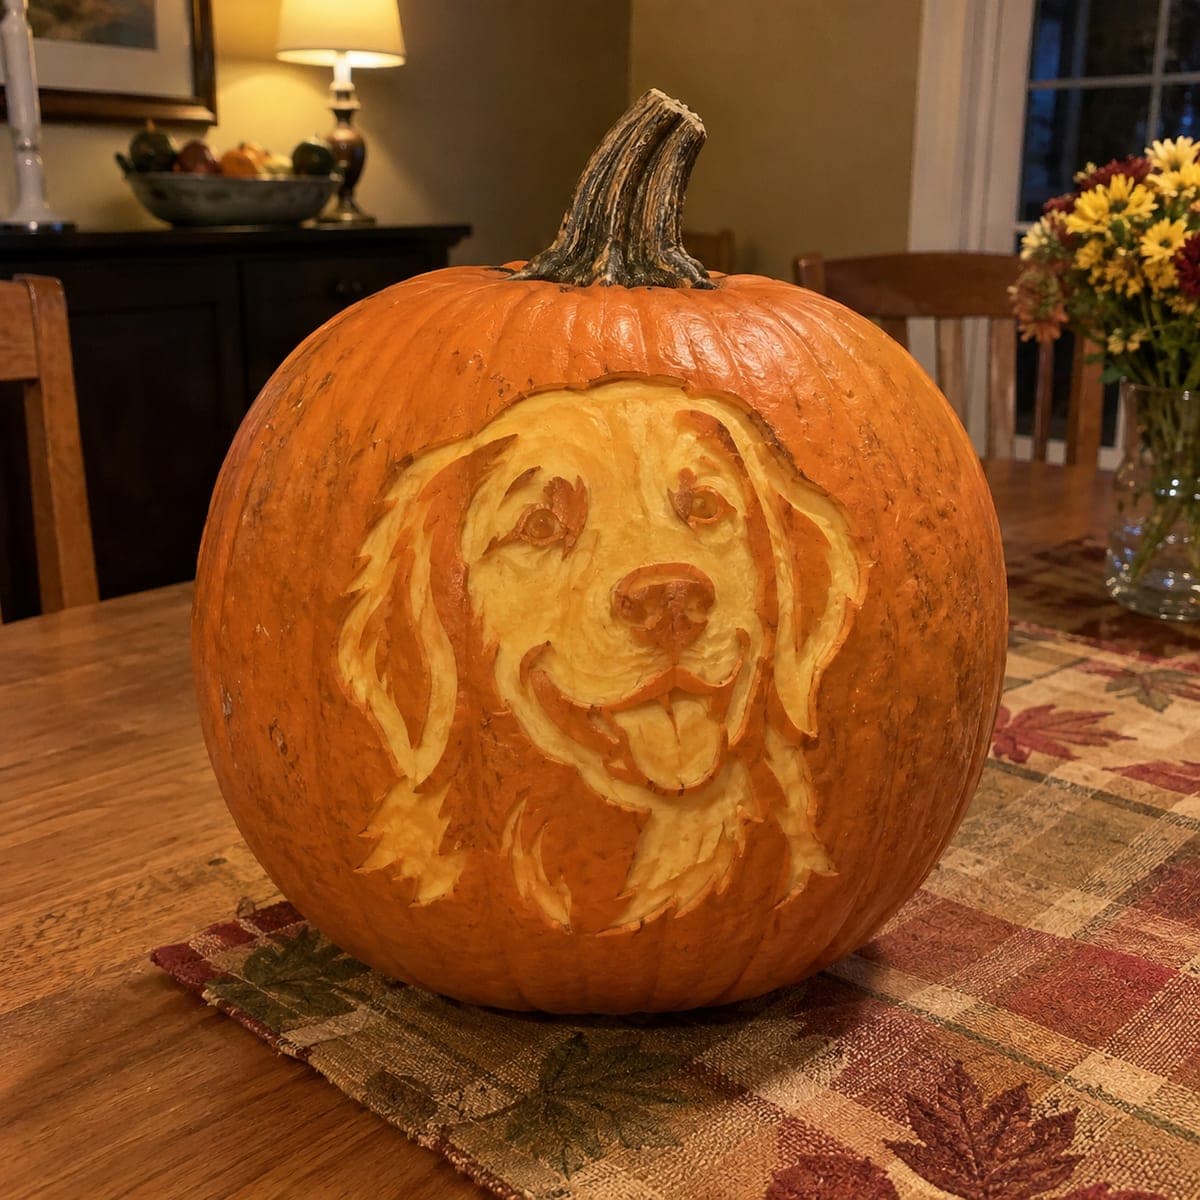
A golden retriever grins with its tongue out on this backlit pumpkin portrait, the feathered ears and ruff etched in warm layered strokes that glow like real golden fur. This is a favorite pumpkin carving idea for dog lovers who want their own pet immortalized on the porch. Convert a head shot of your dog to high contrast, transfer it with pin pricks, and carve the lightest areas (muzzle, chest, tongue highlights) thinnest so the face pops at night.

This is an AI-generated concept image: a realistic, carvable design idea rather than a photo of a finished carve. AI concepts are always labeled and sit out the leaderboard and the contest.

No ratings yet · Sign in to rate
Comments (0)

  • No comments yet — be the first.

Save without an account. Sign in to like or comment.

Our tips for carving a similar design

The trick here is tonal etching, where you shave the pumpkin skin to different depths instead of cutting all the way through, so the light passes through in soft gradients that read like fur. Since this is a concept image, picture it as a plan you could follow: a golden retriever head done almost entirely in peeled tones, with only the brightest highlights on the muzzle, chest, and tongue thinned nearly to the shell. Keep the dark skin as your outline and let the graduated peels do the shaping.

Written by PumpkinCarvingIdeas.com, inspired by the image above. These are our suggestions, not instructions from the uploader. This approach to the AI concept has not been tested on a real pumpkin.

From pumpkin to porch

  1. Prep the pumpkin and photo

    Choose a large pumpkin with a smooth, pale, evenly shaped front and no soft spots. Convert a clear head shot of your dog to high contrast black, gray, and white, then size it to fit the carving face. Cut a lid or a wide access hole in the back, not the top, so the front stays intact for detail work. Scrape the inside wall behind the design down to about one inch thick so light travels easily.

  2. Transfer the portrait

    Tape the printed pattern flat against the front, smoothing it over the curve so the face does not distort. Use a pin or a poking tool to prick along every major boundary: the outline of the head, the ears, the eyes, the nose, and the tongue. Space the pricks close together in detailed areas like the eyes so you keep the shapes accurate. Peel the paper away and connect the dots lightly with a washable marker if it helps you read the map.

  3. Map your three tones

    Before cutting, decide which areas stay dark skin, which get a light peel, and which get thinned almost through. Mark the darkest fur shadows and the head outline to leave alone. The mid golden fur across the ears, ruff, and forehead becomes your peeled zone, and the muzzle, chest, tongue highlights, and eye catchlights become your thinnest, brightest spots. Working out the plan now keeps you from over cutting later.

  4. Etch the fur in layered strokes

    Using a ribbon or loop tool, shave the skin off the mid tone fur areas so the orange flesh glows dim. Pull the tool in short directional strokes that follow the way the fur lies, feathering out from the face and down the ruff. Vary your depth so thicker fur stays a little darker and the raised cheeks and brow shave lighter. Keep bridges of darker skin between clumps of fur so the strokes stay distinct rather than blurring into one flat glow.

  5. Thin the brightest highlights

    Return to the muzzle, chest blaze, tongue, and eye catchlights and shave those down further until the flesh is thin and almost translucent, but stop before you break through. These near-through areas will read as the brightest points and make the face pop. Keep the eyes controlled: a small thinned catchlight in each eye gives life, while the surrounding iris stays a mid tone. Go slowly and check against a light as you approach the thinnest depth.

  6. Light it and photograph

    Drop in a bright LED puck or a string of battery lights, never a candle, since the thin walls and long detail session make open flame risky. Set the pumpkin on the porch after dark and look at it from a few feet back to judge the balance of tones. If any area looks muddy, shave it a touch thinner to brighten it. Mist the cut surfaces with water and refrigerate overnight when not on display to keep the fur detail crisp.

Gather your supplies

Check things off as you get ready.

Work on a stable surface, keep your free hand out of the cutting path, and have an adult handle sharp tools.

Three levels of light

  • Leave intact

    Dark fur shadows, the outline of the head, and the nose stay as untouched skin.

  • Peel & shade

    The golden fur across the ears, forehead, and ruff gets a light skin peel for a warm mid glow.

  • Cut through

    The muzzle, chest blaze, tongue highlights, and eye catchlights are thinned nearly through for the brightest spots. No area is cut fully open.

Learn the carving basics

Before you start cutting

How do I keep the fur from turning into one flat blur of light?

Carve in short directional strokes that follow the fur's flow and leave thin bridges of darker skin between fur clumps. Those darker gaps are what separate one lock of fur from the next. Vary your peel depth so shadowed fur stays dimmer than the raised, lighter fur.

My dog is not a golden retriever. Can I still use this method?

Yes. The tonal etching approach works for any breed as long as you start from a clear, high contrast head shot. Long feathered coats like this glow beautifully, but short coats work too if you map the shadows and highlights carefully.

Why etch instead of cutting all the way through?

Cutting through would give you harsh open shapes and lose the soft fur gradients that make a pet portrait look real. Peeling the skin to different depths lets light pass through in graduated tones, which reads like fur and facial contours. Save any full cuts for simpler designs; here everything stays shaved, not open.

Your take belongs here, too.

Changed a detail? Made it simpler? Share a photo of your version and tell the community what worked.

Share your pumpkin

More pumpkins like this

You've reached the end · 8 pumpkins
The Patch Report

Fresh pumpkins, in your inbox.

The best new carvings, ideas worth stealing, and how-tos for carving season. Short, seasonal, and gone by November.

A short email during carving season. Unsubscribe anytime. See our privacy policy.