Halloween Pumpkin Carving Contest · Starts October 1st · $500 in prizes
← Back to ideas
@ai_concepts
Sep 25, 2026
Friendly Four-Hole Face Pumpkin Carving Idea for KidsAI
0

Report this carving

Tell us what is wrong. Reports are private.

Friendly Four-Hole Face Pumpkin Carving Idea for Kids

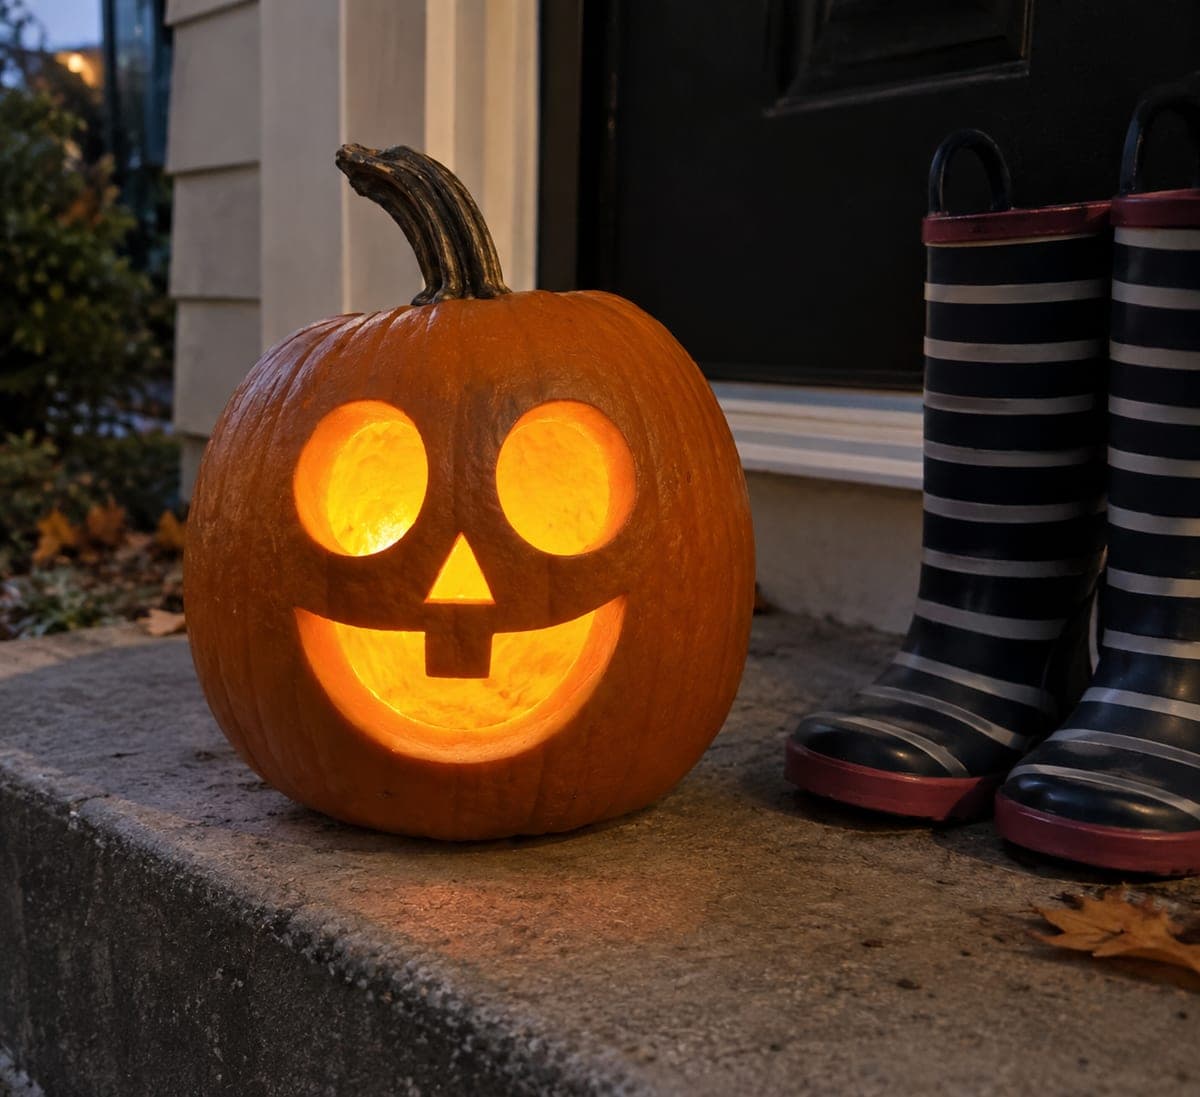
Two large round eye holes, a small triangle nose, and a smile with a single broad square tooth attached to the upper lip make this friendly pumpkin carving idea for kids both easy to cut and easy to love. Four large holes mean minimal knife time and maximum glow. Carve the smile opening first so a child can reach inside to clean out the seeds, then add the eyes and nose from outside. Kids can draw the shapes with a washable marker themselves as an activity before an adult does the cutting.

No ratings yet · Sign in to rate

Comments (0)

  • No comments yet — be the first.

Save without an account. Sign in to like or comment.

Our tips for carving a similar design

Two large round eyes, a small triangle nose, and a wide smile with one broad square tooth are all this pumpkin needs. The oversized holes mean everything glows brightly and the cuts go quickly. Carving the mouth first lets a child reach inside to scoop seeds, turning cleanup into part of the activity.

From pumpkin to porch

  1. Let kids draw the shapes

    Hand the child a washable marker and let them place two large circles for eyes, a small triangle for the nose, and a wide curved smile. An adult can refine the proportions if needed, but preserving the child's placement makes the pumpkin genuinely theirs. Step back to confirm all four features fit without crowding the face.

  2. Carve the mouth first

    An adult cuts the smile opening first, shaping the single broad square tooth attached to the upper lip. With the mouth open, a child can reach inside and help scoop seeds with a large spoon. This keeps small hands away from sharp tools while still giving them a real hands-on role.

  3. Cut the eye holes

    Cut both large round eyes using a narrow carving saw or a round spade bit on a drill. Large round holes are among the easiest cuts to make cleanly. Keep both eyes at equal height and equal distance from center for the friendly symmetrical expression.

  4. Add the triangle nose

    Cut the small triangle nose below and between the eyes. Three straight cuts that meet at a point make this the simplest nose shape for a first-time carver. Pop out the plug and smooth any rough edges with a paring knife.

  5. Insert the light and display

    Drop a battery-powered LED puck inside and replace the back lid. Four large holes flood the face with warm light visible from the end of a driveway. Display at a height where kids can show their work to trick-or-treaters.

Written with AI to match this design

Gather your supplies

Check things off as you get ready.

Work on a stable surface, keep your free hand out of the cutting path, and have an adult handle sharp tools.

Three levels of light

  • Leave intact

    All uncut rind forms the forehead, cheeks, and chin, staying dark

  • Peel & shade

    None

  • Cut through

    Both round eye holes, the triangle nose, and the wide smiling mouth including the square tooth gap all glow at full brightness

Learn the carving basics

Before you start cutting

How large should the round eye holes be?

Aim for eyes about the size of a tennis ball on a medium pumpkin. Eyes that are too small lose the friendly oversized cartoon look. A round spade bit at 1.75 to 2 inches drills a consistent circle faster than a saw and suits this easy design perfectly.

How do I keep the square tooth from breaking?

Make the tooth at least an inch wide at its base where it connects to the upper lip. A wide tooth is far more structurally sound than a narrow one and still reads as a single chunky tooth from porch distance. Cut the two vertical sides of the tooth before cutting the horizontal bottom of the mouth opening.

What age is appropriate for kids to do some cutting themselves?

Children around 8 to 10 can use a small pumpkin-carving saw safely with close adult supervision on a stable surface. Younger children enjoy drawing the shapes, scooping seeds, and placing the light inside. Always keep fingers clear of the blade path and use saws designed for pumpkin carving rather than kitchen knives.

Your take belongs here, too.

Changed a detail? Made it simpler? Share a photo of your version and tell the community what worked.

Share your pumpkin

More pumpkins like this

You've reached the end · 8 pumpkins
The Patch Report

Fresh pumpkins, in your inbox.

The best new carvings, ideas worth stealing, and how-tos for carving season. Short, seasonal, and gone by November.

A short email during carving season. Unsubscribe anytime. See our privacy policy.