Halloween Pumpkin Carving Contest · Starts October 1st · $500 in prizes
← Back to ideas
@ai_concepts
Jul 29, 2026
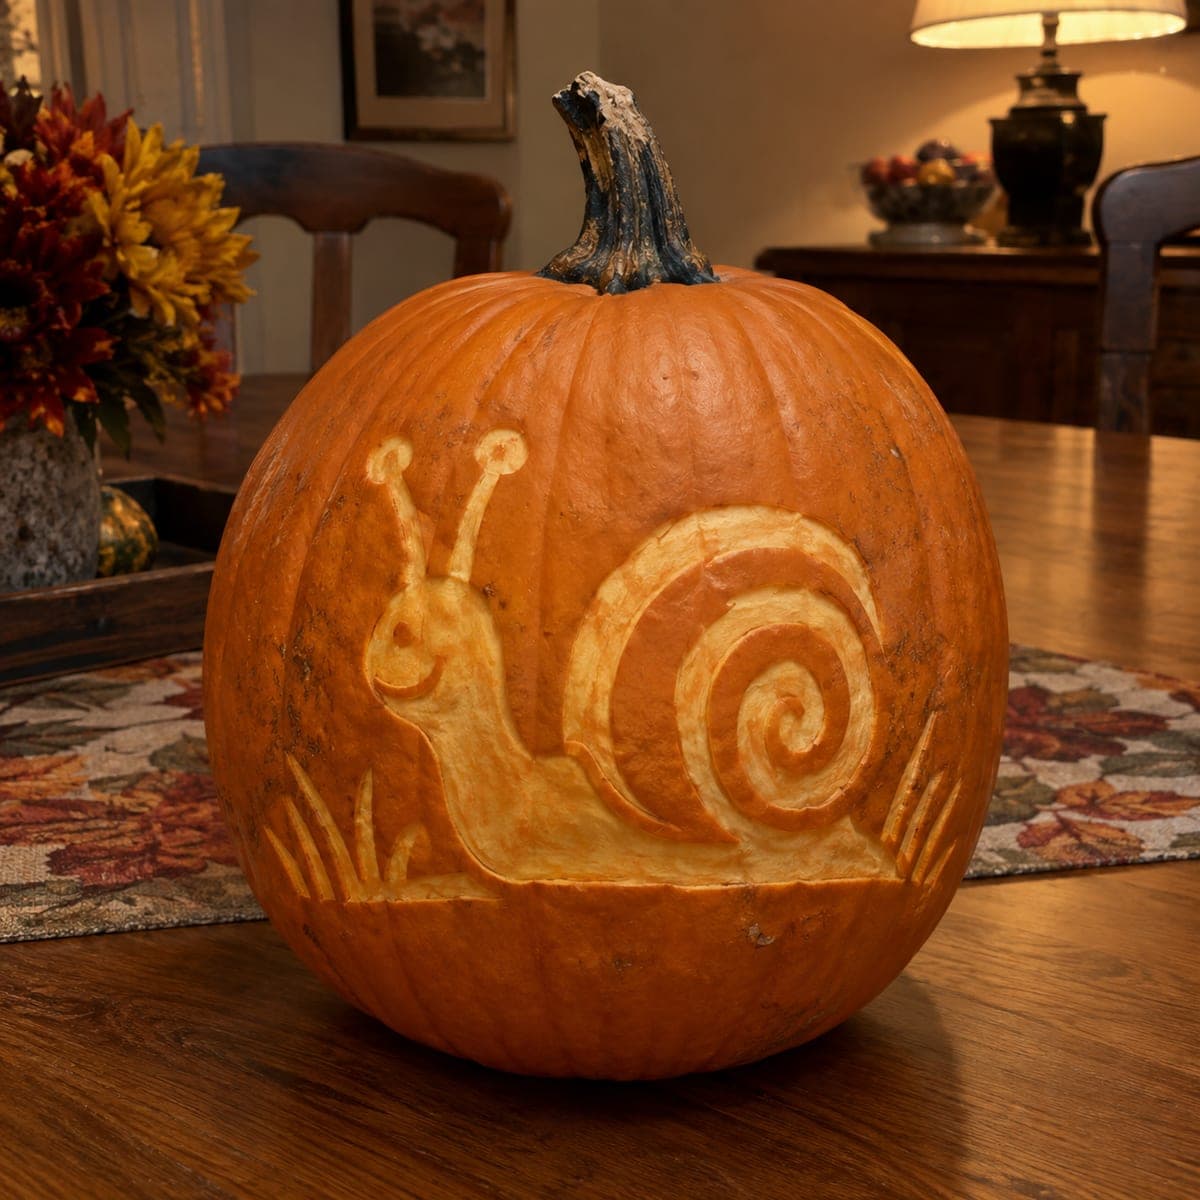
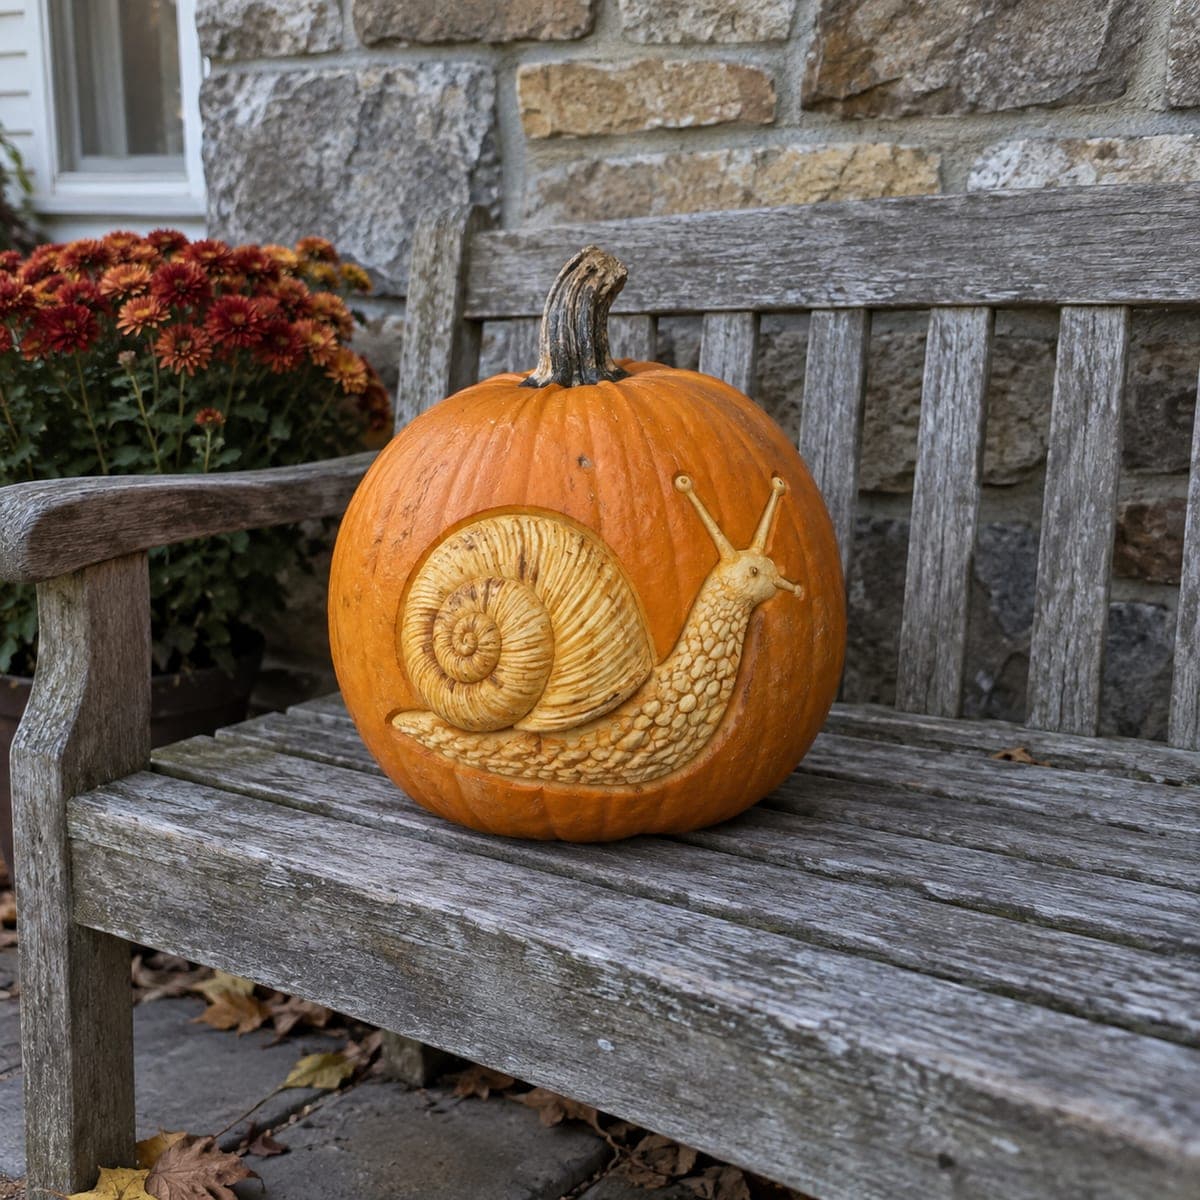
Garden Snail Etched Pumpkin With Grass AccentsAI
0

Garden Snail Etched Pumpkin With Grass Accents

A cheerful garden snail with a spiral shell and bobble-tipped antennae is peeled into this pumpkin, flanked by tufts of etched grass. The design uses simple skin removal, so the pale snail sits against the orange rind with no through-cuts at all. Score the outline with a craft knife, then lift the skin inside the lines with a peeler or zester, saving the spiral for careful last passes. A friendly fall table centerpiece that needs no candle.

This is an AI-generated concept image: a realistic, carvable design idea rather than a photo of a finished carve. AI concepts are always labeled and sit out the leaderboard and the contest.

No ratings yet · Sign in to rate
Comments (0)

  • No comments yet — be the first.

Save without an account. Sign in to like or comment.

Our tips for carving a similar design

The whole charm here comes from skin removal, not cutting through the wall. You peel away only the top rind so the pale flesh glows a soft orange while the untouched skin stays dark, giving you a friendly snail, a spiral shell, and grass tufts with no through-cuts at all. Treat it like drawing with a peeler, working from thin outlines outward and saving the tight spiral for last.

Written by PumpkinCarvingIdeas.com, inspired by the image above. These are our suggestions, not instructions from the uploader. This approach to the AI concept has not been tested on a real pumpkin.

From pumpkin to porch

  1. Prep the pumpkin and pick a flat face

    Choose a pumpkin with a broad, smooth front so the snail and shell have room to sit side by side. Since this design has no openings, you can leave the lid on and skip gutting if you want a purely decorative piece, or cut a small back hatch if you plan to add an LED. Wipe the surface clean and dry it so your stencil and pencil marks stay put. Set it on a towel to keep it from rolling while you work.

  2. Transfer the outline

    Tape your snail and grass stencil onto the flat face, keeping the shell centered and the head to one side. Poke through the main lines with a pin or transfer tool, spacing dots close together along the spiral so you can follow the curve later. Remove the paper and lightly connect the dots with a washable marker or pencil. Double check the antennae and grass blades read clearly before you touch a blade.

  3. Score all the outlines

    With a small craft knife, score just through the skin along every line, going only about an eighth of an inch deep. Keep the antennae, their bobble tips, and the thin grass blades as scored outlines so they stay structurally sound and do not tear. Take the spiral slowly, letting the blade ride the curve rather than forcing it. These score lines act as clean stopping edges when you start peeling.

  4. Peel the snail body and shell

    Switch to a vegetable peeler, lino tool, or citrus zester and lift the skin inside the snail body, head, and the open bands of the shell. Work in shallow, even strokes so the exposed flesh looks smooth and pale, stopping at your scored lines. Keep the peeled depth consistent so the glow will be uniform. Leave the grass and antennae as thin dark accents against the peeled areas.

  5. Detail the spiral last

    Save the tight center of the shell for careful final passes when your hand is warmed up. Peel the spiral bands one at a time, leaving narrow strips of skin between them so the coil reads clearly. Use the tip of your zester or a small loop tool for the innermost curl where space is tight. Go slow here, since this is the focal point and the easiest spot to overshoot.

  6. Clean up and light it

    Brush away loose bits and lightly even out any ragged edges with the peeler. If you added a back hatch, drop in a battery LED for a warm inner glow, or simply set the pumpkin under lamp light since this design shows off beautifully with no candle at all. Rub a little vegetable oil on the peeled areas to slow browning. Photograph it on a table runner while the flesh is bright and fresh.

Gather your supplies

Check things off as you get ready.

Work on a stable surface, keep your free hand out of the cutting path, and have an adult handle sharp tools.

Three levels of light

  • Leave intact

    The background rind, the thin antennae and their bobble tips, the grass blades, and the strips between the spiral bands stay as dark untouched skin.

  • Peel & shade

    The snail body, head, and the open bands of the shell are skin-peeled for a soft mid-orange glow.

  • Cut through

    Nothing is cut all the way through on this design, so there are no full-brightness openings.

Learn the carving basics

Before you start cutting

Do I need to hollow out the pumpkin for this?

Not for the carving itself, since every line is surface etching with no openings. If you want a gentle inner glow you can cut a small hatch in the back and add a battery LED, but the design also looks great lit only by room or lamp light. Skipping the gutting makes this a low-mess centerpiece.

How do I keep the spiral shell looking clean?

Score the full spiral first so you have crisp edges to peel against, then remove the bands one at a time from the outside in. Leave narrow strips of untouched skin between the peeled bands so the coil stays readable. Saving the tight center for your final passes keeps a tired hand from slipping into the delicate middle.

Will the thin antennae and grass survive?

Yes, because they are left as narrow dark accents rather than cut out. Keep them as scored outlines and simply peel around them, so there is nothing fragile to snap off. This is what makes the design friendly for careful kids working alongside an adult.

Your take belongs here, too.

Changed a detail? Made it simpler? Share a photo of your version and tell the community what worked.

Share your pumpkin

More pumpkins like this

You've reached the end · 8 pumpkins
The Patch Report

Fresh pumpkins, in your inbox.

The best new carvings, ideas worth stealing, and how-tos for carving season. Short, seasonal, and gone by November.

A short email during carving season. Unsubscribe anytime. See our privacy policy.