Halloween Pumpkin Carving Contest · Starts October 1st · $500 in prizes
← Back to ideas
@ai_concepts
Sep 10, 2026
Geometric Fox Face Glowing PumpkinAI
0

Geometric Fox Face Glowing Pumpkin

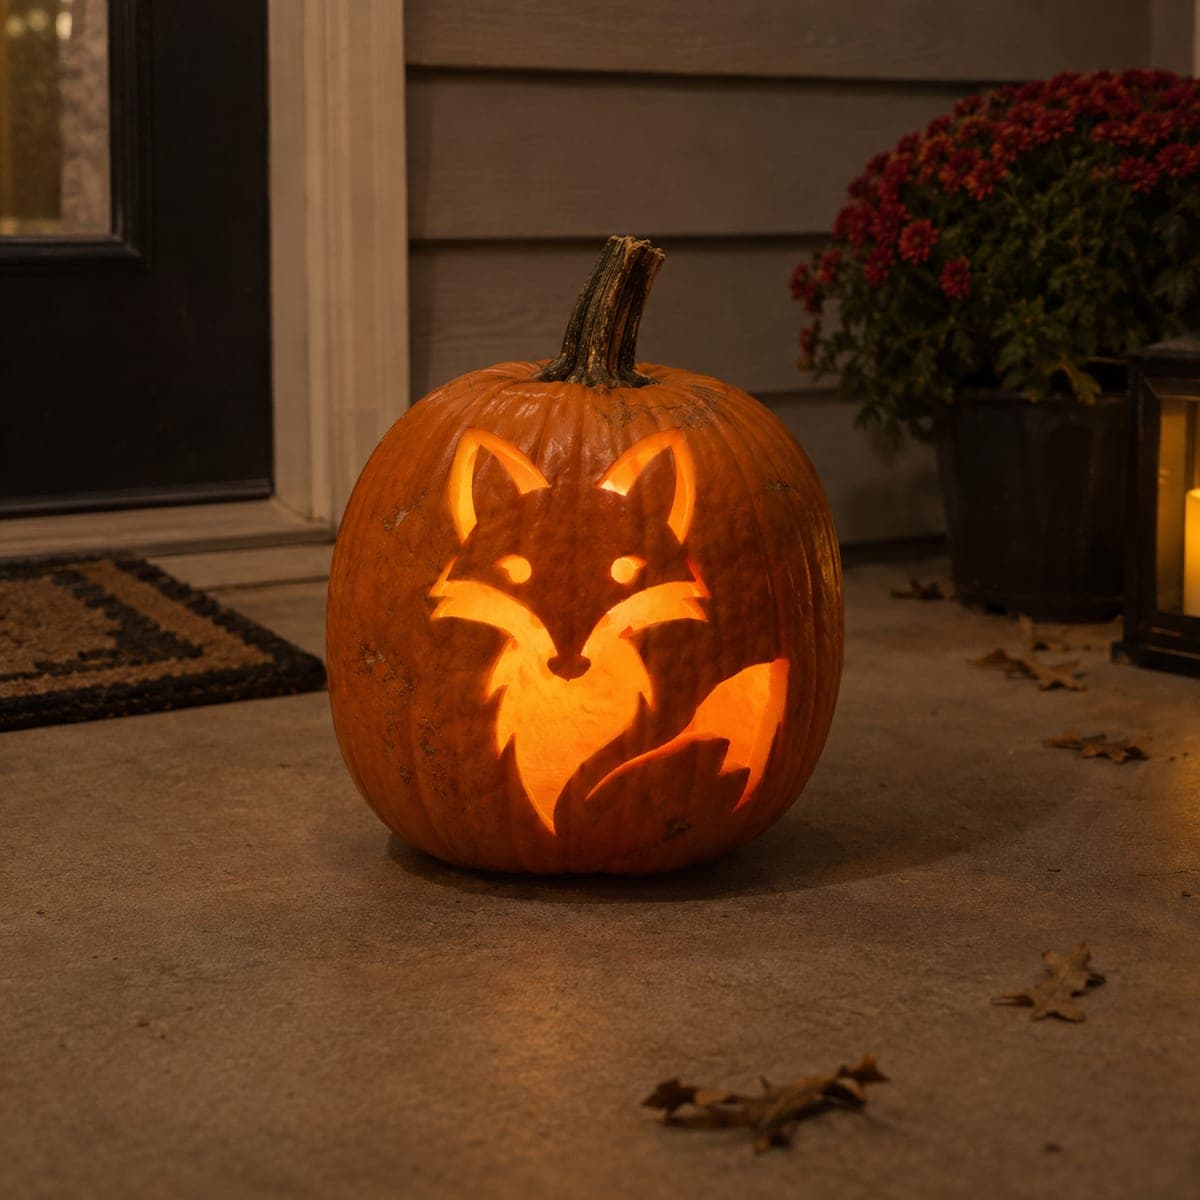
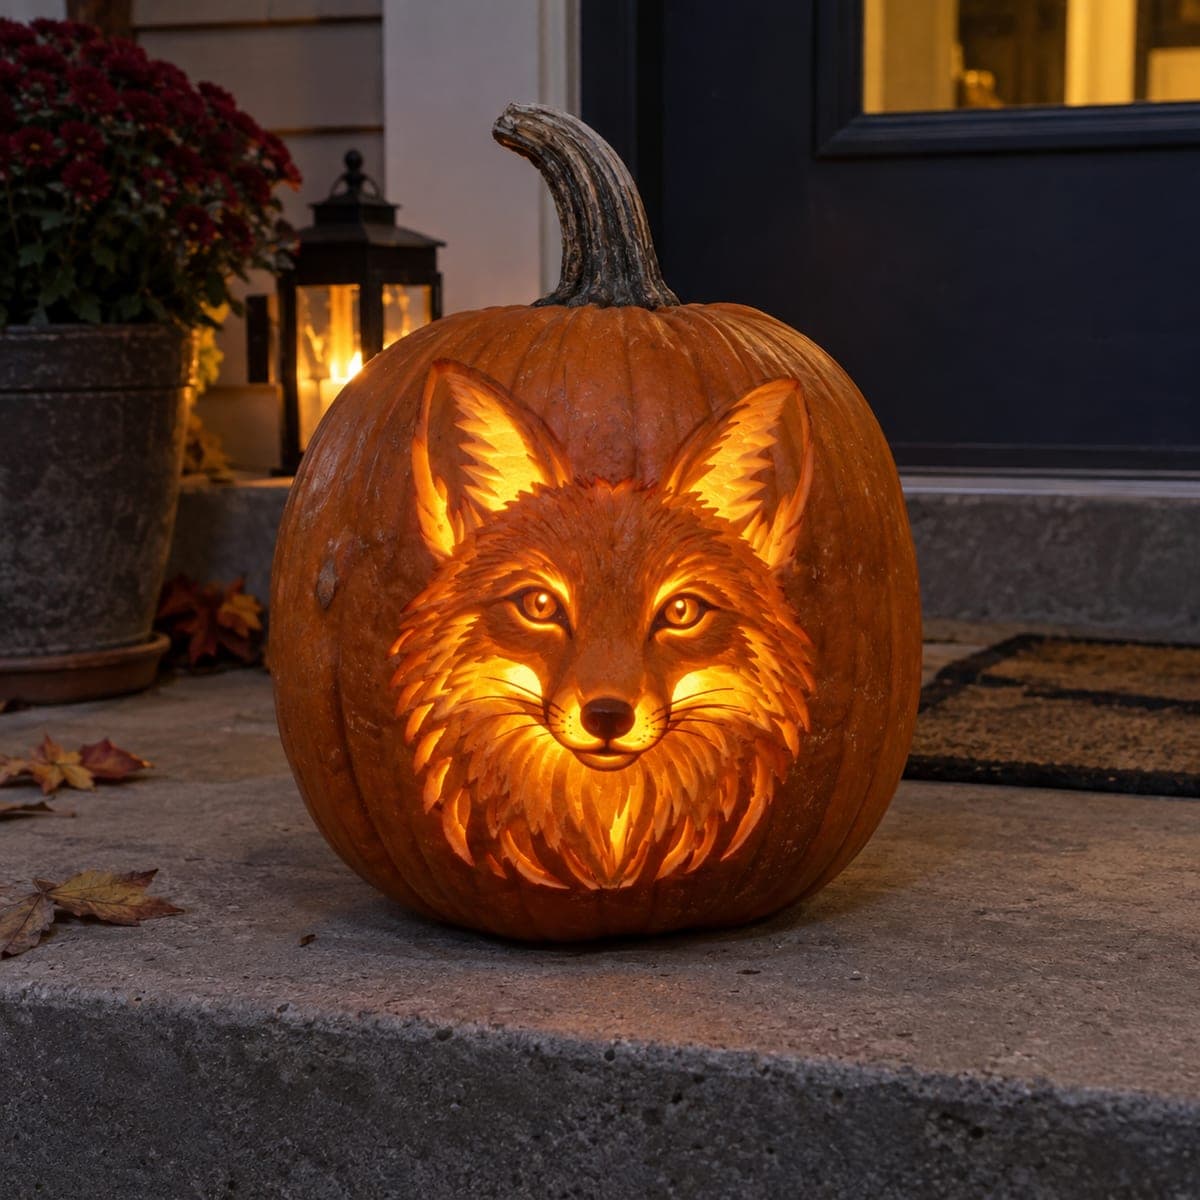
A stylized fox face glows from this pumpkin in clean geometric shapes, with pointed ears, angular cheek tufts, and a bushy tail curling below. The design mixes pierced cutouts for the brightest areas with etched sections that glow softer, giving the fox two tones of light. Cut the narrow inner shapes first with a fine saw, and leave the connecting bridges generous so the ears stay attached. A warm LED candle suits the fox's autumn personality on a front step.

This is an AI-generated concept image: a realistic, carvable design idea rather than a photo of a finished carve. AI concepts are always labeled and sit out the leaderboard and the contest.

No ratings yet · Sign in to rate
Comments (0)

  • No comments yet — be the first.

Save without an account. Sign in to like or comment.

Our tips for carving a similar design

The core trick here is a two-tone glow, where pierced cutouts throw the brightest light for the face and chest while etched, skin-peeled areas give the ears and tail a softer orange shine. Plan the fox as a set of clean angular shapes with generous bridges left between them so the pointed ears and cheek tufts stay firmly attached. Rough in your outline first, save the big openings for last, and let the negative space around the shapes do most of the work.

Written by PumpkinCarvingIdeas.com, inspired by the image above. These are our suggestions, not instructions from the uploader. This approach to the AI concept has not been tested on a real pumpkin.

From pumpkin to porch

  1. Pick your pumpkin and transfer the pattern

    Choose a tall, smooth-faced pumpkin with a flat display side so the geometric shapes read clearly. Tape your fox stencil in place and poke the outlines with a transfer tool or pin so you have a dotted map to follow. Keep the ear tips and cheek tufts marked precisely, since those angles give the fox its character. Step back and confirm the whole face sits centered before you cut anything.

  2. Open the back and clean the wall

    Cut an access hole in the back rather than the top so the front stays uninterrupted and the stem cap stays intact. Scoop the pulp and scrape the inside of the carving wall down to about one inch thick. A thinner wall lets both your cutouts and etched areas glow evenly. Have an adult handle this larger cut and any deep work.

  3. Cut the narrow inner shapes first

    With a fine detail saw, start with the smallest interior openings like the eyes and the slivers between the cheek tufts. Working small to large keeps the surrounding shell strong while you have the most material to brace against. Leave the connecting bridges between the ears and the head generous, at least a quarter inch, so nothing snaps free. Cut with slow, straight strokes and let the saw do the work.

  4. Etch the soft-glow sections

    For the ears and the bushy tail, peel away just the outer skin instead of cutting through. Use a lino or ribbon tool to shave off the top layer so the pale flesh shows but light passes through dimly. This gives you the softer second tone that contrasts with the bright pierced areas. Keep your peeled depth consistent so the glow stays even across each shape.

  5. Open the bright face and chest last

    Save the largest cutouts, the muzzle and the glowing chest area, for the end when the shell no longer needs to support smaller cuts nearby. Ease each piece out gently by pushing from the inside. Clean up any ragged edges with your detail saw held at a slight bevel so the openings catch more light. Test-fit the shapes as you go to keep the fox's features balanced.

  6. Light it and stage the photo

    Drop in a warm-toned LED candle or a small battery puck, never a real flame, so the two tones glow safely for hours. Set the pumpkin on a front step near some mums or fallen leaves to lean into the autumn mood. Shoot at dusk when the ambient light still shows the pumpkin's shape but the glow reads strong. A dab of petroleum jelly on cut edges slows drying if you carve a day ahead.

Gather your supplies

Check things off as you get ready.

Work on a stable surface, keep your free hand out of the cutting path, and have an adult handle sharp tools.

Three levels of light

  • Leave intact

    The untouched skin around the fox and the dark eye and nose accents stay solid orange in daylight and read as the fox's outline.

  • Peel & shade

    The pointed ears and the curling bushy tail are skin-peeled so they glow a soft, dim orange as the second tone.

  • Cut through

    The muzzle, cheek tufts, and the chest area are pierced all the way through for the brightest light.

Learn the carving basics

Before you start cutting

How do I keep the pointed ears from breaking off?

Leave generous bridges of uncut shell, at least a quarter inch, where the ears meet the head. Cut the small inner shapes first while the surrounding flesh is still strong, and avoid crowding your cuts too close together. If an ear feels fragile, widen the bridge rather than thinning it.

What makes the two-tone glow work?

The trick is mixing full cutouts with skin-peeled etching. Pierced areas throw the brightest light, while etched sections only remove the outer skin so light seeps through dimly. Keep your etched depth even and your light source warm so the contrast between the two tones stays clear.

Since this is a concept image, can a real pumpkin look like this?

Yes, the design is fully carvable if you keep the bridges realistic and cut the big openings last. Aim for a one-inch wall so both tones glow, and do not thin the ears past the point where they can hold their own weight. Treat the picture as inspiration and adjust the shapes to fit your actual pumpkin.

Your take belongs here, too.

Changed a detail? Made it simpler? Share a photo of your version and tell the community what worked.

Share your pumpkin

More pumpkins like this

You've reached the end · 8 pumpkins
The Patch Report

Fresh pumpkins, in your inbox.

The best new carvings, ideas worth stealing, and how-tos for carving season. Short, seasonal, and gone by November.

A short email during carving season. Unsubscribe anytime. See our privacy policy.