Halloween Pumpkin Carving Contest · Starts October 1st · $500 in prizes
← Back to ideas
@ai_concepts
Aug 4, 2026
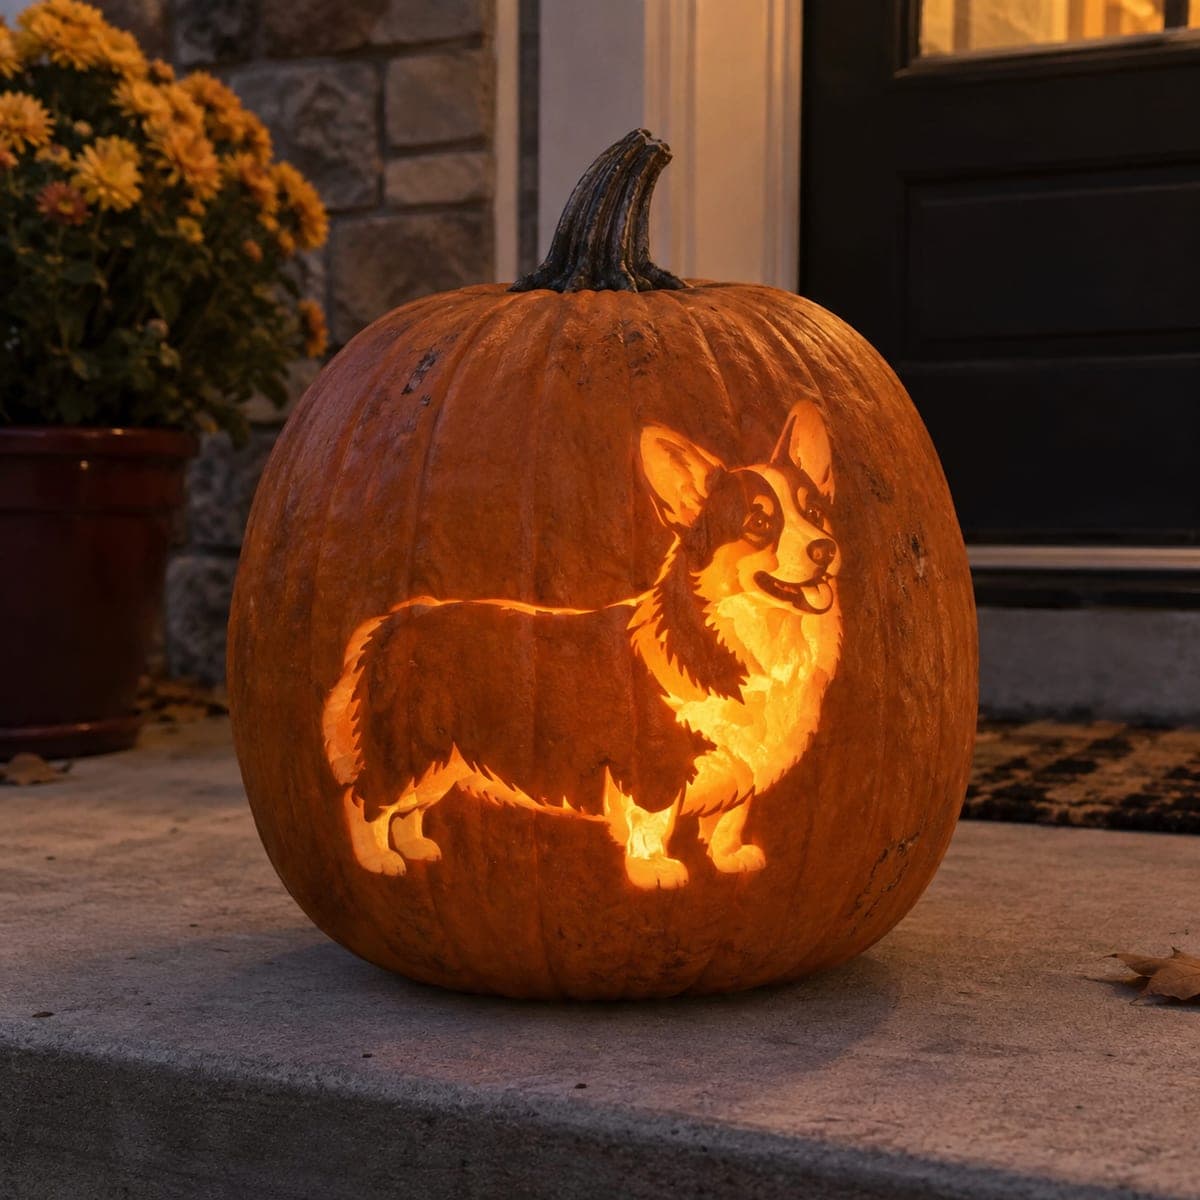
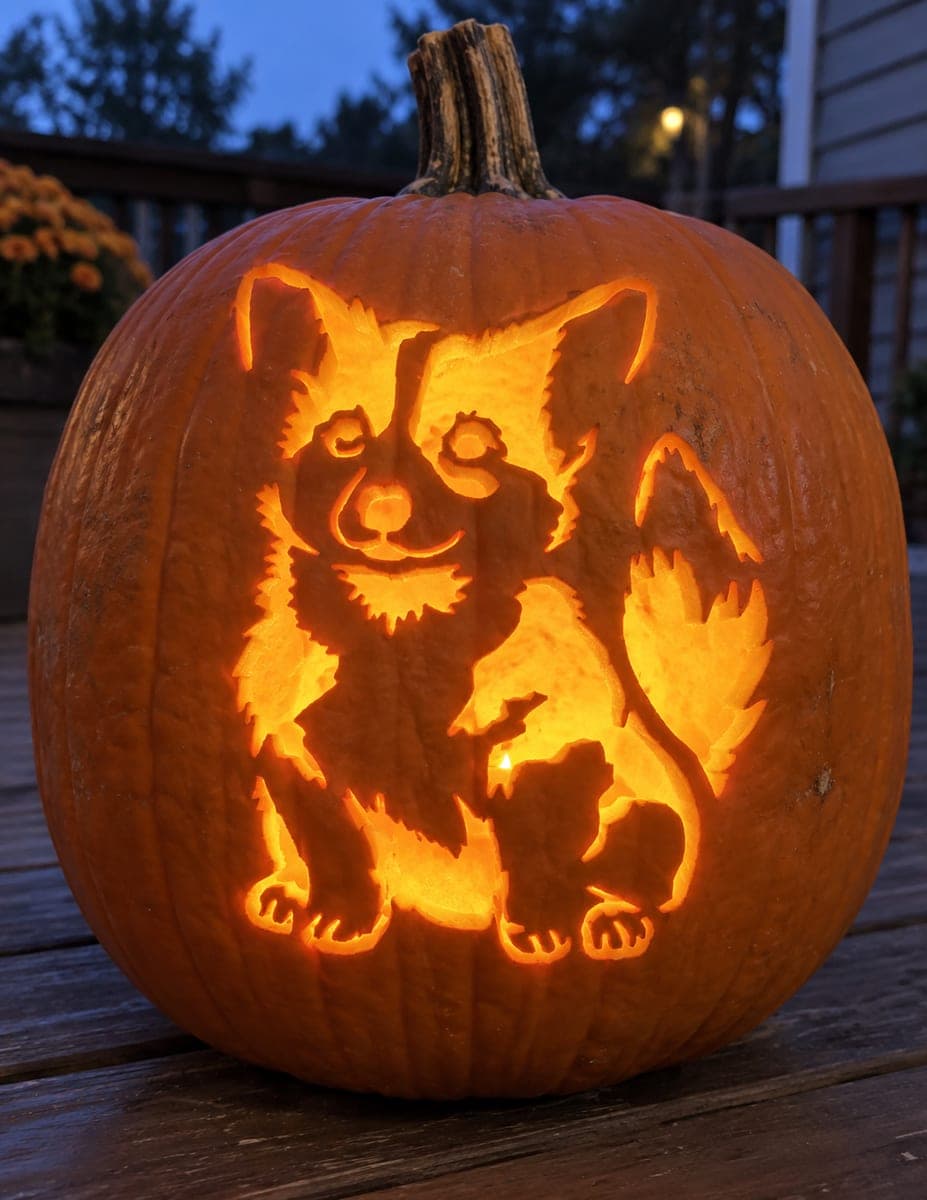
Glowing Corgi Jack-O-Lantern PortraitAI
0

Glowing Corgi Jack-O-Lantern Portrait

A full-body corgi lights up this jack-o-lantern, with layered etching that captures the fluffy chest, pointed ears, and happy grin in several shades of glow. The brightest areas are carved thinnest, so work in gradual layers and hold the pumpkin up to a lamp to check your progress. An LED puck light keeps the thin sections from cooking, and a corgi lover will spot this dog carving from across the street.

This is an AI-generated concept image: a realistic, carvable design idea rather than a photo of a finished carve. AI concepts are always labeled and sit out the leaderboard and the contest.

No ratings yet · Sign in to rate
Comments (0)

  • No comments yet — be the first.

Save without an account. Sign in to like or comment.

Our tips for carving a similar design

The core trick here is layered etching, where you shave the pumpkin skin to different depths so the corgi's fluffy chest, ears, and grin glow in several shades. The plan is to reserve untouched skin for the darkest outlines, peel wide areas for a soft mid glow, and cut all the way through only in the brightest spots like the belly and open mouth. Work slowly from shallow to deep and check often against a lamp, since you can always remove more but never put it back.

Written by PumpkinCarvingIdeas.com, inspired by the image above. These are our suggestions, not instructions from the uploader. This approach to the AI concept has not been tested on a real pumpkin.

From pumpkin to porch

  1. Prep the pumpkin and pick a flat face

    Choose a tall pumpkin with a broad, smooth front so the full-body corgi fits with room to spare. Cut a lid from the bottom or the back rather than the top, which keeps the stem intact and makes it easy to set the pumpkin over an LED light later. Scoop the inside until the front wall is about one inch thick, scraping evenly so light passes through cleanly. A thinner wall on the carving face makes etching much easier.

  2. Transfer the corgi stencil

    Tape your corgi pattern smoothly onto the front, clipping the paper edges so it hugs the curve. Use a poking tool or a pin to dot along every line, marking the outline, the ear tips, the chest fur, and the grin. Remove the paper and connect the dots lightly with a marker so you have a clear map. Take a moment to confirm the whole dog sits above the widest part of the pumpkin where the surface is flattest.

  3. Etch the mid-tone fur first

    Switch to a shallow ribbon or clay loop tool and skin off the top layer over the corgi's body, leaving the skin thin enough to glow dim orange. Keep the darkest lines, like the outline of the back, legs, and ear edges, as untouched skin so they read as shadow. Follow the direction of the fur with short strokes to suggest the fluffy chest and tail. Hold the pumpkin up to a lamp now and then to see the shading develop.

  4. Deepen the bright layers

    Go back over the brightest zones, the lower belly, the front of the chest, and the muzzle, and shave them thinner so they glow more strongly than the surrounding fur. Blend the edges of each depth change so the light fades gradually instead of jumping in hard steps. This gradual layering is what gives the portrait its rounded, dog-like form. Leave a few whisker-thin bridges of skin where fur tufts overlap so nothing weakens.

  5. Cut the few full openings last

    Only after the etching looks right should you cut all the way through for the very brightest accents, such as the open happy mouth and a small highlight in the eye. Keep these cutouts small and rounded, and leave a border of etched skin around them so the transition looks soft. Cutting these last protects the thin etched areas from tearing while you work. Support the pumpkin wall with your free hand as you push the blade through.

  6. Light it and photograph

    Set an LED puck light or a battery string inside and slide the pumpkin over it, keeping the bulb an inch or two from the thin front wall so the glow spreads evenly. Skip candles, since the heat can scorch and dry out the delicate etched sections. Rub a little petroleum jelly on freshly cut edges to slow browning, then place the pumpkin on the porch and take your photo at dusk when the glow reads best against the dark.

Gather your supplies

Check things off as you get ready.

Work on a stable surface, keep your free hand out of the cutting path, and have an adult handle sharp tools.

Three levels of light

  • Leave intact

    Untouched skin holds the darkest outlines: the back, leg edges, ear tips, and the dark saddle markings.

  • Peel & shade

    Peeled skin gives the mid glow across the body fur, the tail, and most of the chest.

  • Cut through

    Full cutouts stay small for the brightest points: the open grinning mouth and a tiny eye highlight.

Learn the carving basics

Before you start cutting

Since this is an AI concept, can a real pumpkin actually glow in this many shades?

Yes, layered etching on a real pumpkin genuinely produces several glow levels based on how thin you shave the skin. The image is a concept, so treat it as a target look rather than a photo of a finished carve. Keep your depth changes gradual and your wall an even thickness for the best real-world result.

How do I keep the fluffy fur edges from breaking off?

Etch the fur rather than cutting through it, so the tufts stay backed by skin and never become loose flaps. Where two fur sections meet, leave thin bridges of skin to hold everything together. Save any true cutouts for the mouth and eye, which are away from the delicate fur.

My shading looks flat. How do I fix it?

Flat shading usually means the depth changes are too similar, so exaggerate the contrast by shaving the bright belly and chest noticeably thinner than the darker back. Blend the borders between depths so light fades instead of stepping abruptly. Check progress against a lamp every few minutes, since your eye judges the glow far better than the raw surface.

Your take belongs here, too.

Changed a detail? Made it simpler? Share a photo of your version and tell the community what worked.

Share your pumpkin

More pumpkins like this

You've reached the end · 8 pumpkins
The Patch Report

Fresh pumpkins, in your inbox.

The best new carvings, ideas worth stealing, and how-tos for carving season. Short, seasonal, and gone by November.

A short email during carving season. Unsubscribe anytime. See our privacy policy.