Halloween Pumpkin Carving Contest · Starts October 1st · $500 in prizes
← Back to ideas
@ai_concepts
Sep 25, 2026
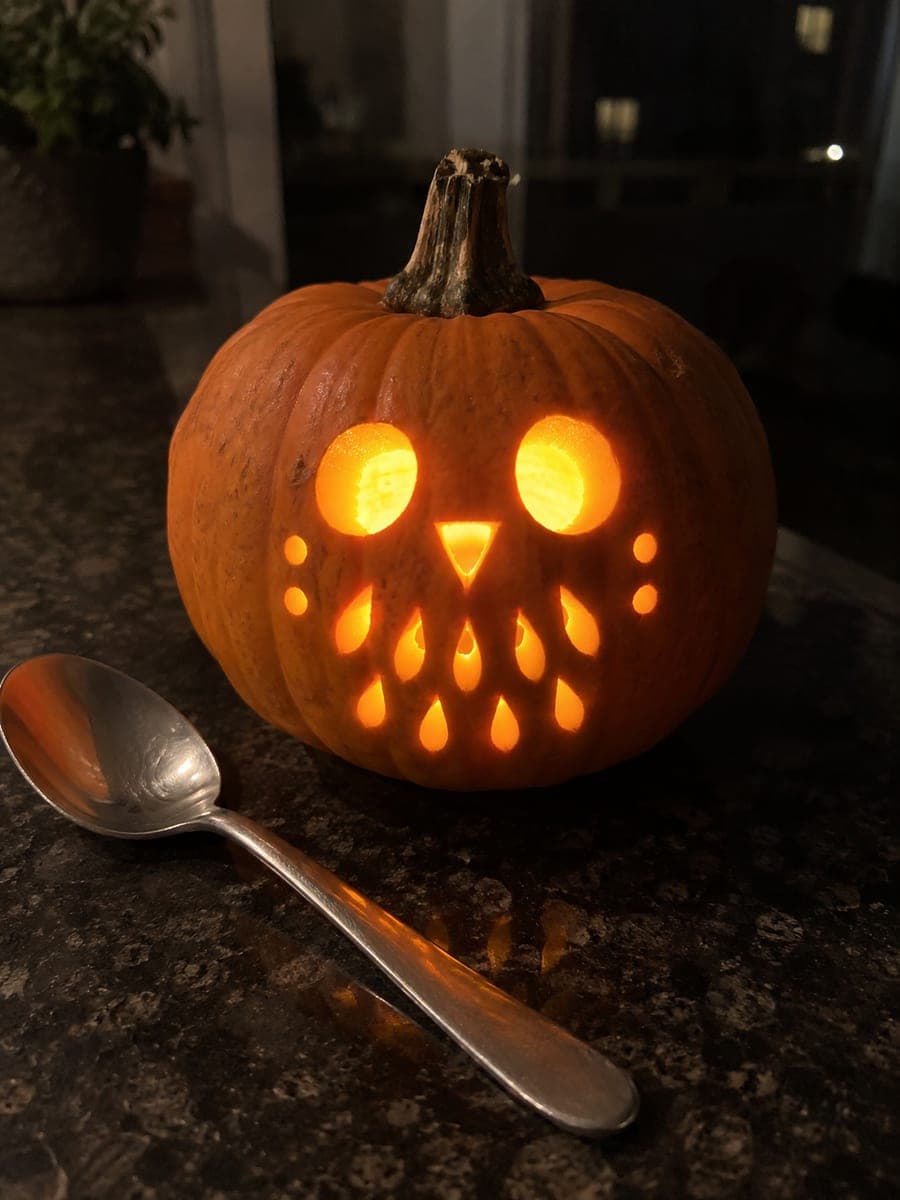
Glowing Owl Face Mini Pumpkin With Feather HolesAI
0

Report this carving

Tell us what is wrong. Reports are private.

Glowing Owl Face Mini Pumpkin With Feather Holes

Round owl eyes, a triangular beak, eight narrow teardrop feather holes, and four cheek dot holes pack an intricate owl portrait onto a 12-centimeter miniature pumpkin. Plan your layout on paper and transfer it with a toothpick-poke tracing; the difficulty is controlling a detail blade in a tiny working area while keeping 6 to 8mm of rind between every aperture. Cut the two large eyes first to establish the focal point, then add beak, feathers, and dots outward. This mini pumpkin carving idea is best lit with a battery LED to avoid heat cracking the tight rind bridges.

No ratings yet · Sign in to rate

Comments (0)

  • No comments yet — be the first.

Save without an account. Sign in to like or comment.

Our tips for carving a similar design

Round owl eyes, a triangular beak, eight narrow teardrop feather holes, and four cheek dot holes pack an intricate design into a 12-centimeter pumpkin. The difficulty is purely about blade control and tight clearances: 6 to 8 mm of rind separates every aperture, and the working area is small enough that a hand wobble can ruin a bridge. Establish the two large eyes first as anchor points, then work outward.

From pumpkin to porch

  1. Plan the layout on paper

    Sketch the owl face at exactly 12 cm wide on paper. Mark eye positions, beak, feather teardrops, and cheek dots to verify that all clearances are 6 to 8 mm or wider before touching the pumpkin. Transfer the finalized layout using the toothpick-poke method.

  2. Hollow carefully

    Cut an angled lid and scoop with a teaspoon, scraping the interior walls to about 1 cm. Thinner walls maximize brightness without compromising the rind bridges, but do not go below 1 cm. An adult handles all cutting steps.

  3. Cut the two round eyes

    Use a fine detail blade to cut the round eye apertures first. Make a scoring pass around each circle, then follow it with a through-cut in a single clean rotation. These are the largest openings and anchor every other feature's position.

  4. Cut the triangular beak

    The beak sits between and below the two eyes. Cut its three sides cleanly and push the plug inward. Keep the beak small relative to the eyes so the face reads correctly as an owl rather than a generic bird.

  5. Cut feather holes and cheek dots

    Work through the eight teardrop feather holes in order from top to bottom on each side, using slow strokes and confirming each hole is fully punched through before moving on. Drill or punch the four cheek dots with a fine hole-saw bit or a pointed skewer tip followed by careful blade widening.

  6. Light with a battery LED and display

    Place a cool battery LED inside. Heat would crack the thin bridges between apertures within hours. Display beside a teaspoon or coin to emphasize the tiny scale, which adds to the charm of the finished lantern.

Written with AI to match this design

Gather your supplies

Check things off as you get ready.

Work on a stable surface, keep your free hand out of the cutting path, and have an adult handle sharp tools.

Three levels of light

  • Leave intact

    All rind bridges between apertures and the outer edges of the pumpkin stay solid and dark.

  • Peel & shade

    None; every light effect comes from the cut-through apertures.

  • Cut through

    Both round eye holes, the triangular beak, all eight teardrop feather holes, and all four cheek dot holes are cut fully through.

Learn the carving basics

Before you start cutting

Is 6 mm of rind really enough to hold the design together?

On a dense, fresh mini pumpkin it is sufficient if you use a fine blade and avoid sawing back and forth. The key is cutting in one clean pass so you do not widen the aperture and eat into the bridge. If any bridge feels narrower than 5 mm, slightly shrink the adjacent aperture outline.

What is the best order for cutting the feather teardrops?

Start at the top of each side column and work downward, completing one side fully before starting the other. This distributes stress evenly rather than concentrating it all in one area while the other side is still solid.

How do I punch the tiny cheek dot holes without cracking the surrounding rind?

Use a pointed wooden skewer to pierce the center of each dot, then enlarge the hole carefully with the tip of a detail knife in a rotating motion. A tiny hole-saw bit on a hand drill also works well for perfectly round dots.

Your take belongs here, too.

Changed a detail? Made it simpler? Share a photo of your version and tell the community what worked.

Share your pumpkin

More pumpkins like this

You've reached the end · 8 pumpkins
The Patch Report

Fresh pumpkins, in your inbox.

The best new carvings, ideas worth stealing, and how-tos for carving season. Short, seasonal, and gone by November.

A short email during carving season. Unsubscribe anytime. See our privacy policy.