Halloween Pumpkin Carving Contest · Starts October 1st · $500 in prizes
← Back to ideas
@ai_concepts
Aug 8, 2026
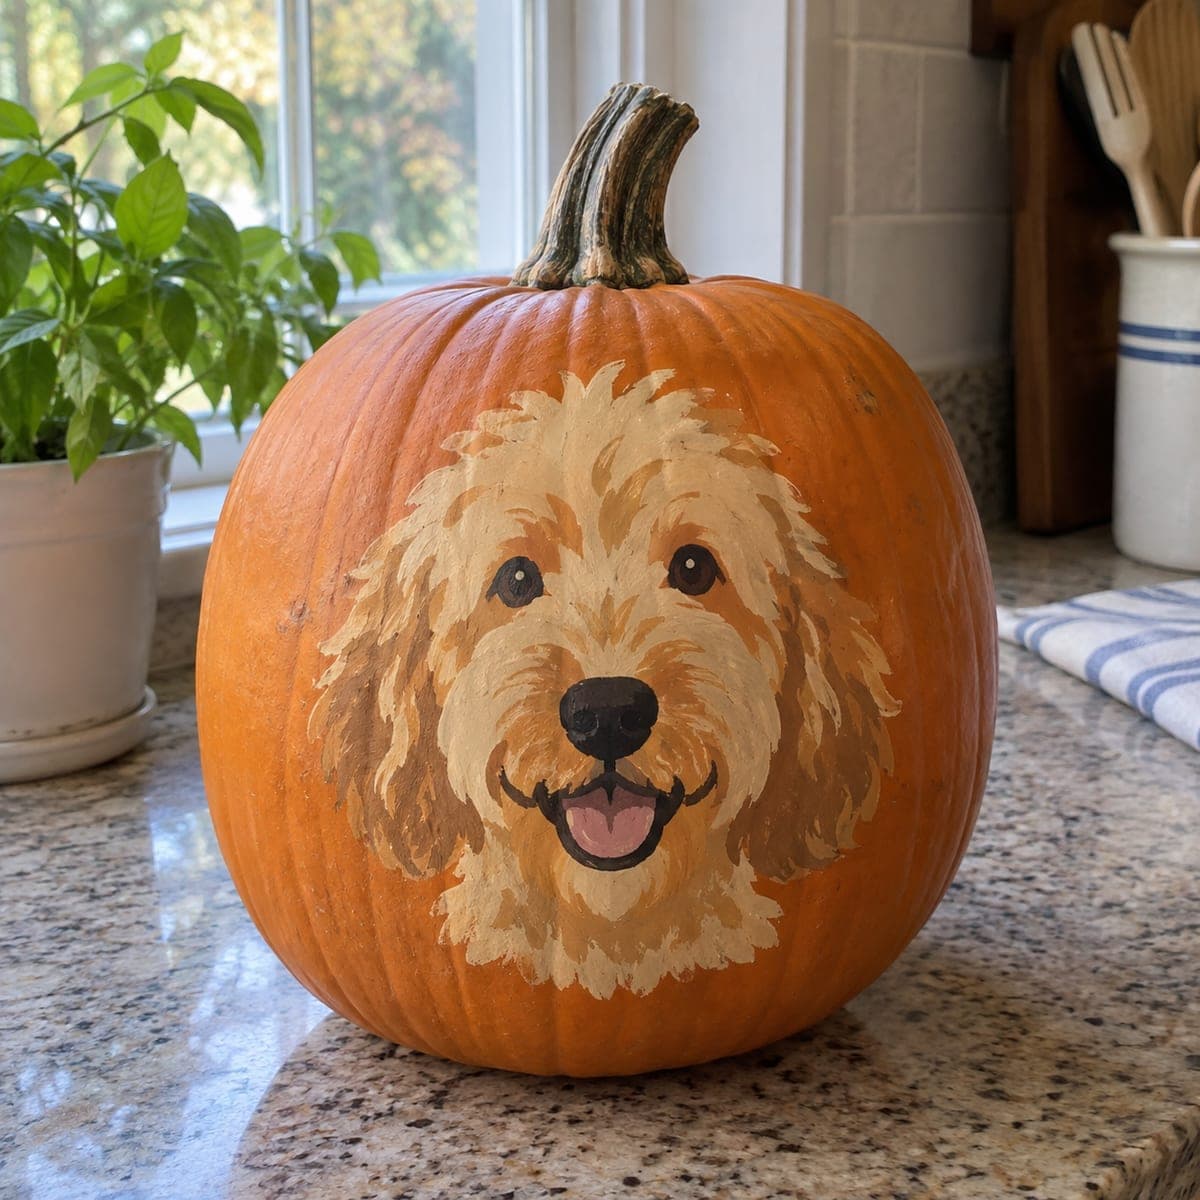
Golden Doodle Face Painted No-Carve PumpkinAI
0

Golden Doodle Face Painted No-Carve Pumpkin

A smiling goldendoodle face with fluffy cream fur, a dark nose, and a lolling pink tongue is painted onto a large pumpkin with acrylic paints in warm golden tones. This no-carve dog pumpkin idea achieves lifelike fur texture by using short, directional brushstrokes layered from the base color outward. Mix raw sienna and white to match the signature goldendoodle coat, and add a touch of burnt umber for shadow areas under the ears. The result is a cheerful, personalized fall decoration that any dog owner will love.

This is an AI-generated concept image: a realistic, carvable design idea rather than a photo of a finished carve. AI concepts are always labeled and sit out the leaderboard and the contest.

No ratings yet · Sign in to rate
Comments (0)

  • No comments yet — be the first.

Save without an account. Sign in to like or comment.

Our tips for carving a similar design

The whole trick here is building fluffy fur out of short, directional brushstrokes layered from a base tone outward, so no cutting is needed at all. You start with a simple painted outline, block in the coat colors, then stack lighter strokes on top to fake soft, dimensional fur. Because this is a no-carve concept, the pumpkin stays whole and lasts longer on the counter.

Written by PumpkinCarvingIdeas.com, inspired by the image above. These are our suggestions, not instructions from the uploader. This approach to the AI concept has not been tested on a real pumpkin.

From pumpkin to porch

  1. Prep and sketch the face

    Wipe the pumpkin clean and dry so paint grips well. Pick the flattest, smoothest panel on the front for the face. Lightly sketch the doodle head with a pencil or washable marker, marking the eyes, nose, mouth, and the outer edge of the fluffy fur. Keep the shape centered and a bit lower than middle so the tall forehead fur has room.

  2. Block in the base coat

    Mix raw sienna with white to hit that signature cream goldendoodle tone. Paint the entire head shape as a solid mid value base, staying inside your sketch. Let this fully dry before moving on so later strokes do not smear. A little burnt umber added along the bottom and under the ear areas sets up your shadows early.

  3. Build the fur in layers

    Load a flat or filbert brush lightly and pull short strokes that follow the direction hair grows, outward and downward from the center of the face. Start with your darker shadow mix, then switch to lighter cream and pure white for the top highlights. Let each pass dry a bit so the strokes stay crisp instead of blending into mud. The goal is many small overlapping flicks, not smooth coverage.

  4. Paint the features

    Add the dark nose with black or very dark brown, leaving a tiny unpainted or white dot for a shine highlight. Paint the two eyes dark and round, again with a small white catchlight in each to bring them to life. Outline the open smiling mouth in dark brown and fill the lolling tongue in soft pink with a lighter pink center. Keep these edges clean so the face reads clearly from across the room.

  5. Refine and seal

    Step back, check that the fur frames the face evenly, and add final white flyaway strokes around the outer edge for softness. Touch up any spots where the orange shows through unintentionally. Once everything is bone dry, brush on a thin coat of clear acrylic sealer to protect the paint. This keeps the design from smudging when it gets handled or moved.

  6. Stage the photo

    Set the finished pumpkin on a clean counter or porch step where the face catches soft daylight. Because nothing is cut, you can skip lights entirely, or tuck a small LED puck nearby for a warm evening glow. Angle the stem so it reads like a jaunty little topknot. Snap your photo straight on so the smile is the star.

Gather your supplies

Check things off as you get ready.

Work on a stable surface, keep your free hand out of the cutting path, and have an adult handle sharp tools.

Three levels of light

  • Leave intact

    The bare orange pumpkin skin around the head stays untouched as the background.

  • Peel & shade

    The mid cream base coat and shadow strokes act as the softer, dimmer value of the coat.

  • Cut through

    The brightest white highlight flicks, eye catchlights, and nose shine read as the punchiest points, standing in for full light since nothing is actually carved.

Learn the carving basics

Before you start cutting

Do I really not cut this pumpkin at all?

Correct, this is a fully painted no-carve design, so the pumpkin stays whole. That means no scooping and no candle, and it will last longer on the counter. If you want a little glow, set an LED light beside it rather than inside.

How do I get the fur to look fluffy instead of flat?

Use short, directional strokes and build them in layers from dark to light. Let each layer dry slightly so the individual hairs stay visible instead of blending together. Adding white flyaway strokes around the outer edge at the end sells the soft, wispy look.

What if my dog is a different color?

Just swap the base mix to match your own pet. Blend browns and black for a darker doodle, or grays and white for a lighter one, and keep the same layering method. Matching the nose and eye colors to your dog makes it feel personalized.

Your take belongs here, too.

Changed a detail? Made it simpler? Share a photo of your version and tell the community what worked.

Share your pumpkin

More pumpkins like this

You've reached the end · 8 pumpkins
The Patch Report

Fresh pumpkins, in your inbox.

The best new carvings, ideas worth stealing, and how-tos for carving season. Short, seasonal, and gone by November.

A short email during carving season. Unsubscribe anytime. See our privacy policy.