Halloween Pumpkin Carving Contest · Starts October 1st · $500 in prizes
← Back to ideas
@ai_concepts
Sep 13, 2026
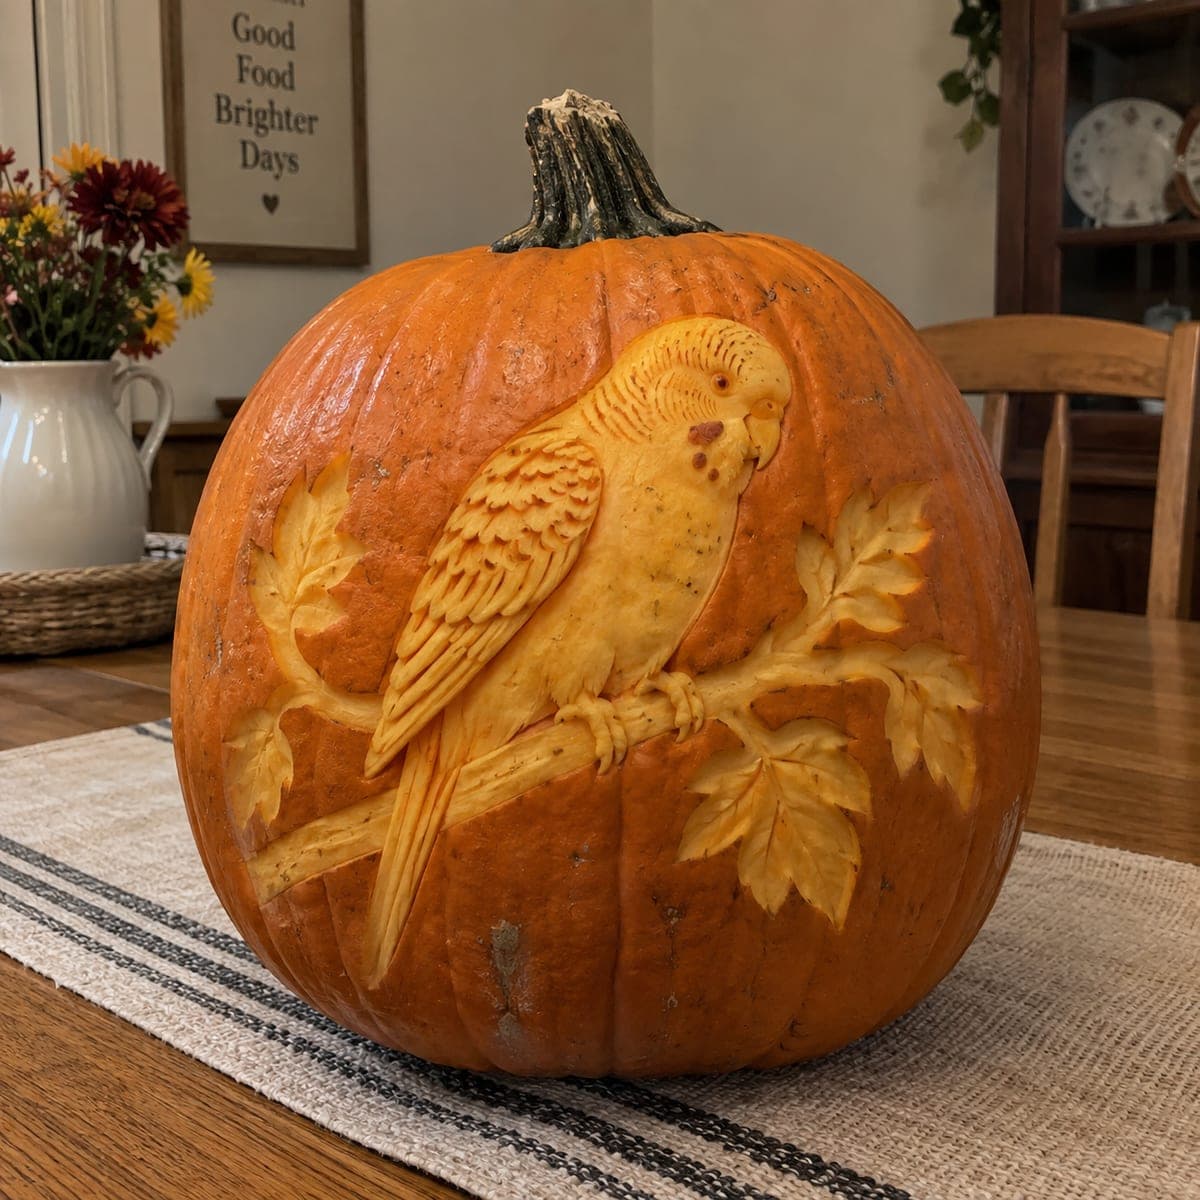
Green Budgie on a Branch Painted PumpkinAI
0

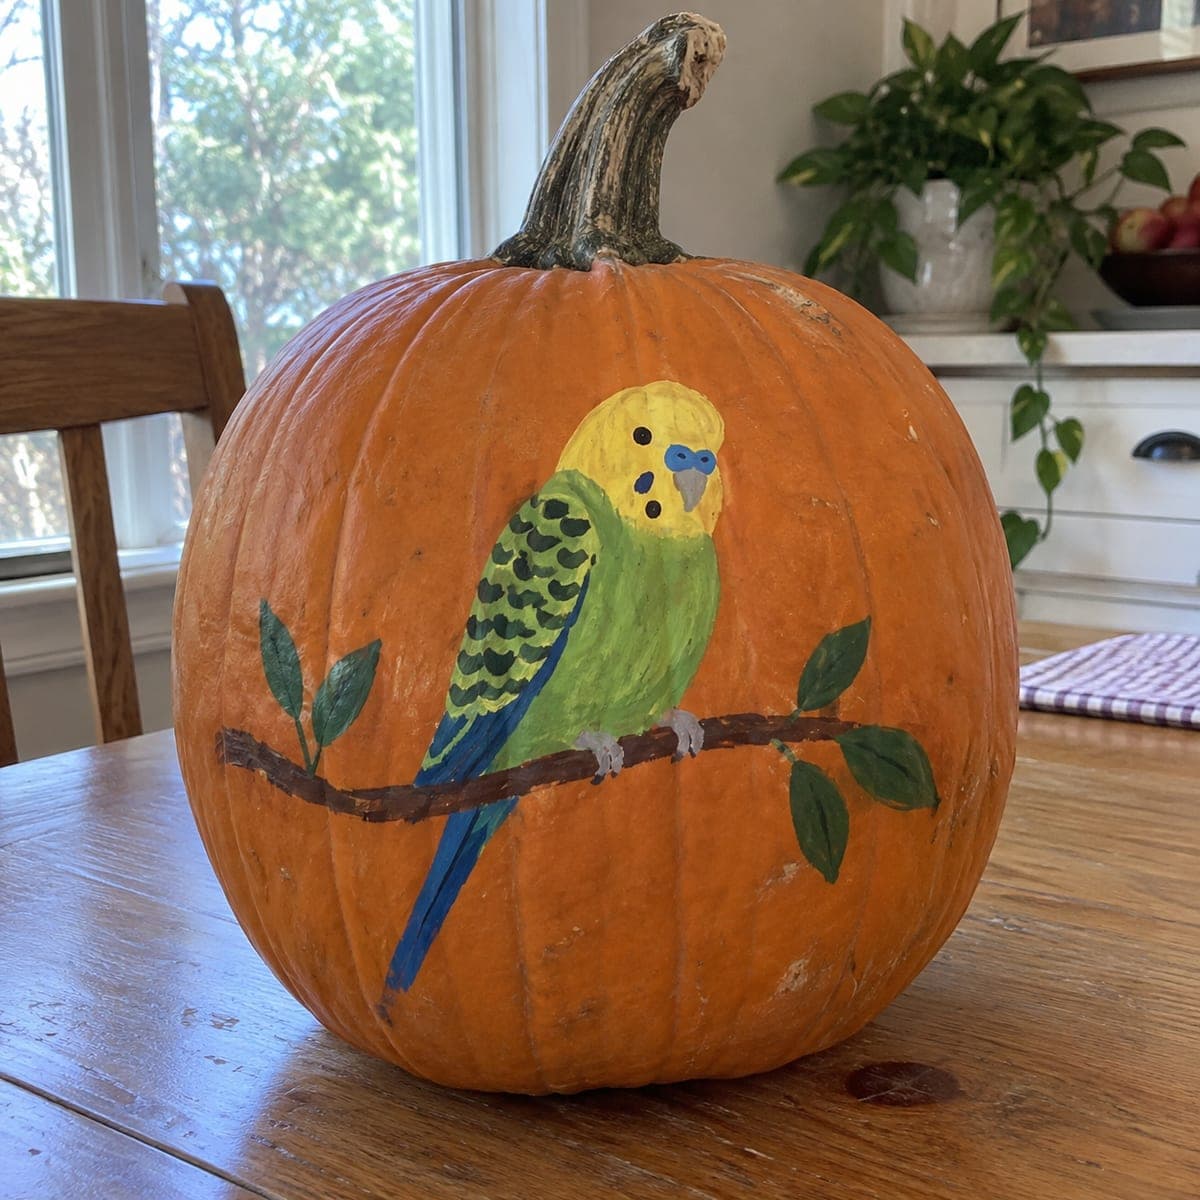
Green Budgie on a Branch Painted Pumpkin

A green and yellow budgie perches on a painted leafy branch that wraps around this pumpkin, its scalloped wing feathers dotted in careful dark strokes. Bird lovers get a portrait pumpkin that doubles as year-round-cheerful fall decor, no carving tools required. Paint the branch across the pumpkin first so the bird has something to stand on, block in the body colors, then add the wing scallops and cheek spots with a fine brush.

This is an AI-generated concept image: a realistic, carvable design idea rather than a photo of a finished carve. AI concepts are always labeled and sit out the leaderboard and the contest.

No ratings yet · Sign in to rate
Comments (0)

  • No comments yet — be the first.

Save without an account. Sign in to like or comment.

Our tips for carving a similar design

The core trick here is layering: paint the branch and background first so the budgie has something to stand on, then build the body from broad color blocks to fine detail. Because this is a painted, no-carve design, you keep the whole pumpkin intact and let acrylics do the work. Save the tiny wing scallops and cheek spots for last with a liner brush so nothing smears.

Written by PumpkinCarvingIdeas.com, inspired by the image above. These are our suggestions, not instructions from the uploader. This approach to the AI concept has not been tested on a real pumpkin.

From pumpkin to porch

  1. Clean and sketch

    Wipe the pumpkin down with a damp cloth and let it dry fully so paint grips the skin. Lightly pencil in the branch line wrapping across the belly of the pumpkin, then rough in the budgie's oval body and round head where they will sit. Keep marks faint since you will paint over them. Step back and check the bird reads well from a few feet away.

  2. Paint the branch and leaves

    Load a medium brush with brown and lay the branch across the pumpkin in one confident sweep, following the natural ribs. While that dries, mix two greens and add pointed leaves at each end of the branch for balance. Let this base layer dry completely before the bird goes on top so colors stay clean. A hair dryer on low speeds this up.

  3. Block in the budgie body

    Fill the head and upper chest with yellow, then blend into bright green down the back and belly. Add the long blue tail feathers sweeping down toward the bottom of the pumpkin. Keep these as flat shapes for now with no detail. Two thin coats look smoother than one thick one, so let the first dry and repeat.

  4. Add wing scallows and markings

    Switch to a fine liner brush and dark paint to dot the rows of scalloped feathers along the wing, working in gentle curved rows. Add the small round cheek spots below the eye and the black eye itself. Paint the blue cere above the beak and a soft gray beak. Rest your painting hand on a folded towel to steady it for these tiny strokes.

  5. Feet, highlights, and touch-ups

    Paint the little gray feet gripping the branch so the bird looks anchored. Add a few pale highlights on the chest and a lighter streak on the branch for dimension. Fix any wobbly edges with a small brush and the background orange if you have leftover skin tone. Check everything from across the room again.

  6. Seal and stage

    Once fully dry, brush on a thin coat of matte clear acrylic sealer to protect the paint from smudges and light moisture. Set the pumpkin on a table or shelf where the bird faces the room. For evening ambience, tuck a battery LED puck nearby rather than inside, since this design is not cut open. Snap your photo in soft daylight to catch the greens.

Gather your supplies

Check things off as you get ready.

Work on a stable surface, keep your free hand out of the cutting path, and have an adult handle sharp tools.

Three levels of light

  • Leave intact

    The orange pumpkin skin stays bare as the background, and the painted budgie and branch sit right on top of it.

  • Peel & shade

    If you want a subtle glow, you could lightly peel a thin halo of skin around the bird before painting so it reads brighter, but the design works fully painted.

  • Cut through

    No full cutouts are needed for this design; keep the pumpkin whole so the painted scene stays crisp and the shell lasts longer.

Learn the carving basics

Before you start cutting

Do I need to carve anything for this budgie design?

No, this is a fully painted, no-carve idea, so the pumpkin stays whole. That makes it last much longer than a cut pumpkin and lets you keep it out as cheerful decor. If you want a little evening glow, set a battery LED puck beside it rather than cutting into the shell.

How do I keep the tiny wing scallops from looking messy?

Let the green body coat dry completely first, then use a fine liner brush with just a little dark paint. Work in gentle curved rows and rest your hand on a folded towel for steadiness. If a dot goes wrong, wait for it to dry and dab background green over it before trying again.

Which colors should I paint first?

Work back to front: the brown branch and green leaves go down first since the bird perches on top of them. Then block in the yellow head and green body, and save the blue tail, dark markings, cheek spots, and gray feet for last. Letting each layer dry before the next keeps the colors from muddying together.

Your take belongs here, too.

Changed a detail? Made it simpler? Share a photo of your version and tell the community what worked.

Share your pumpkin

More pumpkins like this

You've reached the end · 8 pumpkins
The Patch Report

Fresh pumpkins, in your inbox.

The best new carvings, ideas worth stealing, and how-tos for carving season. Short, seasonal, and gone by November.

A short email during carving season. Unsubscribe anytime. See our privacy policy.