Halloween Pumpkin Carving Contest · Starts October 1st · $500 in prizes
← Back to ideas
@ai_concepts
Sep 14, 2026
I Love Montana Heart Lettering PumpkinAI
0

I Love Montana Heart Lettering Pumpkin

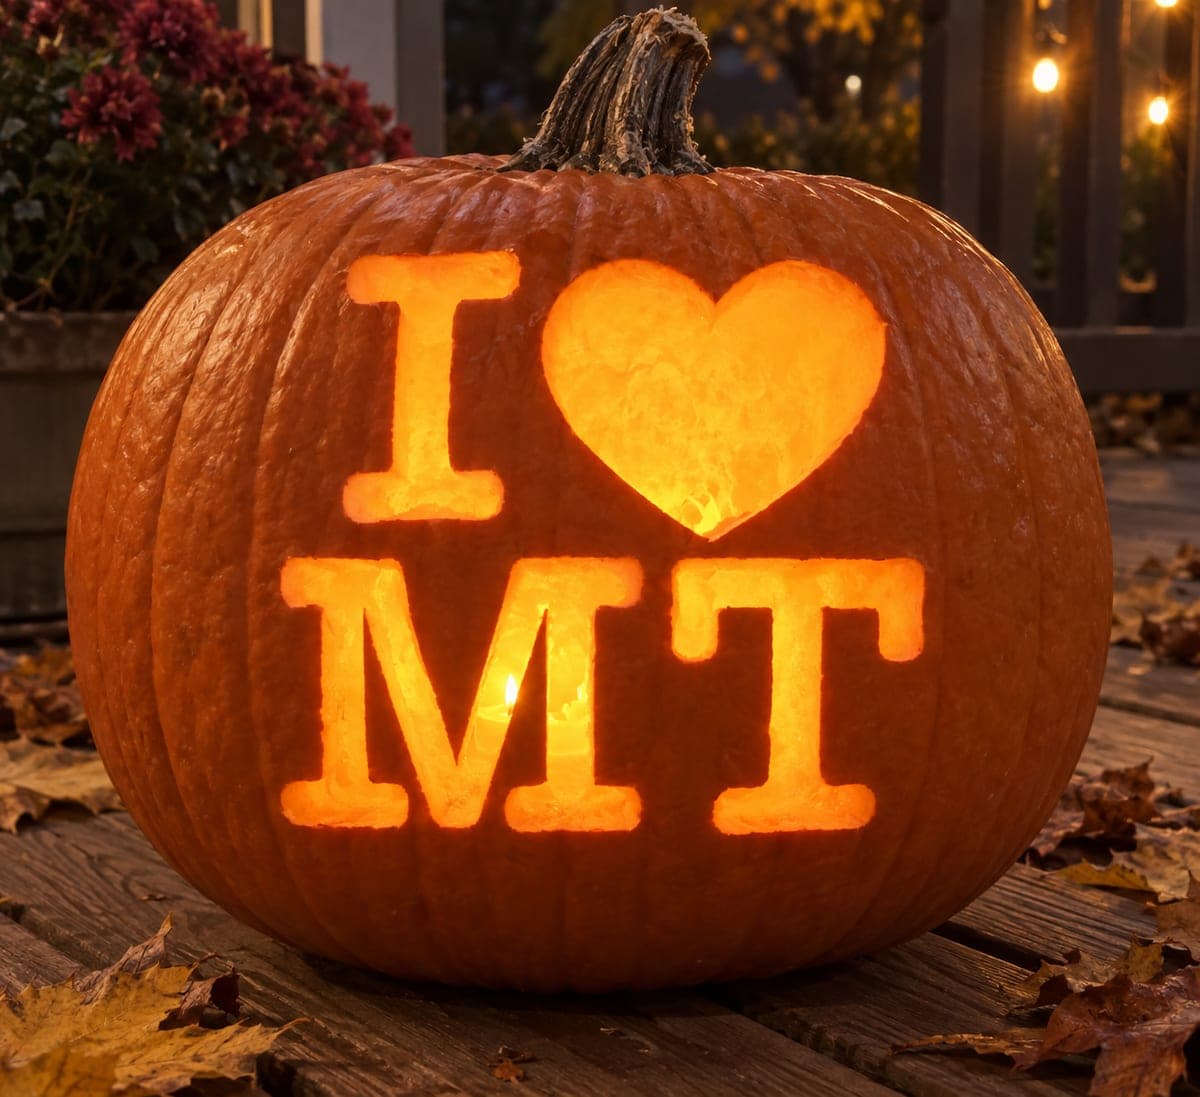
Lit from within against a backdrop of string lights and autumn foliage, this Montana pumpkin carving idea displays I, a heart, and MT in large slab-serif block letters pierced through the rind. The T is one of the simplest shapes in state-abbreviation carving because it has no enclosed counters; cut the wide crossbar first and then drop straight down for the stem. Keeping the overall design well centered and leaving at least three-quarters of an inch of rind on each outer edge prevents the face from cracking when the pumpkin dries. String lights in the background boost the warm, festive atmosphere without washing out the carved glow.

This is an AI-generated concept image: a realistic, carvable design idea rather than a photo of a finished carve. AI concepts are always labeled and sit out the leaderboard and the contest.


No ratings yet · Sign in to rate

Comments (0)

  • No comments yet — be the first.

Save without an account. Sign in to like or comment.

Our tips for carving a similar design

The core trick here is treating each letter as its own full cutout while keeping generous rind between them so the face stays strong. You lay out I, a heart, and MT in wide slab-serif shapes, then pierce each one clean through so the light pours out. Because the letters carry the whole design, careful spacing and centering matter more than any fancy shading.

Written by PumpkinCarvingIdeas.com, inspired by the image above. These are our suggestions, not instructions from the uploader. This approach to the AI concept has not been tested on a real pumpkin.

From pumpkin to porch

  1. Transfer a centered layout

    Print or draw the I, heart, and MT letters at a size that leaves at least three-quarters of an inch of rind on every outer edge. Tape the pattern flat on the front of the pumpkin and poke holes along every outline with a pin or a poker tool. Step back and check that the whole design sits centered before you commit to any cuts. Even spacing between the letters is what sells the clean look.

  2. Open a back lid and hollow it out

    Have an adult cut an access hole in the back or bottom rather than the top, so the stem and front stay intact. Scoop out the seeds and scrape the inside wall behind the letters down to about one inch thick. A thinner wall makes the letters easier to cut and lets more light through. Save the pulp for seed roasting if you like.

  3. Cut the simplest letters first

    Start with the T, since it has no enclosed centers to worry about. Cut the wide crossbar first, then drop straight down for the stem. Move to the I next, keeping its serif caps square and even. Working easy to hard warms up your hand before the trickier shapes.

  4. Carve the M and the heart

    The M has several angled strokes, so make short, controlled cuts and rejoin them at each corner instead of forcing one long stroke. Keep the two peaks the same height so the letter reads evenly. Then cut the heart with smooth curves, meeting cleanly at the bottom point and dipping the top notch symmetrically. Save the heart for last since it is the visual centerpiece.

  5. Clean the edges and test the glow

    Run your blade back around each opening to bevel the inside edge slightly, which widens the light path and brightens the letters. Wipe away crumbs and check that no thin bits of rind are hanging inside any letter. Drop in a battery LED light, never a candle, and look at the face in a dark room. Trim any spots that look dim or uneven.

  6. Stage and photograph it

    Set the pumpkin on a porch or deck with the back lid facing away from view. Add a strand of warm string lights behind it and a few autumn leaves around the base for that cozy fall mood. Shoot at dusk so the carved glow reads bright against the darker background. A phone on a steady surface beats handheld for a crisp night photo.

Gather your supplies

Check things off as you get ready.

Work on a stable surface, keep your free hand out of the cutting path, and have an adult handle sharp tools.

Three levels of light

  • Leave intact

    The broad orange face and rind around and between the letters stays untouched and dark.

  • Peel & shade

    Optional thin serif accents or a shallow-scraped border can be skin-peeled for a soft mid glow.

  • Cut through

    The I, the heart, and the M and T are cut fully through for the brightest light.

Learn the carving basics

Before you start cutting

How do I keep the letters from making the face weak?

Leave at least three-quarters of an inch of solid rind on each outer edge and keep clear gaps between letters. Those uncut bridges of rind are what hold the whole face together as the pumpkin dries. Avoid crowding the letters near the edges where the wall curves and thins.

Which letter should I cut first?

Start with the T because it has no enclosed centers to hold in place, just a crossbar and a stem. Cut the wide crossbar, then drop straight down for the stem. Warming up on the simplest shape builds confidence before you tackle the angled M and the curved heart.

Can I swap MT for my own state abbreviation?

Absolutely, the layout works for any two-letter state code. Just keep the letters the same height and weight so the row stays balanced, and watch out for letters with enclosed centers like A, B, D, O, P, Q, and R that need small bridges left in. Recenter the whole design once you change the letters.

Your take belongs here, too.

Changed a detail? Made it simpler? Share a photo of your version and tell the community what worked.

Share your pumpkin

More pumpkins like this

You've reached the end · 8 pumpkins
The Patch Report

Fresh pumpkins, in your inbox.

The best new carvings, ideas worth stealing, and how-tos for carving season. Short, seasonal, and gone by November.

A short email during carving season. Unsubscribe anytime. See our privacy policy.