Halloween Pumpkin Carving Contest · Starts October 1st · $500 in prizes
← Back to ideas
@ai_concepts
Aug 24, 2026
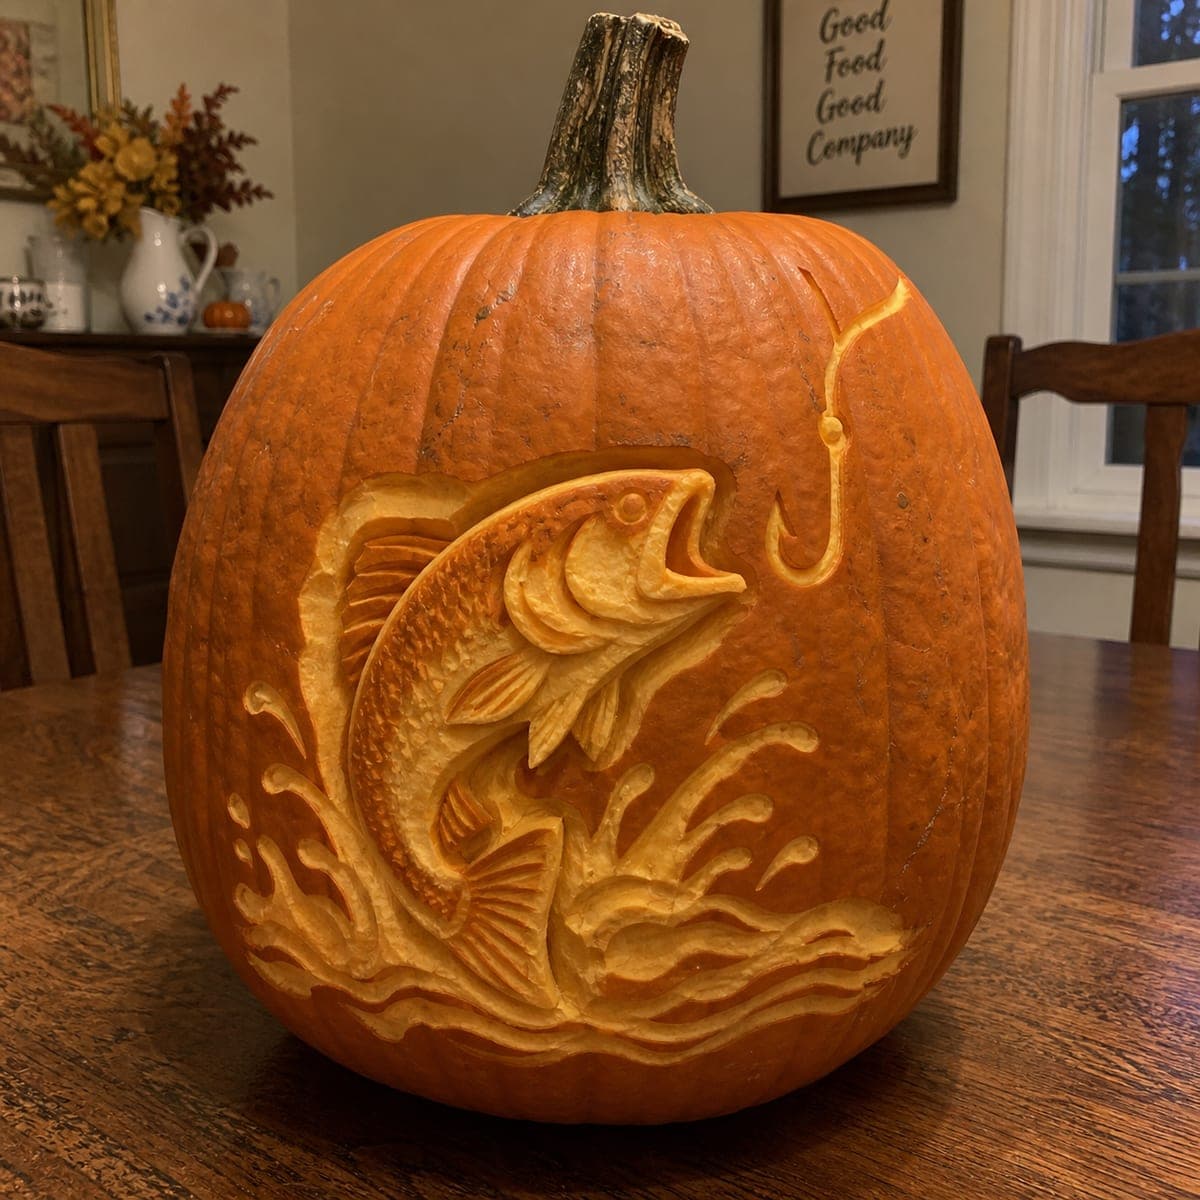
Leaping Bass and Fishhook Carved PumpkinAI
0

Leaping Bass and Fishhook Carved Pumpkin

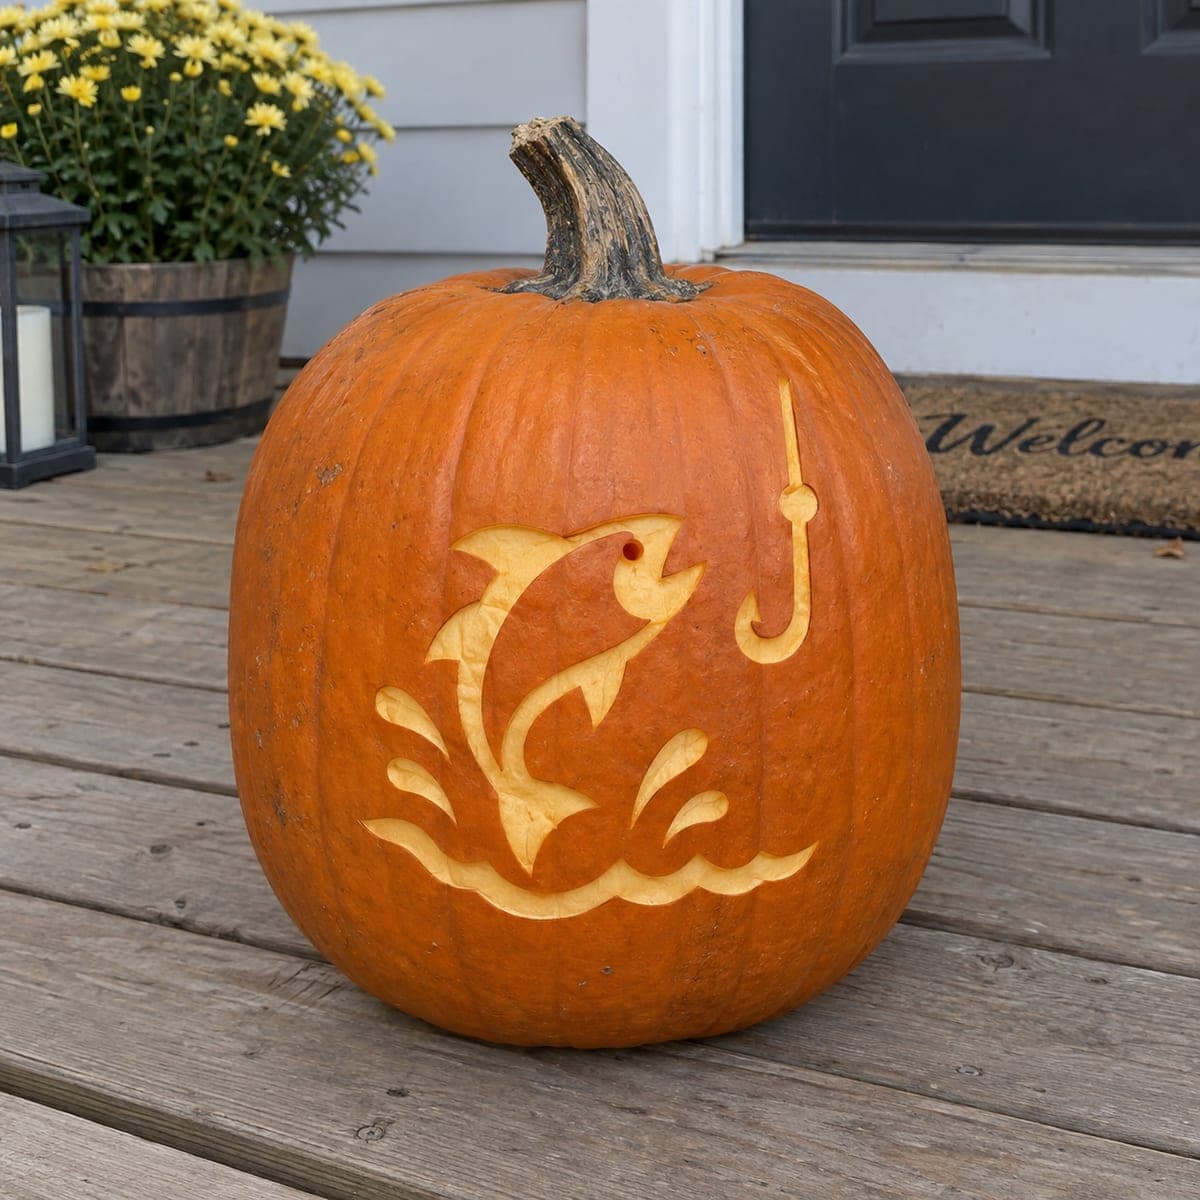
A largemouth bass bursts from carved whitewater to strike a dangling fishhook in this deep relief pumpkin made for the angler in the family. The splash is built from layered, overlapping waves that get thinner toward the edges, while the fish keeps crisp scale and gill detail at full depth. Carve the fish body before the water so you can blend the splash around it, and thin the hook line carefully with a detail knife.

This is an AI-generated concept image: a realistic, carvable design idea rather than a photo of a finished carve. AI concepts are always labeled and sit out the leaderboard and the contest.

No ratings yet · Sign in to rate
Comments (0)

  • No comments yet — be the first.

Save without an account. Sign in to like or comment.

Our tips for carving a similar design

This design works almost entirely in relief, which means you shave the skin and top flesh to different depths rather than cutting all the way through. The core trick is layering the splash so overlapping waves get thinner and lighter toward their edges, framing a full depth bass with crisp scales and gills. Carve the fish first, then blend the whitewater around it, and save the delicate hook line for last.

Written by PumpkinCarvingIdeas.com, inspired by the image above. These are our suggestions, not instructions from the uploader. This approach to the AI concept has not been tested on a real pumpkin.

From pumpkin to porch

  1. Prep the pumpkin and transfer the pattern

    Since this is a concept image and no real pumpkin exists, pick a large pumpkin with a smooth, tall face to fit the leaping fish and the splash below it. Wipe the surface clean and dry it. Tape your stencil in place and poke the outlines with a transfer tool or pin so you have a dotted guide. Keep the fish, the water, and the hook line as separate outlines so you can work them in order.

  2. Establish the fish outline and depth

    Use a small detail knife to score the full outline of the bass, including the open mouth, fins, and tail. Shave away the skin just outside the fish so the body sits raised against a lighter background. Take the body down to your deepest working level while leaving the head and shoulder proud so the fish reads as three dimensional. Work slowly and keep your bracing hand behind the blade.

  3. Shade the scales, gills, and fins

    Switch to fine ribbon and detail tools to peel shallow rows of skin for the scale pattern, letting each row catch a little glow. Cut the gill plate and fin rays a touch deeper so they stand out as crisp lines. Vary your depth to suggest the curve of the body, going lighter along the back and darker in the shadows. This shading is the heart of the piece, so take breaks and check it under light.

  4. Build the layered splash

    Outline the whitewater beneath and around the fish, then carve the waves so the ones nearest the fish are deepest and the outer droplets are barely skinned. Overlap each wave slightly over the one behind it to create depth. Thin the flying droplets toward their tips but leave them attached to the main splash so nothing breaks off. Let the water wrap up around the tail to tie the scene together.

  5. Thin the hook and dangling line

    Carve the fishhook and its line last, since they are the most fragile part. Keep the line as a shallow, narrow channel rather than a full cutout so the wall stays strong. Shape the hook curve and barb with a detail knife, taking light passes so you do not snap the point. If any section feels weak, leave a small bridge of skin to hold it in place.

  6. Light it and photograph

    Drop a battery LED puck inside and set it to a warm tone to mimic the glow in the scene. The deep cuts on the fish will read brightest while the skinned scales and outer splash stay dim. Turn the pumpkin until the shading pops, then shoot in a dark room for the best contrast. Keep it cool and misted, and it should hold its detail for a couple of days.

Gather your supplies

Check things off as you get ready.

Work on a stable surface, keep your free hand out of the cutting path, and have an adult handle sharp tools.

Three levels of light

  • Leave intact

    The orange skin surrounding the scene and the darkest shadow lines of the gills and deep water

  • Peel & shade

    The scale rows, fin detail, and outer splash droplets skinned shallow for a soft dim glow

  • Cut through

    The deepest relief hollows behind the fish body and inside the open mouth for the brightest light

Learn the carving basics

Before you start cutting

Do I cut all the way through anywhere on this design?

Mostly no, this is a relief piece where you shave to different depths instead of making full cutouts. The brightest areas come from carving very deep behind the fish, not from opening a hole. If you want more glow, thin the deepest spots until light barely shows through, but keep the wall intact so the fish stays supported.

How do I keep the hook line from breaking?

Carve the hook and line last and treat the line as a shallow narrow groove rather than a cutout. That keeps the pumpkin wall continuous and strong. Take light passes with a sharp detail knife, and leave tiny skin bridges under the hook curve if it feels fragile.

What is the best way to make the scales look convincing?

Work in overlapping shallow rows and vary your depth so scales along the back stay lighter and the belly falls into shadow. Consistent tool angle helps each scale catch the light the same way. Step back often and check the pattern under your LED, since shading reads very differently once lit.

Your take belongs here, too.

Changed a detail? Made it simpler? Share a photo of your version and tell the community what worked.

Share your pumpkin

More pumpkins like this

You've reached the end · 8 pumpkins
The Patch Report

Fresh pumpkins, in your inbox.

The best new carvings, ideas worth stealing, and how-tos for carving season. Short, seasonal, and gone by November.

A short email during carving season. Unsubscribe anytime. See our privacy policy.