Halloween Pumpkin Carving Contest · Starts October 1st · $500 in prizes
← Back to ideas
@ai_concepts
Jul 28, 2026
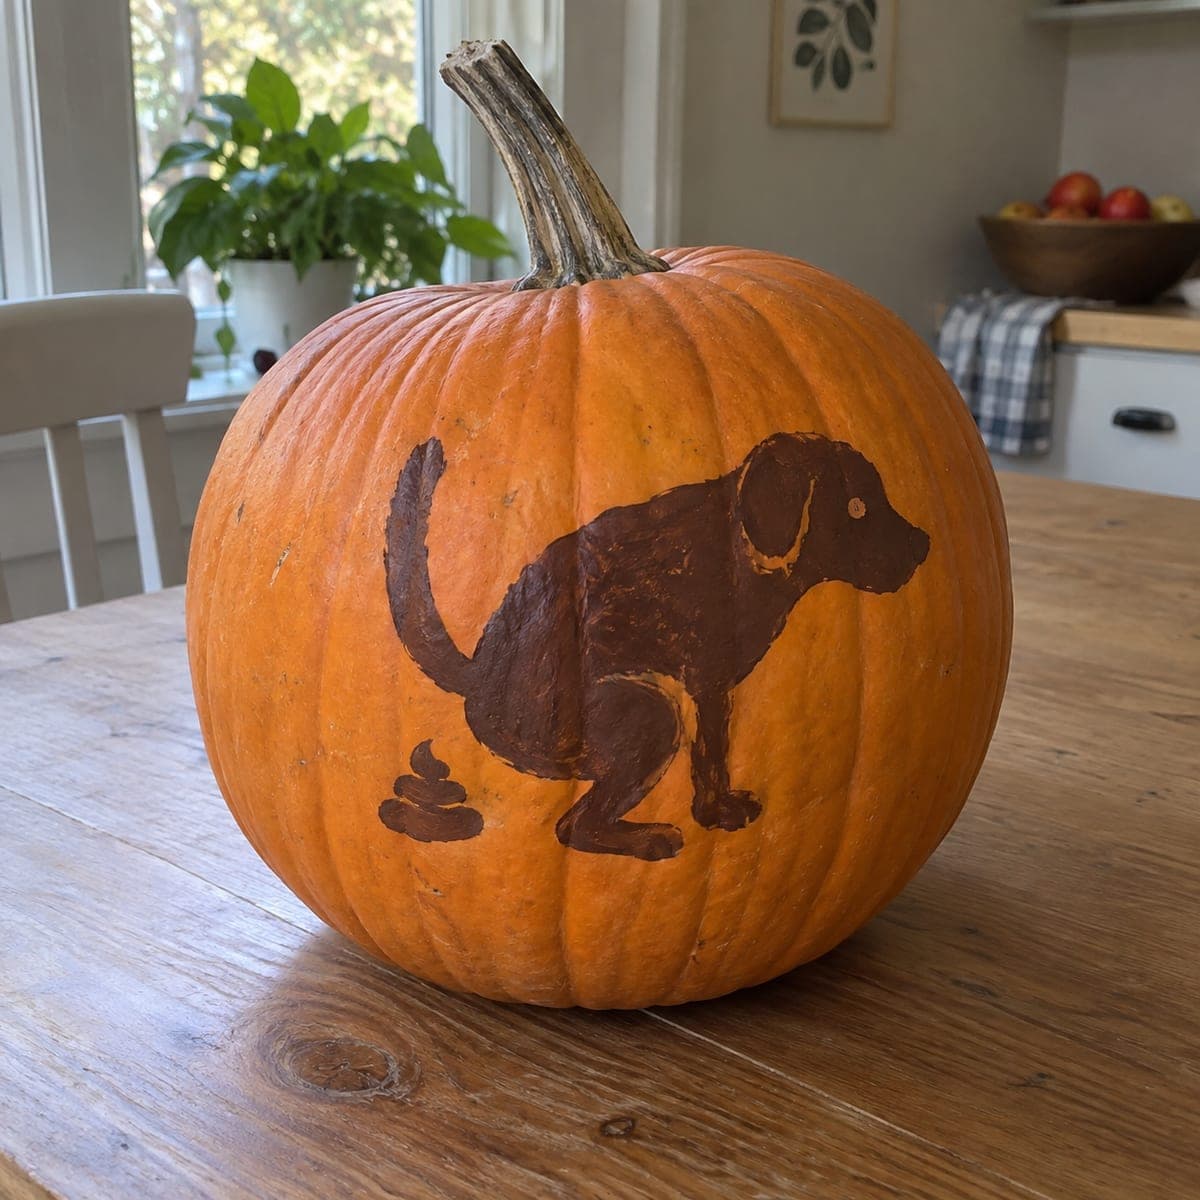
Naughty Pooping Dog Painted PumpkinAI
0

Naughty Pooping Dog Painted Pumpkin

A brown dog caught mid-squat with a guilty backward glance, complete with a painted swirl on the ground behind him, makes this the gag pumpkin of the neighborhood. The whole joke is two silhouettes in one color, so it is genuinely easy to paint even if the humor is not for everyone. Position this one facing the sidewalk, and use a chalk outline first so the squatting pose reads clearly before you commit paint.

This is an AI-generated concept image: a realistic, carvable design idea rather than a photo of a finished carve. AI concepts are always labeled and sit out the leaderboard and the contest.

No ratings yet · Sign in to rate
Comments (0)

  • No comments yet — be the first.

Save without an account. Sign in to like or comment.

Our tips for carving a similar design

The whole gag is two brown silhouettes on one pumpkin, the squatting dog with a guilty backward glance and a small swirl on the ground behind him. Because it is all one flat color, there is no fussy carving or shading to manage. Sketch the pose in chalk first so the squat and the turned head read clearly, then fill both shapes with a single brown paint.

Written by PumpkinCarvingIdeas.com, inspired by the image above. These are our suggestions, not instructions from the uploader. This approach to the AI concept has not been tested on a real pumpkin.

From pumpkin to porch

  1. Clean and dry the pumpkin

    Wipe the whole pumpkin down with a damp cloth and let it dry completely. Paint grips much better on a clean, dry surface. Pick the smoothest, flattest side to face the sidewalk since that is where your dog will go. Set the pumpkin on a towel so it does not roll while you work.

  2. Chalk the pose first

    Use white or light chalk to sketch the dog in profile, mid squat, with the back legs tucked and the head turned back over the shoulder. Add the raised tail and the small swirl on the ground behind the rear. Step back and check that the pose reads as a squat and not just a sitting dog. Chalk wipes off easily, so redraw as many times as you need before committing.

  3. Outline both shapes in paint

    Once the chalk looks right, trace the outline of the dog and the swirl with a thin brush and brown acrylic paint. Work slowly around the ears, snout, and tail so the silhouette stays crisp. A steady outline is what makes a flat silhouette look intentional. Let this outline set for a few minutes before filling.

  4. Fill with flat brown

    Switch to a wider brush and fill the whole dog and the swirl with the same brown. Keep the color even and solid so both shapes read as clean silhouettes from the street. Leave a tiny unpainted dot for the eye, or dab a spot of lighter paint once the brown dries. Add a second coat if the orange shows through.

  5. Add small details and let it cure

    When the base coat is dry, add the eye and a small nose highlight if you want a touch of personality. Keep details minimal so the joke stays a clean two-color silhouette. Let the paint cure fully, at least an hour, before moving the pumpkin. A quick coat of clear sealer helps it survive a few days outside.

  6. Stage it facing the walkway

    Turn the finished side toward the sidewalk so passersby get the full gag. Set an LED puck light or nothing at all, since this is a painted no-carve design and needs no inner glow. Snap your photo in daylight so the brown reads sharply against the orange. Keep it out of heavy rain to protect the paint.

Gather your supplies

Check things off as you get ready.

Work on a stable surface, keep your free hand out of the cutting path, and have an adult handle sharp tools.

Three levels of light

  • Leave intact

    The entire orange body of the pumpkin stays untouched and dark, giving the brown silhouettes their contrast.

  • Peel & shade

    If you want a little glow, lightly scrape the skin just inside the dog outline for a faint tan halo before painting, though a flat silhouette works fine on its own.

  • Cut through

    This is a no-carve design, so nothing is cut through, but you could carve a small moon or bone shape elsewhere for a lit accent if you want interior light.

Learn the carving basics

Before you start cutting

Do I need to carve anything for this design?

No, this is a fully painted no-carve pumpkin, which is part of why it is so beginner friendly. You only need chalk and brown paint. If you want a glow, you can add a small carved shape elsewhere, but the dog itself stays painted.

How do I make the squatting pose read clearly?

Sketch it in chalk first and check it from a few feet back before painting. The key cues are the tucked rear legs, the raised tail, and the head turned back over the shoulder. Adding the small swirl behind the dog confirms the joke instantly.

Will the paint hold up outdoors?

Acrylic paint handles a few days of dry fall weather well, especially with a coat of clear sealer on top. Keep the pumpkin out of steady rain and bring it in during storms. A painted pumpkin also lasts longer than a carved one since the flesh stays sealed.

Your take belongs here, too.

Changed a detail? Made it simpler? Share a photo of your version and tell the community what worked.

Share your pumpkin

More pumpkins like this

You've reached the end · 8 pumpkins
The Patch Report

Fresh pumpkins, in your inbox.

The best new carvings, ideas worth stealing, and how-tos for carving season. Short, seasonal, and gone by November.

A short email during carving season. Unsubscribe anytime. See our privacy policy.