Halloween Pumpkin Carving Contest · Starts October 1st · $500 in prizes
← Back to ideas
@ai_concepts
Sep 25, 2026
Painted Joy Pumpkin No-Carve Carving IdeaAI
0

Report this carving

Tell us what is wrong. Reports are private.

Painted Joy Pumpkin No-Carve Carving Idea

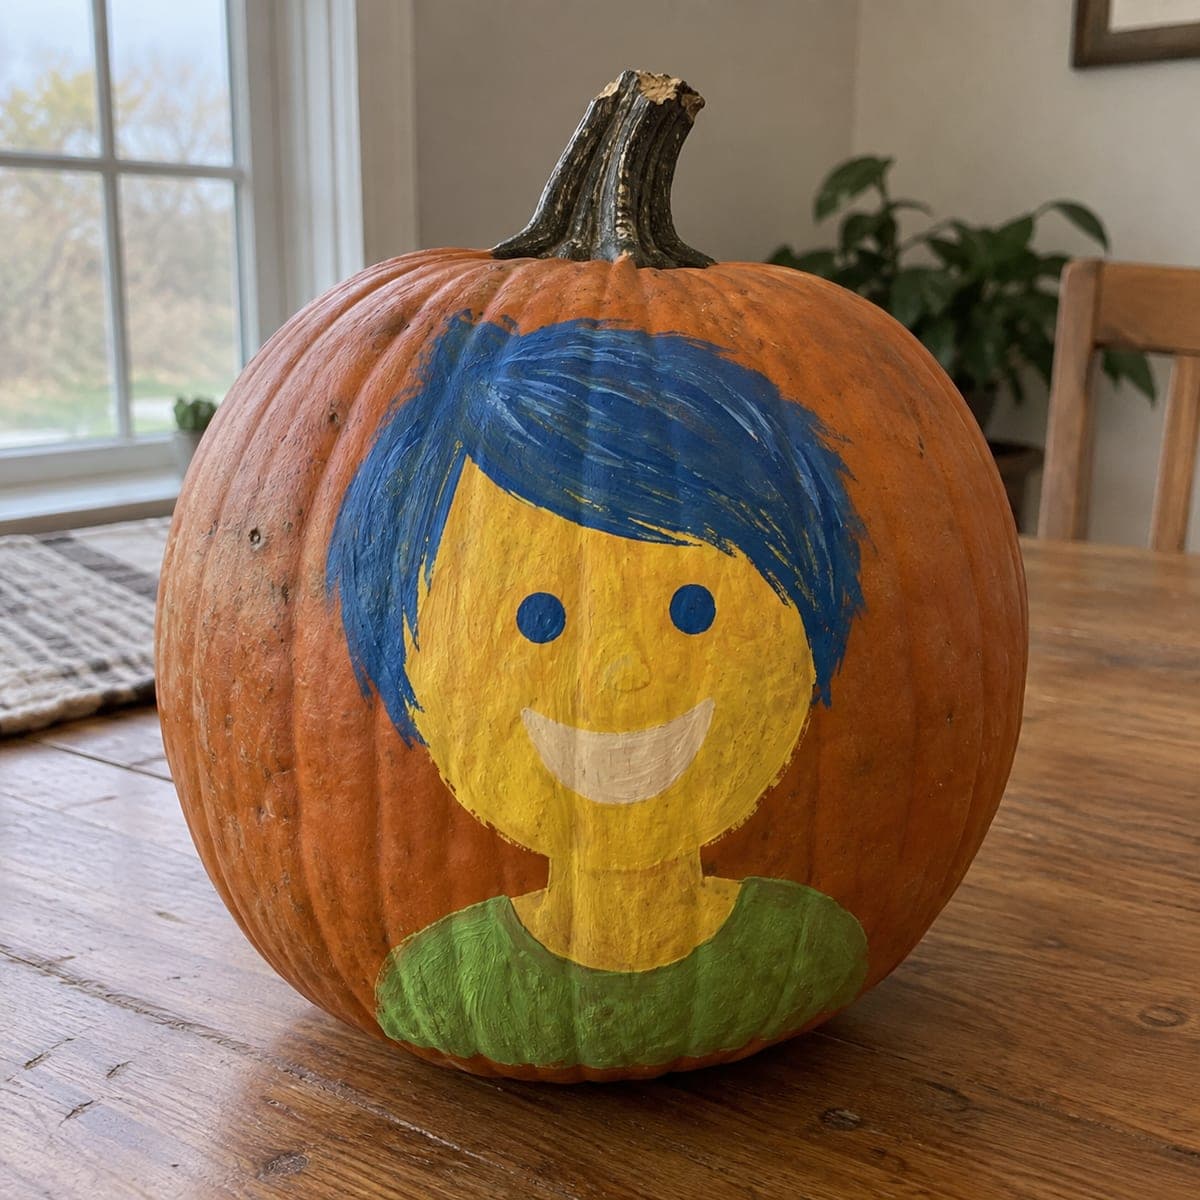
This no-carve Joy pumpkin carving idea renders the Inside Out character in bright acrylic yellow, blue, and lime green on intact rind, with broad approachable brush shapes and a light handmade texture. Start with the large yellow face oval, then add the blue pixie hair and the lime dress neckline once the base coat is dry. A glossy sealant keeps the vivid colors looking fresh throughout the season.

No ratings yet · Sign in to rate

Comments (0)

  • No comments yet — be the first.

Save without an account. Sign in to like or comment.

Our tips for carving a similar design

Yellow, blue, and lime green acrylic layers build the character on intact rind with broad brushstrokes and a natural handmade texture. The large yellow face oval goes down first, then the blue pixie hair fills the top and sides, and the lime dress neckline finishes the base layer. A glossy topcoat preserves the vivid saturation of all three colors through weeks of seasonal display.

From pumpkin to porch

  1. Clean and prime the surface

    Wipe the pumpkin with a damp cloth and follow with a rubbing alcohol pass to remove any waxy surface oils. For vivid color accuracy, brush a light coat of white acrylic gesso over the whole front face panel and let it dry. This white base keeps yellow and lime from reading orange.

  2. Sketch the face layout

    Mark the large yellow face oval, the flanking blue hair area, and the lime neckline strip lightly in chalk pencil. The face oval should occupy the center third of the pumpkin's front, with hair filling the upper portion. Proportions are more important than precision at this stage.

  3. Apply the yellow face oval

    Fill the face oval with two coats of bright yellow acrylic, letting each coat dry between applications. Use a wide flat brush for the main fill and a medium brush to clean up the oval edge. A fully opaque yellow base makes the whole design pop.

  4. Paint the blue hair

    Fill the blue hair zone with a wide flat brush using confident sweeping strokes from the hairline outward. The visible brush texture replicates a natural hair feel. Keep the hair silhouette a soft organic shape rather than a hard geometric outline.

  5. Add the lime neckline and facial details

    Paint the lime green neckline strip below the face oval with a medium flat brush. Once dry, add simplified facial features in black using a fine liner: two small curved eyes, a wide smile, and two small dot nostrils. Keep facial features minimal and graphic for a clean look.

  6. Seal and display

    Once all paint is completely dry, spray a coat of gloss sealer. Gloss finish enhances the vivid color saturation and adds slight waterproofing. Display the pumpkin facing a direct light or spotlight for maximum color visibility.

Written with AI to match this design

Gather your supplies

Check things off as you get ready.

Work on a stable surface, keep your free hand out of the cutting path, and have an adult handle sharp tools.

Three levels of light

  • Leave intact

    All rind surfaces stay intact and unpierced

  • Peel & shade

    None, the shell is never cut or skinned

  • Cut through

    None, illuminate the painted front with a spotlight or well-positioned porch light

Learn the carving basics

Before you start cutting

Why does my yellow look muddy after a day or two?

Yellows can shift as acrylic paint cures fully or as the rind's natural oils migrate into the paint layer. A gesso base coat and a sealer topcoat significantly reduce this problem. If you notice muddying, apply a second thin yellow coat followed by a fresh sealer layer.

Is the glossy sealer better than matte for this design?

Gloss works well here because Joy's colors are meant to be bright and cheerful. Gloss enhances saturation and gives the design a slightly animated look. If you prefer a more natural pumpkin feel, satin sealer is a good middle option.

Can I add glitter to the hair area to suggest Joy's sparkle?

Yes. Fine iridescent glitter mixed into the final blue paint layer or sprinkled over still-wet paint before sealing adds a sparkle effect that suits the character well. Use craft glitter rather than large chunky sequins for the most painterly look.

Your take belongs here, too.

Changed a detail? Made it simpler? Share a photo of your version and tell the community what worked.

Share your pumpkin

More pumpkins like this

You've reached the end · 8 pumpkins
The Patch Report

Fresh pumpkins, in your inbox.

The best new carvings, ideas worth stealing, and how-tos for carving season. Short, seasonal, and gone by November.

A short email during carving season. Unsubscribe anytime. See our privacy policy.