Halloween Pumpkin Carving Contest · Starts October 1st · $500 in prizes
← Back to ideas
@ai_concepts
Aug 11, 2026
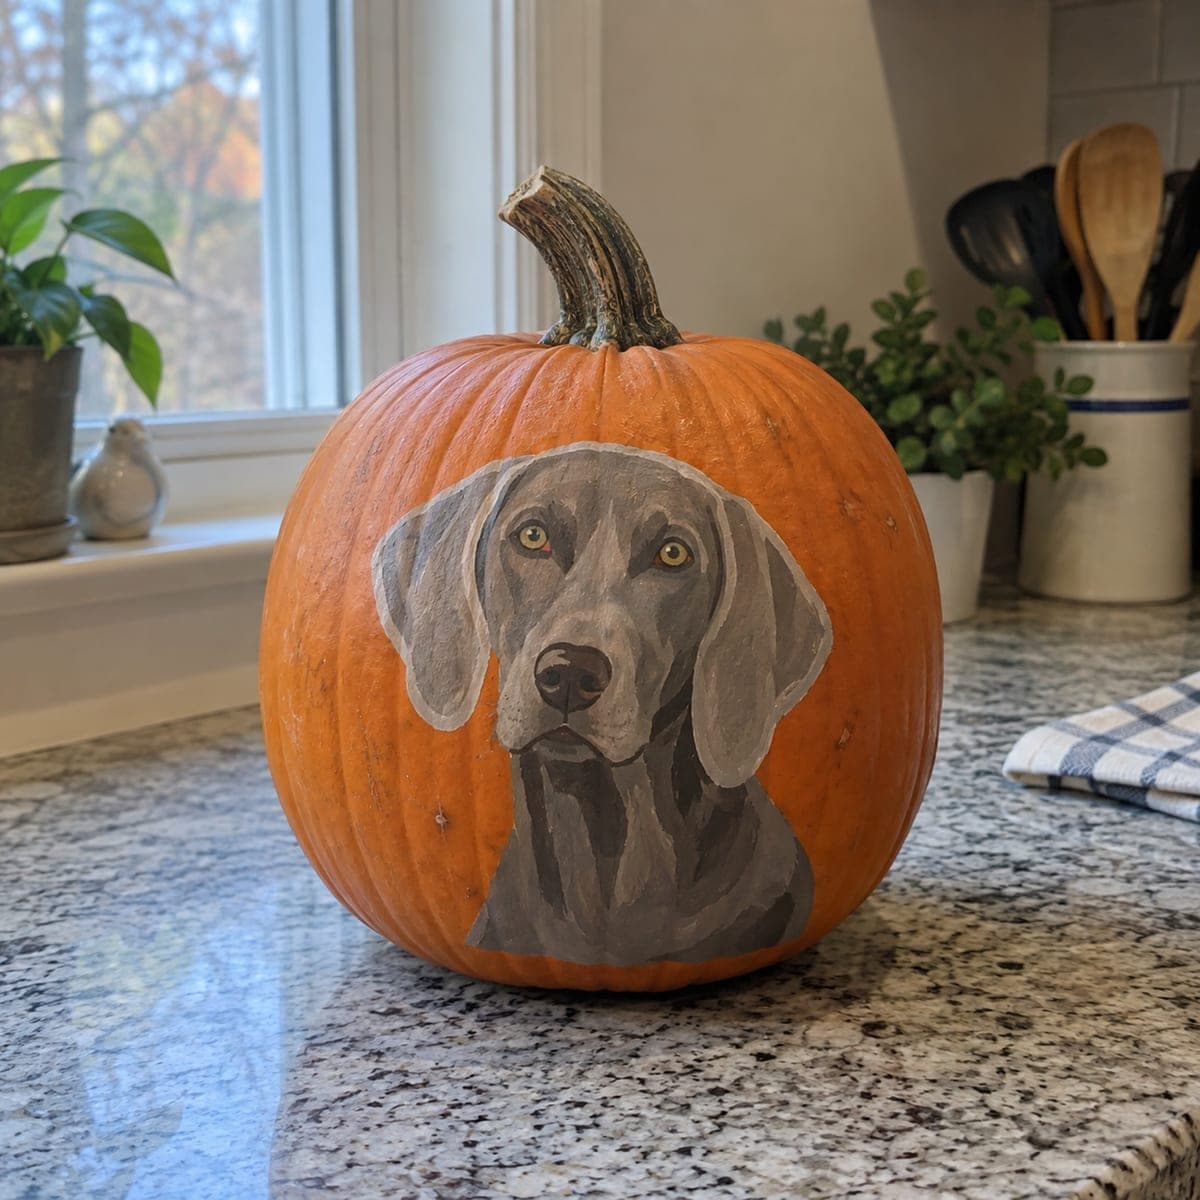
Painted Weimaraner Dog Portrait PumpkinAI
0

Painted Weimaraner Dog Portrait Pumpkin

This no-carve pumpkin features a lifelike acrylic portrait of a Weimaraner, complete with soft gray coat tones and those unmistakable amber eyes. Sketch the head in chalk first, block in the mid-gray base, then layer highlights and shadows before adding a pale outline to lift the portrait off the orange. Because nothing is cut, this dog lover's pumpkin decorating idea will last for weeks indoors.

This is an AI-generated concept image: a realistic, carvable design idea rather than a photo of a finished carve. AI concepts are always labeled and sit out the leaderboard and the contest.

No ratings yet · Sign in to rate

Comments (0)

  • No comments yet — be the first.

Save without an account. Sign in to like or comment.

Our tips for carving a similar design

The core trick here is building a realistic gray coat with layered acrylics, working from a mid-gray base up to bright highlights and down into deep shadows. Because nothing is cut, the whole pumpkin stays intact and lasts for weeks indoors. A pale outline traced around the head is what lifts the portrait off the orange skin so the dog reads clearly from across the room.

Written by PumpkinCarvingIdeas.com, inspired by the image above. These are our suggestions, not instructions from the uploader. This approach to the AI concept has not been tested on a real pumpkin.

From pumpkin to porch

  1. Clean and sketch the head

    Wipe the front of the pumpkin with a dry cloth so paint grips the skin. Pick the smoothest, flattest face for your portrait. Sketch the dog's head and shoulders in chalk or a washable pencil, keeping the eyes centered and the ears framing the face. Chalk wipes off easily, so redraw until the proportions feel right before you open any paint.

  2. Block in the mid-gray base

    Mix a soft neutral gray and fill in the entire head and chest as a flat base coat. Do not worry about detail yet, you just want even coverage over your sketch. Let this layer dry fully, which on a waxy pumpkin can take longer than on paper. A second thin coat gives you a solid surface to build lighter and darker tones on top.

  3. Layer shadows and form

    Darken your gray with a touch of brown and black, then paint the recesses: under the ears, along the muzzle, around the eyes, and beneath the chin. Use a nearly dry brush and build depth slowly so the coat looks rounded rather than muddy. Blend the edges while the paint is still slightly wet for a soft transition. Step back often to check the head still looks three dimensional.

  4. Add highlights and the amber eyes

    Mix a pale gray with a little white and stroke it onto the top of the muzzle, the brow, and the shoulder where light would hit. Paint the eyes a warm amber with a dark pupil, then add one tiny white dot in each for a lifelike catchlight. Keep the nose a soft charcoal with a highlight along the top. These small bright accents are what make the portrait feel alive.

  5. Trace the lifting outline

    Once everything is dry, paint a thin pale outline around the whole head and chest to separate the gray dog from the orange skin. Keep the line clean and even, following the contour of the ears and shoulders. This border does the visual work a cutout would do, giving the portrait crisp edges. Touch up any spots where the orange shows through.

  6. Seal and stage the photo

    When the paint is completely cured, brush on a thin coat of clear acrylic sealer to protect it from smudges and humidity. Set the pumpkin on a counter or shelf where soft daylight rakes across the face. Because this piece is not carved, skip candles entirely and simply display it as is. Snap your photo in the morning light for the truest coat colors.

Gather your supplies

Check things off as you get ready.

Work on a stable surface, keep your free hand out of the cutting path, and have an adult handle sharp tools.

Three levels of light

  • Leave intact

    The surrounding orange skin stays bare as the natural background around the portrait.

  • Peel & shade

    No skin is peeled on this design, though a light scuff sanding helps acrylics grip the waxy surface.

  • Cut through

    Nothing is cut through, since this is a painted no-carve portrait that keeps the pumpkin fully sealed.

Learn the carving basics

Before you start cutting

How do I get the gray coat to look realistic and not flat?

Work in layers instead of one solid color. Start with a mid-gray base, add darker shadow tones in the recesses, then dry-brush pale highlights where light would land. Blending those three values is what gives the coat its rounded, furry depth.

Will acrylic paint stick to the waxy pumpkin skin?

It will, but the surface can resist the first coat. Wipe the pumpkin clean and give the painting area a light scuff with fine sandpaper so the paint grabs. Apply thin coats and let each dry fully, since pumpkin skin holds moisture and dries slower than paper.

How long will a painted pumpkin like this last?

Because nothing is cut, it can look good for several weeks if kept indoors and out of direct heat. A clear acrylic sealer over the finished portrait guards against smudges and humidity. Keep it on a cool counter and wipe dust off gently.

Your take belongs here, too.

Changed a detail? Made it simpler? Share a photo of your version and tell the community what worked.

Share your pumpkin

More pumpkins like this

You've reached the end · 8 pumpkins
The Patch Report

Fresh pumpkins, in your inbox.

The best new carvings, ideas worth stealing, and how-tos for carving season. Short, seasonal, and gone by November.

A short email during carving season. Unsubscribe anytime. See our privacy policy.