Halloween Pumpkin Carving Contest · Starts October 1st · $500 in prizes
← Back to ideas
@ai_concepts
Aug 11, 2026
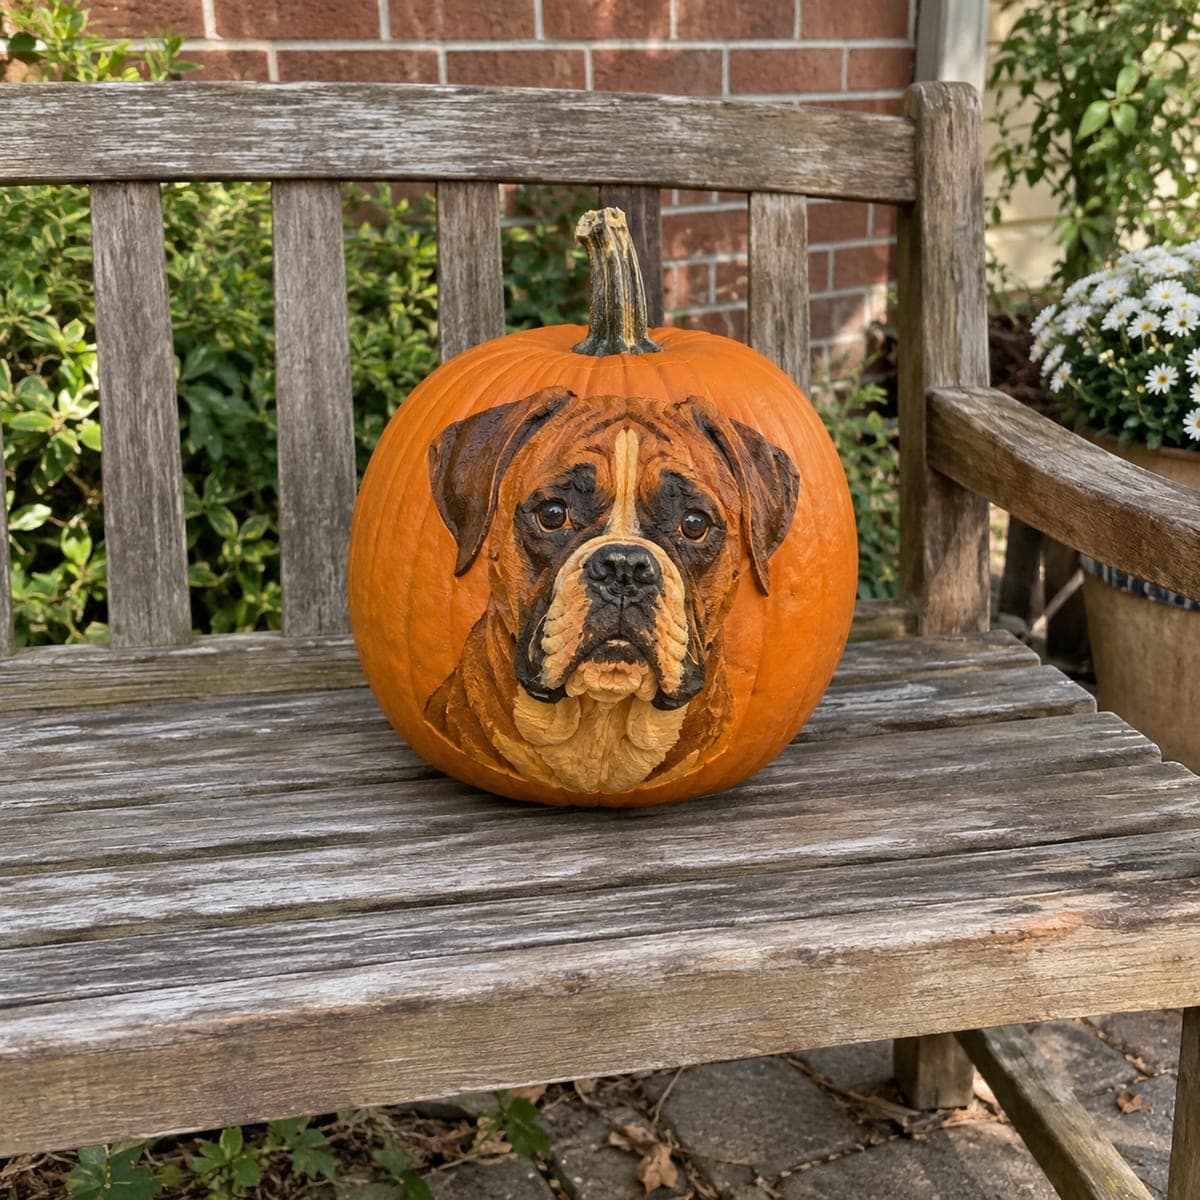
Boxer Dog Portrait Painted No-Carve PumpkinAI
0

Boxer Dog Portrait Painted No-Carve Pumpkin

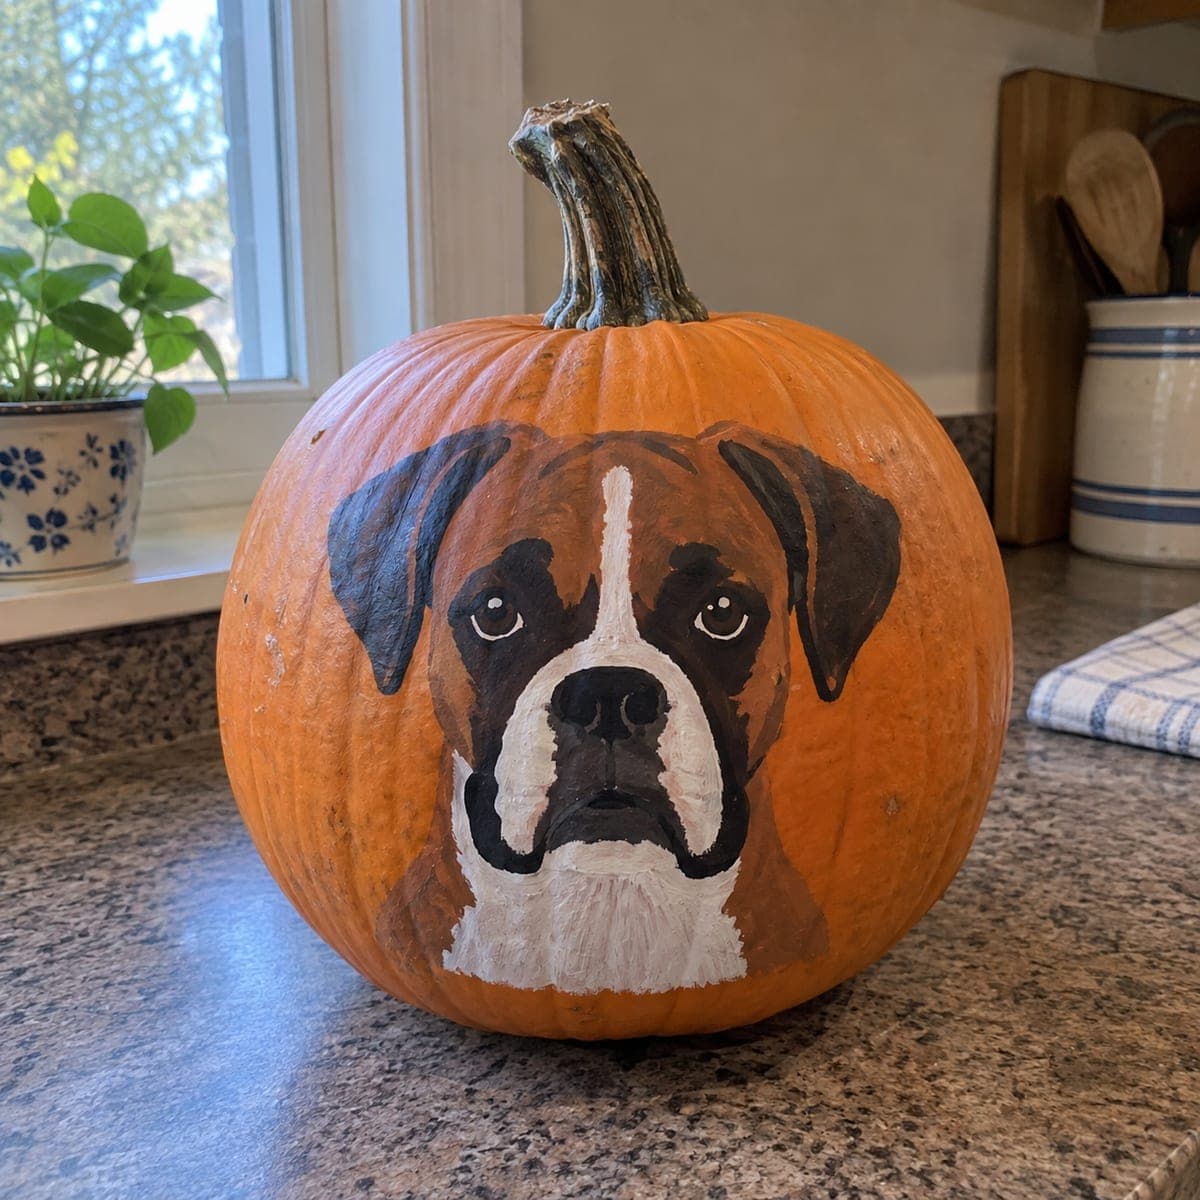
A Boxer's wrinkled face stares out with soulful brown eyes, rendered in beautifully blended acrylic paints on an uncut pumpkin. The warm fawn and brindle tones of the dog's coat are captured with layered brushwork, and the dark muzzle and jowls are highlighted for a realistic portrait effect. This no-carve pumpkin idea is a heartfelt tribute for Boxer owners and requires only craft paint, a palette, and a few rounds of patient layering. Let each color pass dry fully before adding the next to prevent muddy tones.

This is an AI-generated concept image: a realistic, carvable design idea rather than a photo of a finished carve. AI concepts are always labeled and sit out the leaderboard and the contest.

No ratings yet · Sign in to rate
Comments (0)

  • No comments yet — be the first.

Save without an account. Sign in to like or comment.

Our tips for carving a similar design

The core trick here is layered acrylic painting on a whole, uncut pumpkin, letting the natural orange shine through as the Boxer's warm fawn coat. You build the face from broad base tones up to fine wrinkles and dark jowls, drying between passes so colors stay clean. Since nothing is cut, the pumpkin's smooth curve becomes your canvas and the design reads best in daylight.

Written by PumpkinCarvingIdeas.com, inspired by the image above. These are our suggestions, not instructions from the uploader. This approach to the AI concept has not been tested on a real pumpkin.

From pumpkin to porch

  1. Pick and prep the canvas

    Choose a tall, smooth pumpkin with a flat, uninterrupted front face and few deep ribs. Wipe it clean with a damp cloth and let it dry fully so paint grips. Face the smoothest side forward and set the pumpkin on a towel ring so it will not roll while you work. A whole, uncut pumpkin lasts longer than a carved one, so this design can sit out for weeks.

  2. Sketch the Boxer face

    Lightly draw the head shape, folded ears, snout, and eyes with a washable marker or soft pencil. Keep the muzzle low and centered so the soulful eyes land in the upper third of the face. Step back often to check the proportions before you commit to paint. If a line looks off, wipe it away with a damp cloth and try again.

  3. Block in the base coat tones

    Mix a fawn tan and a deeper brindle brown on your palette. Paint the broad coat, ears, and forehead first, leaving some bare orange skin to warm the fawn areas. Let this layer dry completely before touching it again to avoid muddy blends. Thin coats build cleaner color than one thick pass.

  4. Build the dark muzzle and jowls

    Load a soft brush with dark brown to near black and paint the mask around the snout, the mouth line, and the shadow under the jowls. Blend the edge where dark meets fawn with a dry brush so the transition looks soft, not sharp. Let each value dry before adding the next. The dark muzzle is what makes the portrait read as a Boxer, so take your time here.

  5. Add wrinkles, highlights, and eyes

    Dry brush light cream along the top of each fold to suggest the Boxer's famous wrinkles and raised brow. Paint the eyes a rich brown with a tiny white catchlight dot to bring them to life. Add fine fur strokes at the edges of the face with a liner brush. Keep highlights subtle so the face stays believable rather than cartoonish.

  6. Seal and stage the finished pumpkin

    Once fully dry, brush on a clear matte acrylic sealer to protect the paint from dew and handling. Set the pumpkin on a porch bench or step where daylight hits the face. For evening, place a small LED spotlight nearby rather than inside, since this pumpkin is not hollowed. Snap your photo in soft morning or late day light for the truest colors.

Gather your supplies

Check things off as you get ready.

Work on a stable surface, keep your free hand out of the cutting path, and have an adult handle sharp tools.

Three levels of light

  • Leave intact

    Bare orange skin left unpainted or barely tinted, warming the fawn coat and forehead.

  • Peel & shade

    Lightly scuffed or thinly painted areas where cream highlights sit on the wrinkles and brow.

  • Cut through

    No cuts on this no-carve design; the brightest accents are the white catchlights painted in the eyes.

Learn the carving basics

Before you start cutting

This looks carved, so is it really no-carve?

Yes, this is a painted concept rendered to look dimensional. The wrinkles and shadows come entirely from layered acrylic values, not from cutting the skin. Painting is a great way to get portrait detail that would be very hard to carve, and it keeps the pumpkin whole and long-lasting.

How do I keep the fawn and dark tones from turning muddy?

Let every color pass dry fully before adding the next one, which is the single most important rule here. Work light to dark in thin coats and blend edges with a dry brush rather than wet paint. If two wet colors touch too much they gray out, so patience between layers is what preserves those warm coat tones.

Can I light this pumpkin at night?

Because it is not hollowed, skip any light inside it. Instead aim a small LED spotlight or path light at the painted face from the side to show off the brushwork after dark. Never use a candle near a painted, sealed surface.

Your take belongs here, too.

Changed a detail? Made it simpler? Share a photo of your version and tell the community what worked.

Share your pumpkin

More pumpkins like this

You've reached the end · 8 pumpkins
The Patch Report

Fresh pumpkins, in your inbox.

The best new carvings, ideas worth stealing, and how-tos for carving season. Short, seasonal, and gone by November.

A short email during carving season. Unsubscribe anytime. See our privacy policy.