Halloween Pumpkin Carving Contest · Starts October 1st · $500 in prizes
← Back to ideas
@ai_concepts
Jul 29, 2026
Praying Angel Jack-O-Lantern With Feathered WingsAI
0

Praying Angel Jack-O-Lantern With Feathered Wings

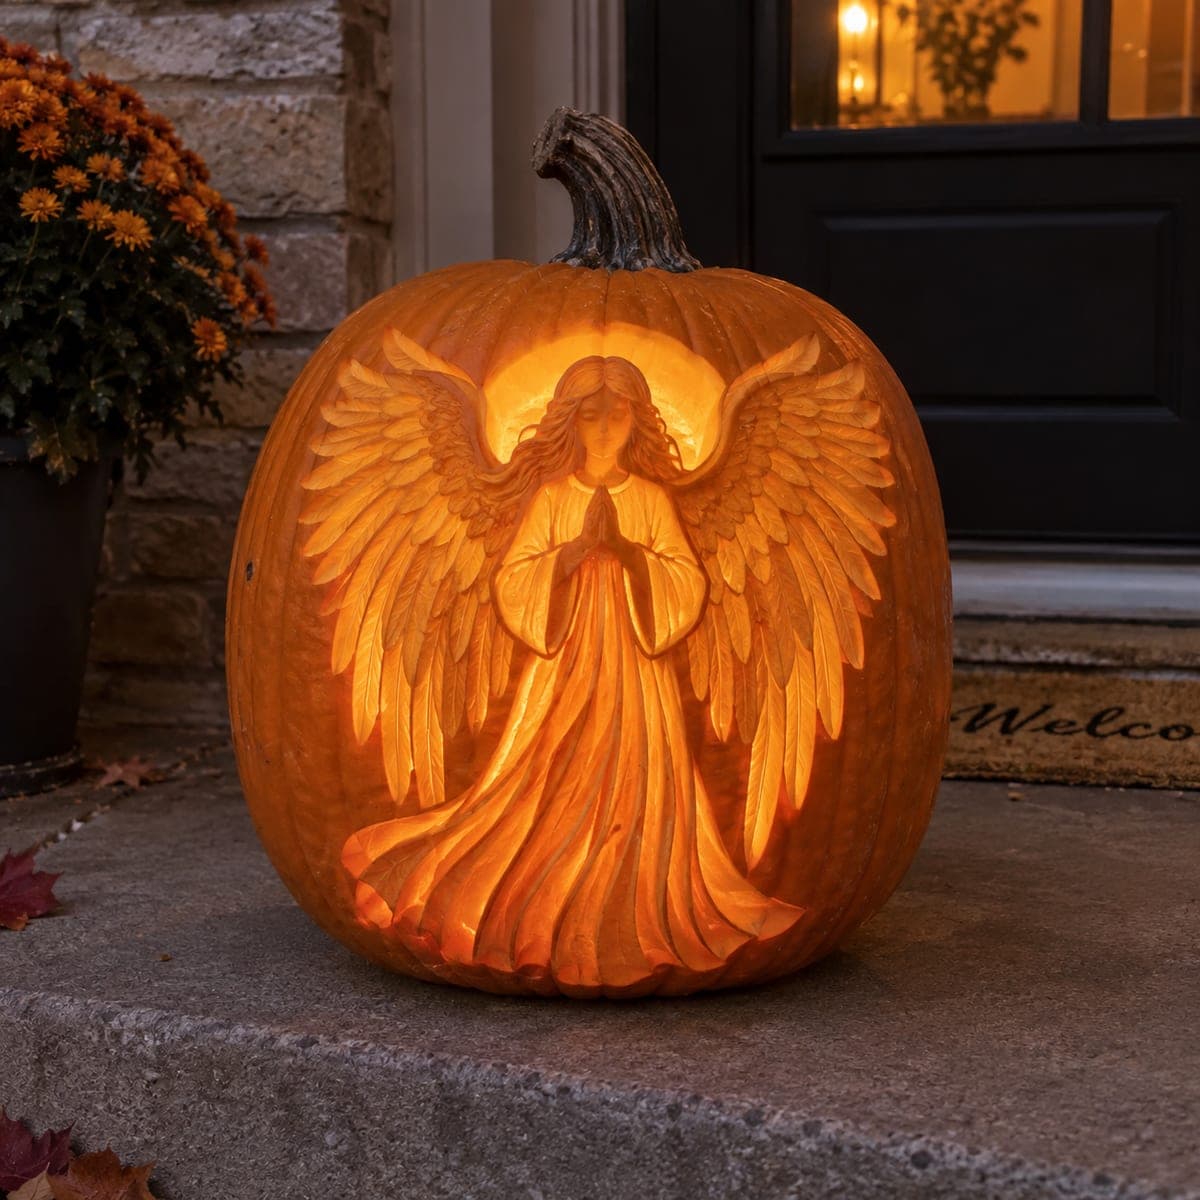
An angel with outstretched feathered wings and a flowing gown glows softly from this intricate front porch jack-o-lantern. Each feather is etched at a slightly different depth, which is what gives the wings their layered radiance when a candle sits inside. Work from the halo outward, saving the thinnest, brightest cuts of the gown hem for last, and use a warm LED to avoid scorching the fine detail.

This is an AI-generated concept image: a realistic, carvable design idea rather than a photo of a finished carve. AI concepts are always labeled and sit out the leaderboard and the contest.

No ratings yet · Sign in to rate
Comments (0)

  • No comments yet — be the first.

Save without an account. Sign in to like or comment.

Our tips for carving a similar design

The whole effect comes from relief carving, where you skin and shade the surface at many different depths instead of cutting all the way through. The angel, her praying hands, gown, and every feather are peeled to varying thickness so light passes through the thin spots and stays dark on the thick ones. Plan the halo as your one true cutout and let everything else glow by shading.

Written by PumpkinCarvingIdeas.com, inspired by the image above. These are our suggestions, not instructions from the uploader. This approach to the AI concept has not been tested on a real pumpkin.

From pumpkin to porch

  1. Transfer the design and prep the shell

    Cut a wide lid from the bottom of the pumpkin so the stem stays intact for the porch look, then scrape the inside wall behind the design down to about one inch thick. A thinner wall lets your shaded areas glow evenly. Tape your angel stencil to the front and poke the main outlines with a transfer tool. Mark the halo, the figure, the wing edges, and the gown folds before you make a single cut.

  2. Open the halo behind the head

    The bright ring behind the angel is your only full cutout, so do it carefully with a fine saw. Cut a clean arc above and beside her head and hair, leaving the head, shoulders, and hair fully attached to the pumpkin. Keep the opening smooth so the edge reads as a soft glow rather than a jagged hole. This single bright zone will backlight the whole figure.

  3. Skin the figure and gown for a mid glow

    Using a loop or ribbon tool, peel the outer skin off the angel's face, hands, gown, and wing surfaces so they turn dim orange when lit. Leave more flesh where you want shadow and remove more where you want brightness. Round the folds of the gown and the shape of the praying hands with gentle scoops. Work slowly, since you can always remove more but cannot put it back.

  4. Etch the feathers at staggered depths

    Give each feather its own depth by etching the tips thinner and the bases thicker with a small V gouge. This staggering is what makes the wings look layered and radiant when the light comes through. Keep a thin ridge of flesh between feathers so none of them break loose. Repeat the technique on the hair strands and the sweeping folds of the gown hem.

  5. Thin the brightest hem cuts last

    Save the flowing bottom of the gown for the end, when the pumpkin wall is at its most fragile. Shave those hem folds very thin so they read as the brightest streaks below the figure, but stop before you cut through. Blend the shaded transitions with a soft touch so light fades gradually. Handle the pumpkin gently now, as the whole front is delicate.

  6. Light it and photograph on the porch

    Drop in a warm white LED, never a candle, so the fine etching will not scorch or dry out. Set the pumpkin on a step at dusk and check that the halo, gown, and feather tips all glow at the right levels. Rotate the light or add a second small LED if any area stays too dark. Seal the cut surfaces with a thin coat of petroleum jelly to slow drying before your photo.

Gather your supplies

Check things off as you get ready.

Work on a stable surface, keep your free hand out of the cutting path, and have an adult handle sharp tools.

Three levels of light

  • Leave intact

    The darkest shadow lines between feathers, the deep gown folds, and the shaded edges of the face for contrast.

  • Peel & shade

    The angel's face, praying hands, gown body, and feather surfaces, skinned to a soft dim orange.

  • Cut through

    The halo ring behind her head, opened fully for the single brightest glow.

Learn the carving basics

Before you start cutting

This is an AI concept, so can a real pumpkin actually hold this much detail?

Yes, if you treat almost all of it as relief shading rather than cutouts. The feathers, gown, and figure are skinned and etched at different depths, not cut through, which keeps the wall strong. Only the halo is a true opening, so the pumpkin stays structurally sound.

How do I keep the thin feather tips from breaking off?

Never cut all the way through a feather. Leave a continuous ridge of pumpkin flesh between each feather and only thin the tips from the surface. Because they stay part of the wall, they glow without becoming loose fragile flaps.

Why work from the halo outward?

The halo is your one bright light source, so establishing it first lets you judge how much to thin everything around it. You can hold a light inside and check whether the face and gown are peeled enough to catch that glow. Saving the thinnest hem cuts for last protects the delicate lower wall until the very end.

Your take belongs here, too.

Changed a detail? Made it simpler? Share a photo of your version and tell the community what worked.

Share your pumpkin

More pumpkins like this

You've reached the end · 8 pumpkins
The Patch Report

Fresh pumpkins, in your inbox.

The best new carvings, ideas worth stealing, and how-tos for carving season. Short, seasonal, and gone by November.

A short email during carving season. Unsubscribe anytime. See our privacy policy.