Halloween Pumpkin Carving Contest · Starts October 1st · $500 in prizes
← Back to ideas
@ai_concepts
Sep 4, 2026
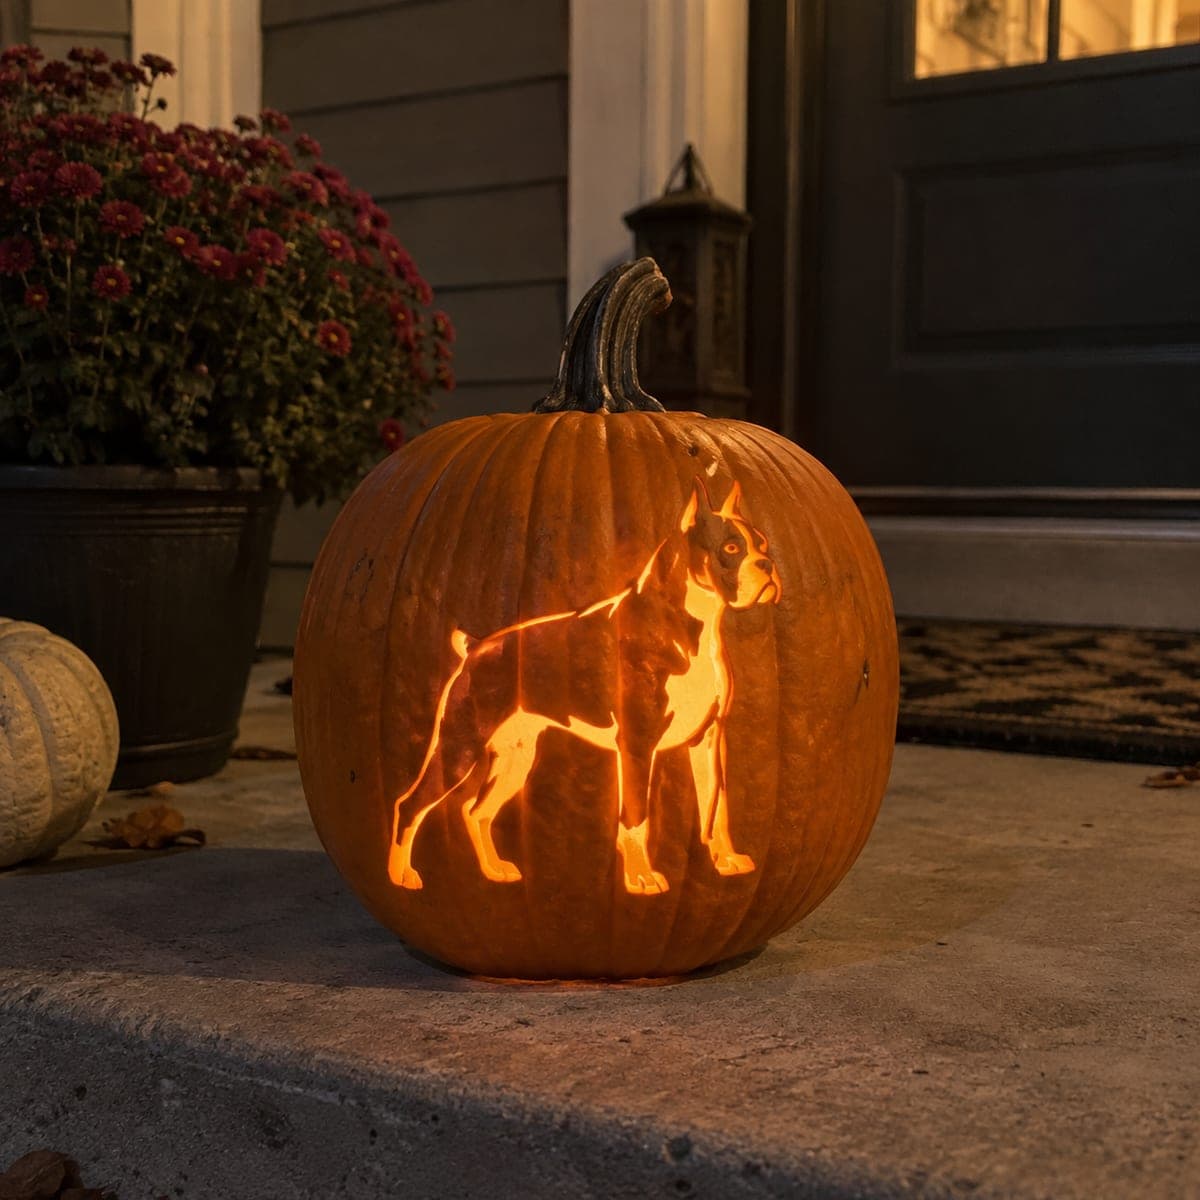
Proud Boxer Dog Full Body Pumpkin CarvingAI
0

Proud Boxer Dog Full Body Pumpkin Carving

A boxer stands at attention in this full-body pumpkin carving, its chest and legs glowing while thin uncut bridges define the face, ears, and muscle lines. The stencil-style design balances big open cuts with delicate connecting strips. Transfer the pattern with a poked outline, cut the largest body sections first, and leave the narrow bridges for last with a fine saw so they do not snap.

This is an AI-generated concept image: a realistic, carvable design idea rather than a photo of a finished carve. AI concepts are always labeled and sit out the leaderboard and the contest.

No ratings yet · Sign in to rate
Comments (0)

  • No comments yet — be the first.

Save without an account. Sign in to like or comment.

Our tips for carving a similar design

The core trick here is a full-body boxer silhouette built from a few large cutouts held together by thin uncut bridges that read as the ears, muzzle, and muscle lines. The plan is to transfer the pattern cleanly, open the big chest and leg gaps first, then save the narrow strips for last so they stay strong. Since this is a concept image, treat it as a design you could recreate rather than a real carved pumpkin.

Written by PumpkinCarvingIdeas.com, inspired by the image above. These are our suggestions, not instructions from the uploader. This approach to the AI concept has not been tested on a real pumpkin.

From pumpkin to porch

  1. Pick and prep the pumpkin

    Choose a tall, rounded pumpkin with a smooth, flat panel on one side big enough for a standing dog. Cut a lid from the bottom instead of the top so the pumpkin sits stable and you can set it over an LED light later. Scoop the inside and thin the carving wall to about one inch so your saw glides through. A thinner wall makes the delicate bridges much easier to cut without cracking.

  2. Transfer the stencil

    Tape the boxer pattern flat against the smoothest area, smoothing out wrinkles so the legs and muzzle stay in proportion. Use a poking tool or pushpin to dot along every outline, spacing the holes close together on the thin bridge lines. Mark which shapes are full cutouts and which are the narrow strips that must stay attached. Peel the paper and connect the dots lightly with a marker if the pattern is faint.

  3. Cut the large body sections first

    Start with the biggest open areas, the space under the belly and between the legs and the gap ahead of the chest. Use a fine carving saw and let the blade do the work with gentle pressure. Cutting the large sections first relieves stress on the shell before you touch the fragile parts. Support each piece with your free hand and push it inward as it releases.

  4. Shape the legs and outline

    Work the four legs and the top line of the back next, following your poked dots for a smooth edge. Keep the saw angled straight in so the silhouette stays sharp from the front. Go slowly around the paws and the tucked rear leg where the strips get thin. Clear each cutout fully so light passes through cleanly.

  5. Save the bridges for last

    The uncut strips that suggest the ears, the muzzle line, the eye, and the muscle seams are the last things you touch. Cut around them with a fine detail saw, leaving the narrow bands of skin in place so the face and body read correctly. If a bridge feels loose, stop and cut on the opposite side to relieve the pressure. Steady, patient strokes here keep the design from snapping.

  6. Light it and photograph

    Drop a battery LED light or two inside and set the pumpkin over it through the bottom opening. The big cutouts will blaze while the bridges hold the boxer's shape in shadow. Photograph it on a porch step at dusk so the glow shows against a darker background. Refresh cut edges with a light trim if they dry out over the next day.

Gather your supplies

Check things off as you get ready.

Work on a stable surface, keep your free hand out of the cutting path, and have an adult handle sharp tools.

Three levels of light

  • Leave intact

    The dog's back outline, ears, and the narrow muscle and muzzle bridges stay as uncut skin so they read dark against the glow.

  • Peel & shade

    Optional shallow skin-peeling along the flank or collar line adds a dim orange gradient if you want soft shading.

  • Cut through

    The chest, belly gap, the spaces between the legs, and the eye are cut fully through for the brightest light.

Learn the carving basics

Before you start cutting

How do I keep the thin bridges from breaking?

Thin your pumpkin wall to about an inch first, since a lighter shell puts less strain on the strips. Cut every large opening before you touch the bridges, and use a fine detail saw with gentle strokes. If a strip feels wobbly, relieve pressure by cutting the opposite edge instead of forcing the blade.

Should I carve the top or the bottom for the lid?

Cut the opening from the bottom on this design. That keeps the tall front panel unbroken for the dog silhouette and lets the pumpkin sit down over your LED light. It also stops moisture from pooling inside near the flame-free light.

What if my pumpkin does not have a flat enough face?

Look for the smoothest, least ribbed panel and center the standing dog there. A few gentle ridges are fine, but heavy ribbing distorts the legs and muzzle. You can shave a shallow flat spot with a knife before transferring the pattern if needed.

Your take belongs here, too.

Changed a detail? Made it simpler? Share a photo of your version and tell the community what worked.

Share your pumpkin

More pumpkins like this

You've reached the end · 8 pumpkins
The Patch Report

Fresh pumpkins, in your inbox.

The best new carvings, ideas worth stealing, and how-tos for carving season. Short, seasonal, and gone by November.

A short email during carving season. Unsubscribe anytime. See our privacy policy.