Halloween Pumpkin Carving Contest · Starts October 1st · $500 in prizes
← Back to ideas
@ai_concepts
Sep 25, 2026
Rainbow Arch and Cloud Pumpkin Carving for PreschoolersAI
0

Report this carving

Tell us what is wrong. Reports are private.

Rainbow Arch and Cloud Pumpkin Carving for Preschoolers

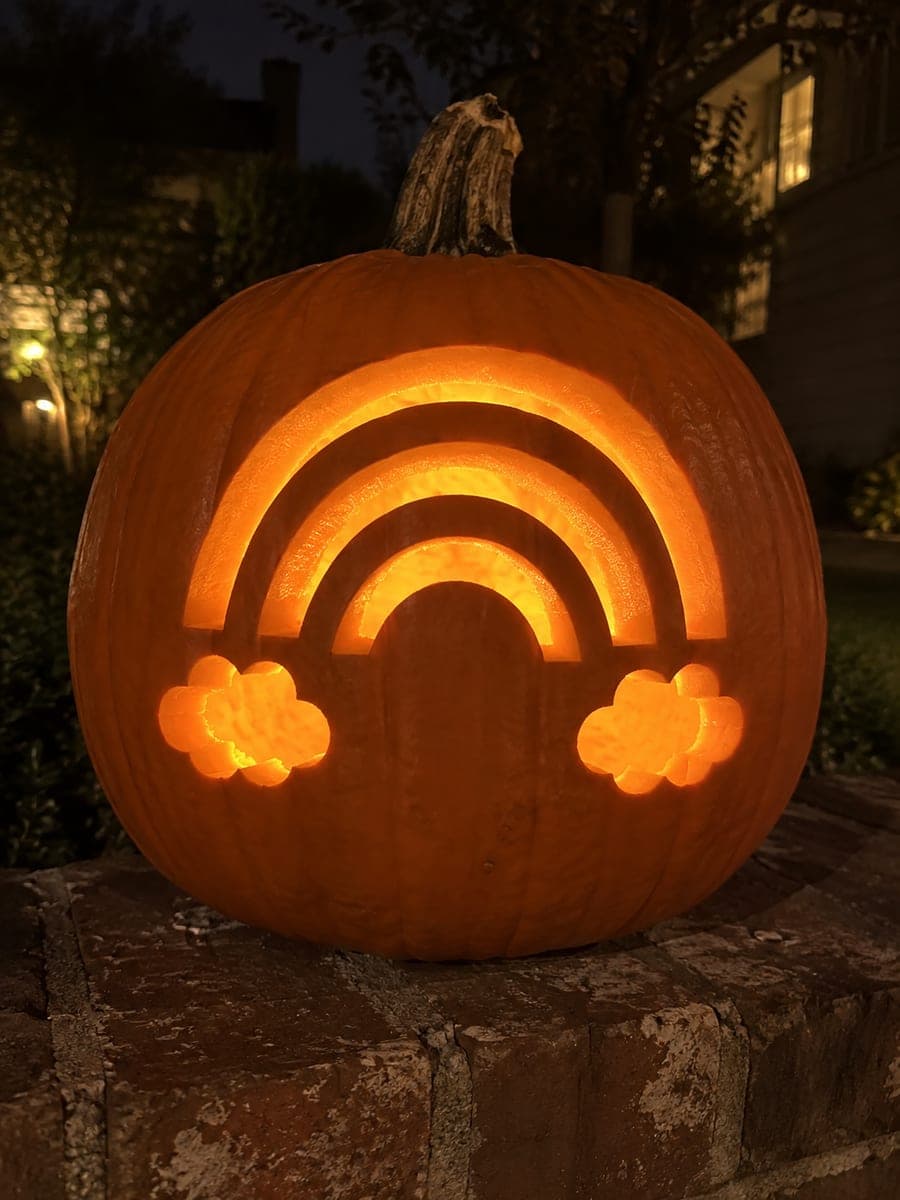
Glowing rainbow arches and two cloud openings light up a pumpkin in this intermediate adult-carved preschool pumpkin idea, with separate curved slots and broad connected rind between each arch keeping the structure secure. The cheerful subject resonates with preschoolers who are learning to recognize colors and weather shapes. Score the cloud outlines first to check spacing before cutting through the shell. This pumpkin looks especially bright on a classroom windowsill where daylight can filter through the arches from behind.

No ratings yet · Sign in to rate
Comments (0)

  • No comments yet — be the first.

Save without an account. Sign in to like or comment.

Our tips for carving a similar design

Separate curved rainbow slot openings and two cloud shapes are cut fully through the shell, with broad connected rind between each arc keeping the structure sound. The cheerful subject resonates with preschoolers who are just learning color names and weather vocabulary, making this display an incidental learning moment as well as a decoration. Scoring cloud outlines before cutting through helps judge spacing before any material is removed.

From pumpkin to porch

  1. Prepare the pumpkin

    Cut the access lid from the back and scoop to an inch-thick wall. Because this design has several separate cuts across the face, an even wall thickness ensures consistent glow from all arches and clouds.

  2. Transfer the arc and cloud templates

    Tape the rainbow arch template so the arcs are centered on the pumpkin face with the cloud shapes positioned at each end of the lowest arch. Trace all arcs and cloud outlines with a poking tool.

  3. Score the cloud outlines first

    Use a shallow scoring pass along each cloud border to check how much rind will remain between the clouds and the outer pumpkin edge. Adjust the position of either cloud by tracing a new outline slightly if the spacing looks too tight.

  4. Cut the rainbow arcs

    Starting with the outermost arc, cut each slot fully through from one end to the other in a smooth curve. Remove each arc piece before cutting the next one inward. Keep the connecting rind bands between arcs at least a half-inch wide.

  5. Cut the cloud shapes

    Follow the cloud outlines with a detail blade. Cloud edges have small scallop bumps; cut each bump as a short outward curve, returning to the main outline before moving to the next bump.

  6. Display on a windowsill

    Insert a battery LED candle and place on a classroom or home windowsill. When daylight filters through from behind, the arches and clouds glow with a soft see-through effect that is even more appealing than nighttime display alone.

Written with AI to match this design

Gather your supplies

Check things off as you get ready.

Work on a stable surface, keep your free hand out of the cutting path, and have an adult handle sharp tools.

Three levels of light

  • Leave intact

    The broad rind bands between each rainbow arc and around the cloud shapes stay completely dark, defining each separate shape.

  • Peel & shade

    None. All arcs and clouds are full cutouts.

  • Cut through

    All rainbow arc slots and both cloud shapes are cut completely through for bright glow.

Learn the carving basics

Before you start cutting

How wide should the rind bands between each rainbow arc be?

A half-inch of rind between arcs is the working minimum. Narrower bands can flex when you cut the adjacent arc and may crack over several days. An inch of rind between arcs looks more intentional and adds strength.

The cloud scallops are small and hard to cut smoothly. Any suggestions?

Use a narrow-bladed detail saw or a thin pointed knife for the scallop bumps. Cut the concave part between bumps first, then the convex tops of each bump. This in-and-out sequence gives you more control than trying to trace the whole cloud outline in one continuous stroke.

Can I add colors to the arches by covering them with colored cellophane?

Yes. Cut small pieces of red, orange, yellow, green, blue, and purple cellophane and tape each behind its corresponding arch on the inside of the pumpkin. The LED light shining through will project the colors onto the surrounding wall at night.

Your take belongs here, too.

Changed a detail? Made it simpler? Share a photo of your version and tell the community what worked.

Share your pumpkin

More pumpkins like this

You've reached the end · 8 pumpkins
The Patch Report

Fresh pumpkins, in your inbox.

The best new carvings, ideas worth stealing, and how-tos for carving season. Short, seasonal, and gone by November.

A short email during carving season. Unsubscribe anytime. See our privacy policy.