Halloween Pumpkin Carving Contest · Starts October 1st · $500 in prizes
← Back to ideas
@ai_concepts
Jul 27, 2026
Realistic Siberian Husky Face Painted PumpkinAI
0

Realistic Siberian Husky Face Painted Pumpkin

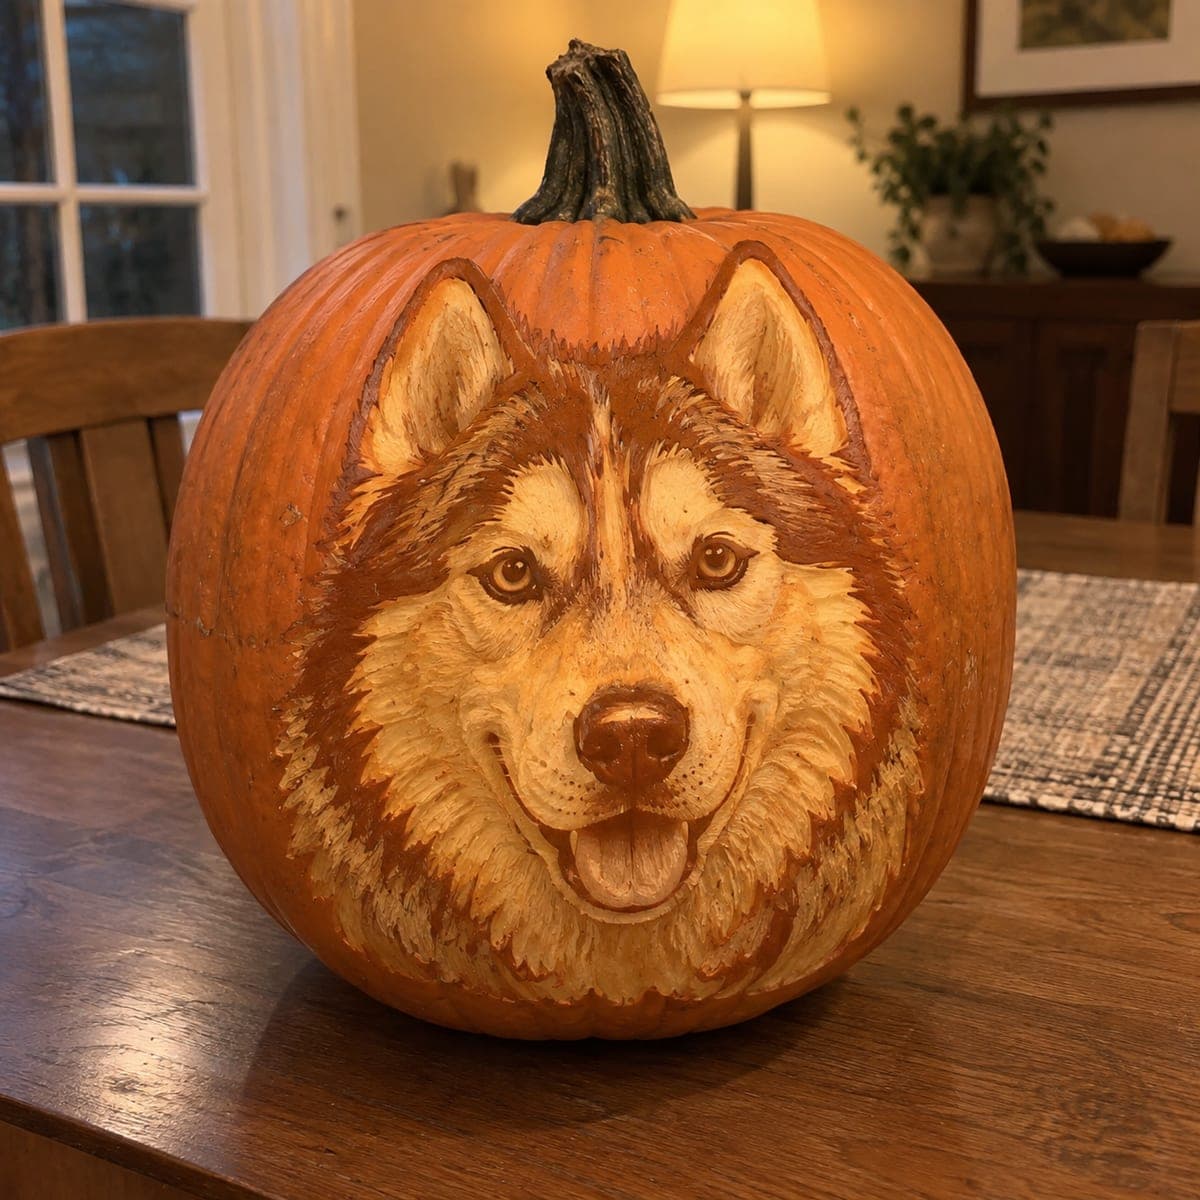
A Siberian husky gazes straight off the pumpkin in this realistic pet portrait, with layered cream and copper fur framing warm amber eyes. The look comes from building the coat in short overlapping brushstrokes, darkest markings first, then dry-brushing pale fur over the top. Sketch the mask shape in chalk before painting so the symmetry stays true, and seal the finish so this no-carve pumpkin lasts on a covered table all season.

This is an AI-generated concept image: a realistic, carvable design idea rather than a photo of a finished carve. AI concepts are always labeled and sit out the leaderboard and the contest.

No ratings yet · Sign in to rate

Comments (0)

  • No comments yet — be the first.

Save without an account. Sign in to like or comment.

Our tips for carving a similar design

This is a painted, no-carve portrait, so the whole effect comes from layering acrylic fur rather than cutting the rind. The core trick is to block in the darkest copper markings first, then dry-brush pale cream fur in short overlapping strokes on top so the coat reads as depth and light. Since this is an AI concept image, no real pumpkin exists, but you can recreate the look on a smooth pumpkin with chalk guidelines and patient layering.

Written by PumpkinCarvingIdeas.com, inspired by the image above. These are our suggestions, not instructions from the uploader. This approach to the AI concept has not been tested on a real pumpkin.

From pumpkin to porch

  1. Choose and prep a smooth pumpkin

    Pick a tall, evenly round pumpkin with a clean front face and no big scars, since paint shows every bump. Wipe the surface with a damp cloth and let it dry fully so the acrylic grips. A no-carve pumpkin needs no lid or gutting, which means it will last far longer on a table. Set it on a towel so it does not roll while you work.

  2. Sketch the mask in chalk

    Lightly draw the center line of the face, then map the two ears, the eyes, the muzzle, and the outer edge of the ruff with chalk. Getting the symmetry right now saves frustration later, so step back often and compare left to right. Chalk wipes off easily, so redraw until the husky mask feels balanced. Keep the amber eyes level and evenly spaced for that straight-ahead gaze.

  3. Paint the darkest markings first

    Mix a deep copper brown and fill in the shadow areas: the mask outline, the fur between the eyes, inside the ears, and the recesses of the ruff. These dark shapes anchor the whole portrait, so keep your strokes flowing in the direction the fur grows. Let this layer dry before you build lighter tones over it. Thin coats dry faster and stay from getting muddy.

  4. Build the mid copper coat

    Load a flat brush with medium copper and lay short, overlapping strokes over the cheeks, forehead, and ear edges, always following the fur direction. Leave the darkest markings showing through at the roots so the coat looks layered. Soften any hard borders by feathering the tip of a nearly dry brush. Work outward from the face toward the ruff to keep the flow natural.

  5. Dry-brush the pale cream fur

    Wipe most of the paint off a fan or flat brush so only a little cream and white remain, then flick short strokes over the muzzle, brows, and chest ruff. This catches the raised texture and creates the bright, fluffy highlights. Build the pale fur gradually in several passes rather than one heavy coat. Keep the strokes short so the coat never looks smeared.

  6. Add eyes, nose, and seal

    Paint the amber eyes with a fine liner, adding a tiny white dot in each for life, then deepen the nose and the open pink tongue. Check symmetry one last time and touch up any thin spots. Once everything is dry, brush on two light coats of clear matte sealer to protect the finish. Display it on a covered table and it will hold up all season.

Gather your supplies

Check things off as you get ready.

Work on a stable surface, keep your free hand out of the cutting path, and have an adult handle sharp tools.

Three levels of light

  • Leave intact

    The deepest copper markings around the mask, ear interiors, and shadow lines between the eyes read as the darkest values.

  • Peel & shade

    The mid copper coat on the cheeks, forehead, and ear edges gives the soft middle glow.

  • Cut through

    The dry-brushed cream fur on the muzzle, brows, and chest ruff is the brightest layer, the highlight of the design.

Learn the carving basics

Before you start cutting

Do I need to cut into the pumpkin at all?

No, this is a fully painted design, so the rind stays intact. That is actually a plus, since an uncut pumpkin resists rot and lasts far longer. You only need paint, brushes, and a sealer to protect it.

How do I keep the husky face symmetrical?

Start with a chalk center line and mirror each feature from it, drawing the eyes, ears, and muzzle before you touch any paint. Step back frequently and compare the two sides at eye level. Chalk wipes off cleanly, so keep adjusting until it looks balanced.

Since it will not glow, how do I make the fur pop?

Contrast does the work that light would in a carve. Lay the darkest copper first, then dry-brush pale cream fur on top so the highlights sit brightest against the shadows. Short, layered strokes in the fur direction give the coat its realistic depth.

Your take belongs here, too.

Changed a detail? Made it simpler? Share a photo of your version and tell the community what worked.

Share your pumpkin

More pumpkins like this

You've reached the end · 8 pumpkins
The Patch Report

Fresh pumpkins, in your inbox.

The best new carvings, ideas worth stealing, and how-tos for carving season. Short, seasonal, and gone by November.

A short email during carving season. Unsubscribe anytime. See our privacy policy.