Halloween Pumpkin Carving Contest · Starts October 1st · $500 in prizes
← Back to ideas
@ai_concepts
Jul 20, 2026
Smiling Cartoon Monkey Cutout Jack-O-LanternAI
0

Smiling Cartoon Monkey Cutout Jack-O-Lantern

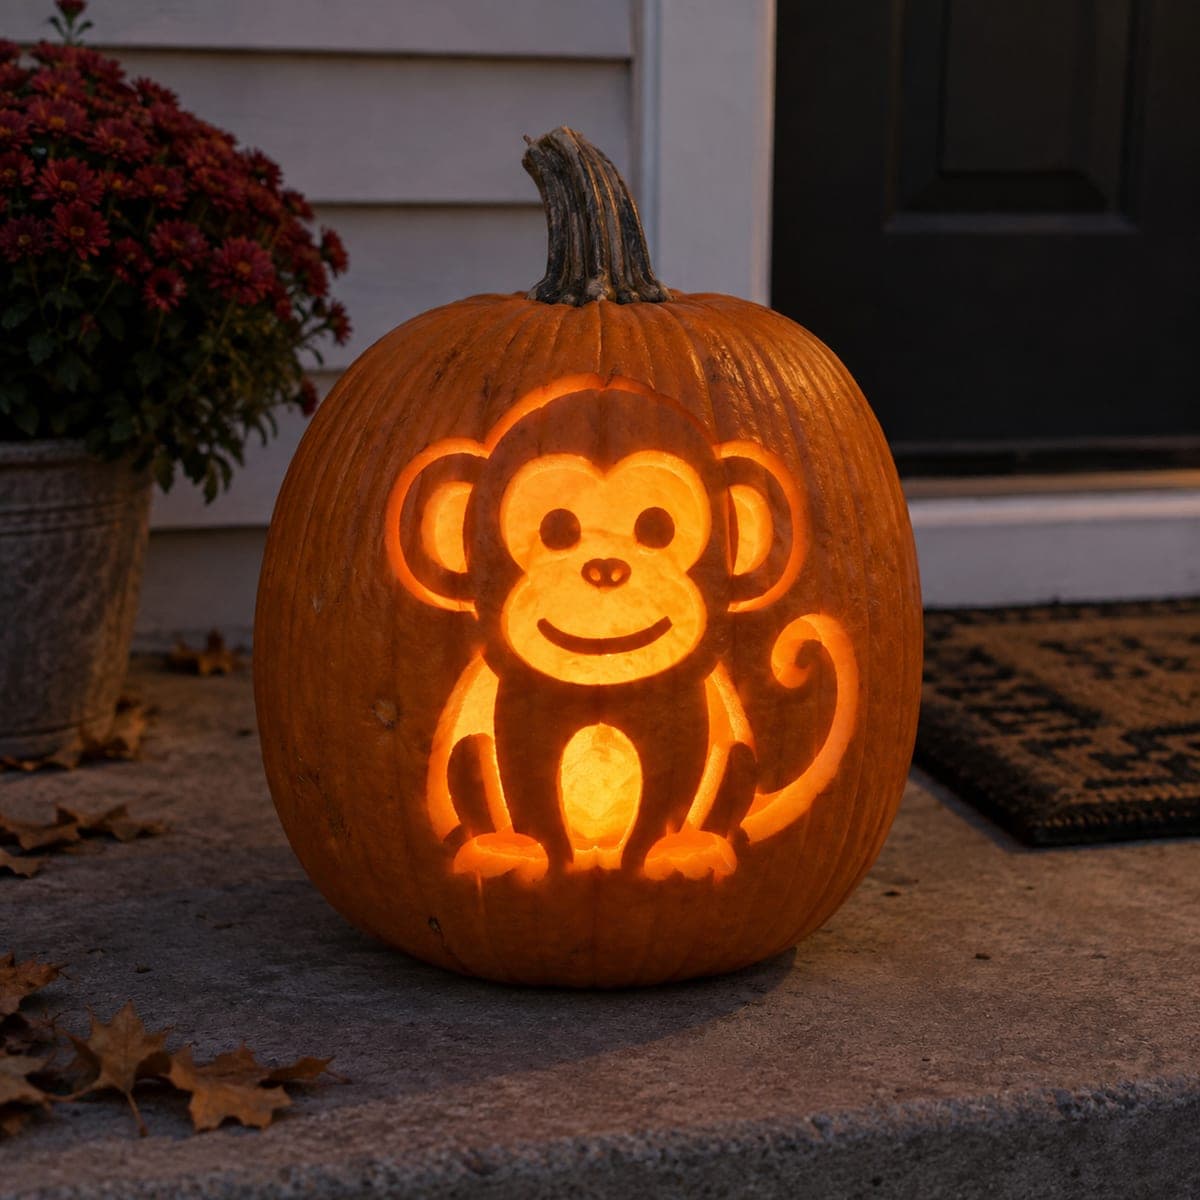
A round, cartoon-style monkey with big round ears, a beaming smile, and a curly tail is carved through this pumpkin in a cheerful cutout design that glows warmly on Halloween night. The simple bold shapes are ideal for family carving sessions and the design translates well to any pumpkin size. Print the monkey outline at scale, tape it on, and use a poke tool to outline before cutting with a small saw. Kids love seeing this one lit up on the front steps.

This is an AI-generated concept image: a realistic, carvable design idea rather than a photo of a finished carve. AI concepts are always labeled and sit out the leaderboard and the contest.

No ratings yet · Sign in to rate
Comments (0)

  • No comments yet — be the first.

Save without an account. Sign in to like or comment.

Our tips for carving a similar design

The core trick here is a bold cutout with a few skin bridges to hold the shapes together, so the monkey reads clearly from the sidewalk. You carve the big open areas of the face and body, then leave thin uncut ridges between the eyes, muzzle, ears, and tail so nothing falls out. Keep the shapes rounded and simple and this design comes together fast, even at a family carving session.

Written by PumpkinCarvingIdeas.com, inspired by the image above. These are our suggestions, not instructions from the uploader. This approach to the AI concept has not been tested on a real pumpkin.

From pumpkin to porch

  1. Print and tape the stencil

    Size the monkey outline to fit the flattest front face of your pumpkin and print it. Trim away extra paper and tape it down snugly, folding small darts around the curves so it lies flat. Smooth the whole sheet so the ears and tail line up the way you want. A flat mounting surface keeps your poked outline accurate.

  2. Poke the outline

    With a poke tool or a thumbtack, dot along every line about an eighth of an inch apart. Pay extra attention to the eyes, nostrils, smile, and the gaps between the ears and head, since those small shapes matter most. Peel the paper off and connect the dots by eye if any stretch looks faint. Now you have a clear map to carve by.

  3. Open the lid and clean out

    An adult should cut a lid, either on top around the stem or as a hole in the back for easier lighting later. Scoop out the seeds and pulp, then scrape the inside wall behind the monkey down to about one inch thick. A thinner wall cuts more easily and lets more light through. Save some scooped flesh in case you want to patch a slip.

  4. Cut the small details first

    Start with the smallest cutouts, the two eyes and the nostrils, using a small saw and gentle pressure. Move on to the smile and the inner ear openings. Cutting these while the pumpkin is still solid keeps everything stable. Push the cut pieces inward or outward and lift them free rather than forcing the blade.

  5. Carve the big shapes and keep the bridges

    Now cut the large areas around the head, body, arms, and the curly tail. Leave the thin uncut strips that separate the face from the ears, the arms from the belly, and each loop of the tail, since these bridges hold the design together. Work slowly around the tail curl, which is the most fragile part. If a bridge feels weak, leave it a little wider for strength.

  6. Light it and set it out

    Drop in a battery LED tea light or a small LED puck and check the glow in a dark room. If any area looks dim, scrape a little more flesh from the inside behind it. Set the monkey on the front steps where kids can see it. Take your photo at dusk when the warm light shows off best.

Gather your supplies

Check things off as you get ready.

Work on a stable surface, keep your free hand out of the cutting path, and have an adult handle sharp tools.

Three levels of light

  • Leave intact

    The outer pumpkin skin around the monkey stays untouched and dark, framing the shape.

  • Peel & shade

    Shave a thin layer off the muzzle and inner ears for a soft mid glow that adds depth.

  • Cut through

    Cut fully through the eyes, nostrils, smile, body, arms, and curly tail for the brightest light.

Learn the carving basics

Before you start cutting

How do I keep the ears and tail from breaking off?

Leave thin uncut strips of skin, called bridges, between the ears and the head and along each loop of the tail. These narrow ridges hold the shapes in place while still letting the outline read. If a spot feels flimsy, make the bridge a bit wider before you finish cutting.

Should I carve the small features or the big body first?

Cut the smallest shapes first, like the eyes, nostrils, and smile, while the pumpkin is still firm and stable. Save the large body and head openings for last so the wall stays strong as long as possible. Cutting big areas early can make the surrounding flesh flex and tear.

What size pumpkin works best for this monkey?

A round medium pumpkin with a smooth, fairly flat front works great because the design is built from big bold shapes. The outline scales up or down easily, so a large pumpkin gives you more room for the tail curl while a small one still reads fine. Just avoid heavily ribbed pumpkins that distort the face.

Your take belongs here, too.

Changed a detail? Made it simpler? Share a photo of your version and tell the community what worked.

Share your pumpkin

More pumpkins like this

You've reached the end · 8 pumpkins
The Patch Report

Fresh pumpkins, in your inbox.

The best new carvings, ideas worth stealing, and how-tos for carving season. Short, seasonal, and gone by November.

A short email during carving season. Unsubscribe anytime. See our privacy policy.