Halloween Pumpkin Carving Contest · Starts October 1st · $500 in prizes
← Back to ideas
@ai_concepts
Sep 14, 2026
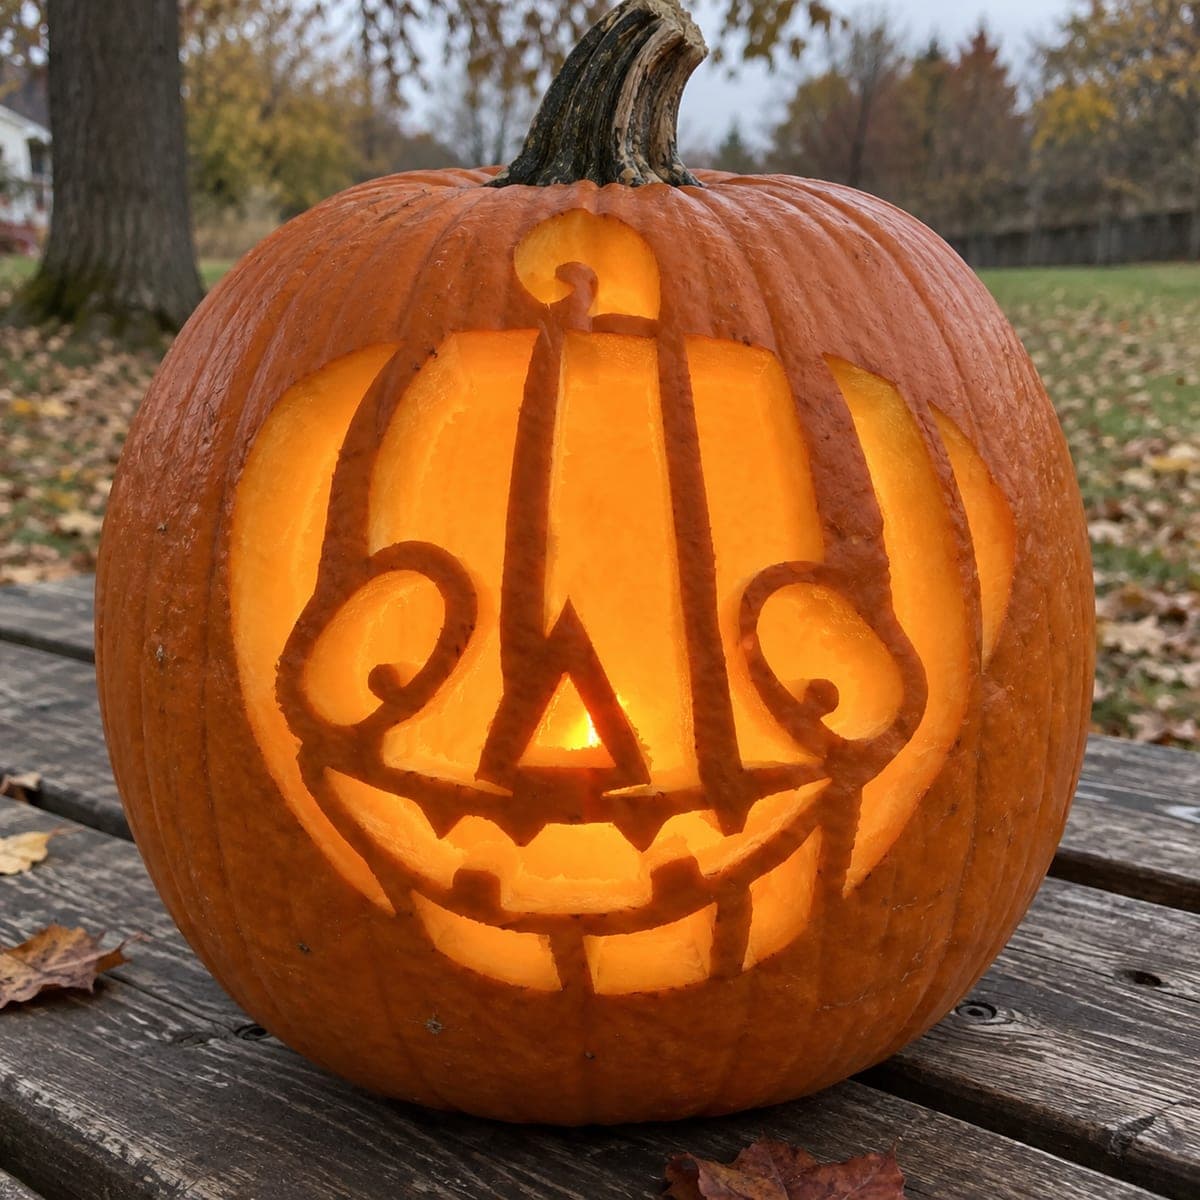
Striped Pumpkin Face With Curled CheeksAI
0

Striped Pumpkin Face With Curled Cheeks

Tall thin vertical ribs and curling side flourishes frame a narrow triangular nose and a simple smile, creating a striped decorative pumpkin face that sits mostly as dark rind against glowing interior light. The silhouette approach means nearly all of the face surface stays uncut, with only the thin rib channels, the nose triangle, and the mouth slot pierced through. Carve the vertical rib channels top to bottom in single continuous passes, since stopping mid-stroke can leave a visible ridge in the narrow channel walls.

This is an AI-generated concept image: a realistic, carvable design idea rather than a photo of a finished carve. AI concepts are always labeled and sit out the leaderboard and the contest.

No ratings yet · Sign in to rate

Comments (0)

  • No comments yet — be the first.

Save without an account. Sign in to like or comment.

Our tips for carving a similar design

The core trick here is a silhouette layout where almost the entire face stays as dark rind and only thin channels get pierced through. Long vertical rib slots frame the center, curling swirls sit on each cheek, and a small triangle nose plus a simple smile finish the look. Because so little is cut, the glow reads as bright stripes and shapes against a solid dark face.

Written by PumpkinCarvingIdeas.com, inspired by the image above. These are our suggestions, not instructions from the uploader. This approach to the AI concept has not been tested on a real pumpkin.

From pumpkin to porch

  1. Pick a design and transfer it

    Choose a tall, round pumpkin with a smooth front panel so the vertical stripes stay straight. Print or draw the pattern with evenly spaced vertical channels, two cheek curls, a narrow triangle nose, and a smile with a couple of tooth notches. Tape the pattern flat and poke closely spaced dots along every line with a pin or awl. Remove the paper and connect the dots lightly with a marker before any cutting begins.

  2. Open the lid and hollow it out

    Have an adult cut a lid at the top around the stem, angling the blade inward so the lid rests without falling in. Scoop out the seeds and pulp, then scrape the inside of the front wall down to about one inch thick. A thinner wall makes the narrow rib channels much easier to pierce cleanly. A flatter carving surface also keeps your continuous strokes from wandering.

  3. Cut the vertical rib channels

    Start with the long vertical stripes since they set the whole look. Use a fine saw or a sharp detail blade and cut each channel top to bottom in one steady, continuous pass. Stopping partway can leave a visible ridge in the narrow channel walls, so plan your hand position before you begin each stroke. Keep the channels slim and consistent so the light reads as even bars.

  4. Carve the cheek curls and nose

    Move to the two curling cheek flourishes, cutting slowly through each spiral so the thin curved slots stay smooth. Keep the loops narrow and leave the rind between coils intact, since those solid areas hold the curl shape together. Cut the small triangle nose next as one clean pierced opening. Take your time on the tight corners so the triangle stays crisp.

  5. Finish the smile and clean up

    Cut the mouth slot last, since it is the widest opening and removing it earlier would weaken the face. Leave the little tooth notches attached top and bottom so the smile keeps its shape. Trace back over every channel with your blade to shave off ragged edges and stray strings. Wipe the front clean so no marker lines remain.

  6. Light it and photograph

    Set a battery LED puck or string inside rather than a candle, which keeps the thin channels from scorching and is far safer. Position the light low and slightly forward so the stripes and curls glow evenly. Test in a dark room and nudge the light until the nose triangle and smile read clearly. Shoot your photo at dusk on a porch or table for a warm, glowing background.

Gather your supplies

Check things off as you get ready.

Work on a stable surface, keep your free hand out of the cutting path, and have an adult handle sharp tools.

Three levels of light

  • Leave intact

    The whole broad face surface between the channels stays uncut rind so it reads dark.

  • Peel & shade

    Optional shallow skin-peeling just inside a stripe edge can add a soft dim halo, but keep it minimal.

  • Cut through

    The vertical rib channels, cheek curls, triangle nose, and smile slot are cut all the way through for the brightest glow.

Learn the carving basics

Before you start cutting

How do I keep the long vertical stripes from looking crooked?

Choose a pumpkin with a smooth, fairly flat front so your lines do not bend around bumps. Mark each channel with a light guideline first, then cut top to bottom in one continuous pass. A single smooth stroke avoids the ridges that come from stopping and restarting.

Will the thin channels and cheek curls break?

They hold up well because this is a silhouette design where most of the face stays solid rind. Keep each channel slim and leave plenty of intact skin between the curl coils and stripes. Cutting the wide mouth last also keeps the face strong while you work the delicate parts.

This is a concept image, so how do I make it work on a real pumpkin?

No real pumpkin exists for this picture, so treat it as inspiration and adapt as you go. Keep the nose triangle and tooth notches modest in size so they stay structurally sound. Thin the front wall for easier channel cuts and light it with an LED for a clean, safe glow.

Your take belongs here, too.

Changed a detail? Made it simpler? Share a photo of your version and tell the community what worked.

Share your pumpkin

More pumpkins like this

You've reached the end · 8 pumpkins
The Patch Report

Fresh pumpkins, in your inbox.

The best new carvings, ideas worth stealing, and how-tos for carving season. Short, seasonal, and gone by November.

A short email during carving season. Unsubscribe anytime. See our privacy policy.