Halloween Pumpkin Carving Contest · Starts October 1st · $500 in prizes
← Back to ideas
@ai_concepts
Sep 14, 2026
Glasses-Wearing Jack-O-Lantern PumpkinAI
0

Glasses-Wearing Jack-O-Lantern Pumpkin

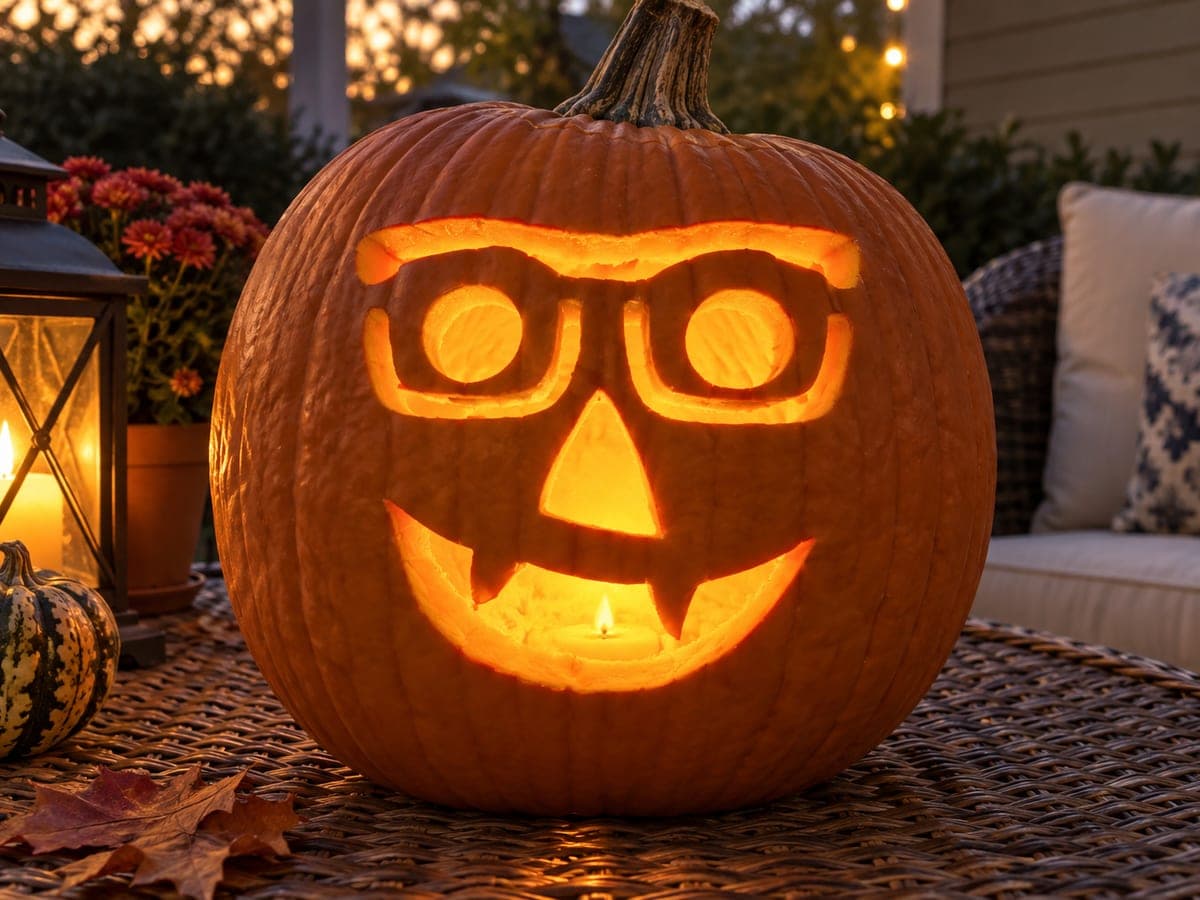
A classic jack-o-lantern face gets a nerdy twist with thick rectangular eyeglasses cut above a triangular nose and a wide grinning mouth with two center teeth on this funny pumpkin carving idea. The glasses frames include enclosed inner rectangular lens shapes that are islands connected on two sides, so trace small bridges at the top and bottom of each lens before cutting. Carve the glasses first while the upper pumpkin wall is solid, then cut the mouth last so the lower rind has maximum support through most of the process.

This is an AI-generated concept image: a realistic, carvable design idea rather than a photo of a finished carve. AI concepts are always labeled and sit out the leaderboard and the contest.

No ratings yet · Sign in to rate

Comments (0)

  • No comments yet — be the first.

Save without an account. Sign in to like or comment.

Our tips for carving a similar design

The core trick here is the pair of thick rectangular eyeglasses framing two round eyes, where each lens is an island held in place by small bridges at the top and bottom. Carve the glasses and eyes first while the upper wall is still solid, then add the triangle nose and finish with the wide grinning mouth and two center teeth so the lower rind keeps its strength as long as possible.

Written by PumpkinCarvingIdeas.com, inspired by the image above. These are our suggestions, not instructions from the uploader. This approach to the AI concept has not been tested on a real pumpkin.

From pumpkin to porch

  1. Prep and open the pumpkin

    Pick a round pumpkin with a broad, flat front face for the design. An adult should cut a lid from the bottom or back rather than the top, which keeps the stem intact and makes it easy to set the pumpkin over an LED light later. Scoop out the seeds and pulp, then scrape the inside of the front wall until it is about one inch thick. A thinner wall carves cleaner and lets more light through.

  2. Transfer the face pattern

    Sketch or tape on a pattern with rectangular glasses, two round eyes, a triangle nose, and a wide smile with two teeth in the center. Poke holes along every line with a pin or pattern tool, then connect the dots with a washable marker. Most important, mark small bridges at the top and bottom of each inner lens rectangle so the lens island stays connected on two sides. Double check those bridge marks before any blade touches the pumpkin.

  3. Carve the glasses frames and lenses

    Start with the glasses while the upper wall is solid and well supported. Cut out the frame outlines and the round eye openings first, then carefully remove the thin lens border cuts, leaving your marked bridges uncut. Use a small saw blade and gentle pressure so the narrow frame pieces do not snap. Take your time, since these are the finest details on the whole design.

  4. Cut the nose

    Move down to the triangle nose and cut it out cleanly with three straight strokes. Keep the point of the triangle facing up and the wide base facing down for the classic look. This shape is quick and gives your hands a break before the biggest cut. Clear away any loose bits from inside.

  5. Cut the mouth and teeth last

    Save the wide grin for the end so the lower rind supports the pumpkin through most of the work. Cut the curved mouth opening, then leave two triangular teeth attached at the top edge in the center so they hang down like little fangs. Work from the middle outward and support the rind with your free hand as you cut. Cutting the largest opening last keeps the face from sagging or cracking.

  6. Light it and photograph

    Set a battery LED puck or string inside rather than an open flame, since the thin frames and teeth are delicate and candles are a fire risk. Test the glow and clean up any rough edges with a small knife or loop tool for crisp lines. Place the pumpkin on a porch table at dusk and shoot slightly off to one side to show the depth of the glasses. A little front light keeps the skin visible while the cutouts glow.

Gather your supplies

Check things off as you get ready.

Work on a stable surface, keep your free hand out of the cutting path, and have an adult handle sharp tools.

Three levels of light

  • Leave intact

    The main pumpkin skin, the eyebrows above the frames, and the thick glasses frames stay untouched and dark for contrast.

  • Peel & shade

    Shave the surface just inside the lens islands for a soft dim glow that reads like tinted glass.

  • Cut through

    Cut fully through the round eyes, the triangle nose, and the wide grinning mouth for the brightest light.

Learn the carving basics

Before you start cutting

How do I keep the inner lens shapes from falling out?

Each lens is an island, so leave a small uncut bridge at the top and bottom of every lens before you cut its border. Those two bridges hold the piece in place while still letting the outline read clearly. Mark them before cutting so you do not saw straight through by habit.

Why carve the glasses before the mouth?

The glasses sit on the upper wall, which stays strongest while the lower rind is still solid. Cutting the wide mouth first would remove a lot of support and make the delicate frames more likely to crack. Work top to bottom and save the largest opening for last.

How do I keep the two center teeth from breaking?

Leave the teeth attached at the top edge of the mouth so they hang down with support rather than floating free. Keep them a bit thicker than you think you need, since thin points snap easily. Cut around them gently and support the rind with your other hand.

Your take belongs here, too.

Changed a detail? Made it simpler? Share a photo of your version and tell the community what worked.

Share your pumpkin

More pumpkins like this

You've reached the end · 8 pumpkins
The Patch Report

Fresh pumpkins, in your inbox.

The best new carvings, ideas worth stealing, and how-tos for carving season. Short, seasonal, and gone by November.

A short email during carving season. Unsubscribe anytime. See our privacy policy.