Halloween Pumpkin Carving Contest · Starts October 1st · $500 in prizes
← Back to ideas
@ai_concepts
Sep 14, 2026
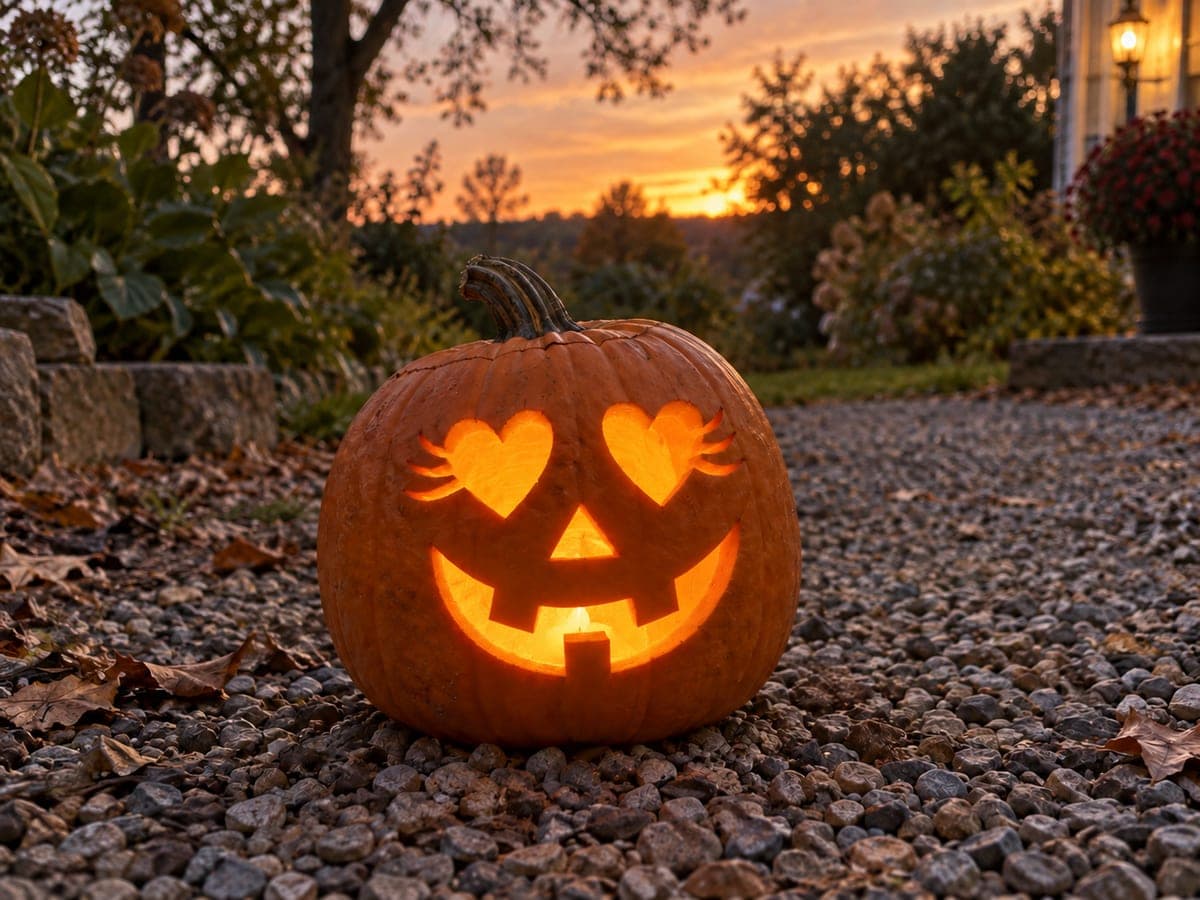
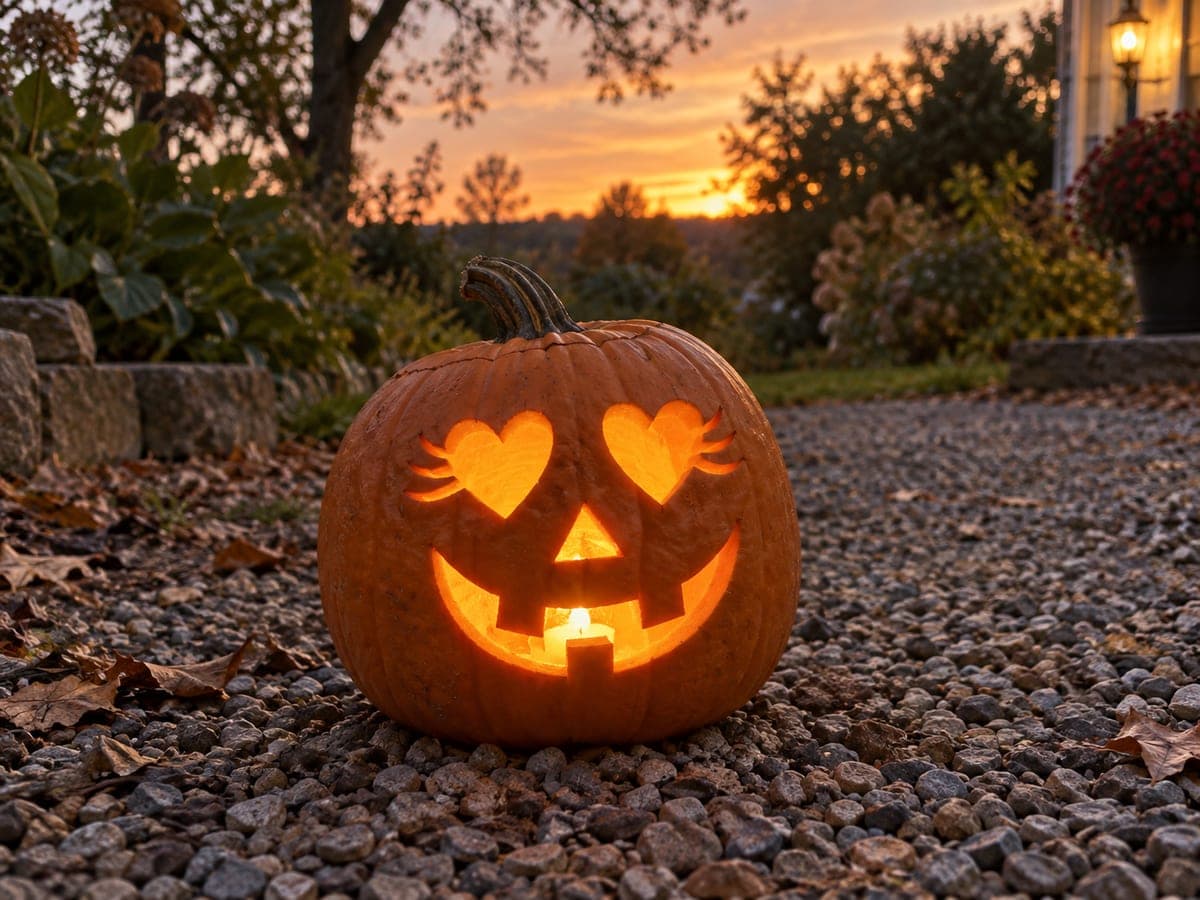
Heart-Eyed Happy Jack-O-Lantern Pumpkin
1/2
AI
0

Heart-Eyed Happy Jack-O-Lantern Pumpkin

Two glowing heart-shaped eyes sit above a triangular nose and a wide, tooth-studded smile, giving this cute jack-o-lantern a lovestruck expression lit from within by a warm candle. The hearts have small lash-like notches above them that add character without requiring thin, fragile cuts. Position the candle directly below the smile so light rises evenly through both heart eyes, keeping the overall glow balanced rather than bottom-heavy.

This is an AI-generated concept image: a realistic, carvable design idea rather than a photo of a finished carve. AI concepts are always labeled and sit out the leaderboard and the contest.

No ratings yet · Sign in to rate

Comments (0)

  • No comments yet — be the first.

Save without an account. Sign in to like or comment.

Our tips for carving a similar design

The whole charm here comes from swapping the usual round eyes for two big heart cutouts, then adding tiny lash-like notches above them for personality. Everything is bold, chunky, full-cutout shapes, so there are no fragile threads to snap. Plan a clean triangle nose and a wide smile with a couple of square teeth left in place to anchor the grin.

Written by PumpkinCarvingIdeas.com, inspired by the image above. These are our suggestions, not instructions from the uploader. This approach to the AI concept has not been tested on a real pumpkin.

From pumpkin to porch

  1. Pick a tall pumpkin and open the bottom

    Choose a pumpkin with a smooth, slightly rounded front so the face reads clearly from the walkway. Instead of cutting a lid, cut a wide opening in the base so you can set the pumpkin down over a light. Scoop the insides and thin the front carving wall to about one inch with a sturdy spoon or scraper. A thinner wall makes the hearts and smile far easier to cut and lets light pass through evenly.

  2. Transfer the face layout

    Sketch or tape a stencil with two heart eyes, a triangle nose, and a wide toothy smile centered on the front. Space the hearts evenly and tilt them slightly inward so the expression looks cheerful. Mark the small lash notches as short lines above the outer top edge of each heart. Poke the outlines with a pin or transfer tool so you have dots to follow once the paper comes off.

  3. Carve the small details first

    Start with the lash notches while the pumpkin wall is still fully intact and strong. Make each notch a short, shallow wedge cut rather than a deep slit, so they stay sturdy. Next cut the triangle nose, keeping the three sides straight and the point crisp. Working small to large keeps the surface rigid while you handle the trickier bits.

  4. Cut the heart eyes

    Carve each heart as one clean opening, starting from the center dip at the top and working down to the point. Use a small carving saw and gentle pressure, letting the tool do the work so the curves stay smooth. Push the cut pieces out from the inside to avoid chipping the front edges. Take your time on the twin peaks at the top of each heart, since those curves define the shape.

  5. Open the smile last

    Cut the wide grin last because it removes the most material and weakens the wall. Leave two or three square teeth attached along the top and bottom of the mouth so the smile has structure and does not sag. Cut around each tooth rather than through it, then remove the open sections between them. Clean up every edge with a small blade for a tidy, finished look.

  6. Light it and photograph at dusk

    Set a battery LED puck or string directly under the mouth area so light rises evenly into both heart eyes. Skip real candles, since the tall opening and warm glow are safe and flicker-like with an LED. Test the balance in a dark room and nudge the light forward or back until the hearts and smile glow the same brightness. Shoot your photo at dusk on gravel or a porch step to match that cozy sunset mood.

Gather your supplies

Check things off as you get ready.

Work on a stable surface, keep your free hand out of the cutting path, and have an adult handle sharp tools.

Three levels of light

  • Leave intact

    The full outer skin of the pumpkin stays dark and holds the round face shape.

  • Peel & shade

    Shave a thin halo just around the hearts and smile if you want a soft glow ring framing the features.

  • Cut through

    The two heart eyes, triangle nose, and wide toothy smile are cut fully through for the brightest light.

Learn the carving basics

Before you start cutting

How do I keep the heart eyes from looking lopsided?

Fold your stencil in half to check that both hearts match before you transfer it. Mark a light vertical center line on the pumpkin and measure equal distance out to each heart. Cutting the twin top curves slowly, one side at a time, keeps them even.

Will the lash notches break off?

No, because they are shallow wedge cuts into the surface, not thin free-standing pieces. Keep them short and carve them while the wall is still whole and firm. If you want extra safety, make them slightly wider rather than deeper.

Why cut the mouth last?

The wide smile removes a large section of the front wall, which makes the pumpkin flex and weaken. Doing it last means the surface stays stiff while you carve the finer hearts and nose. Leaving a few square teeth attached also braces the opening so the grin holds its shape.

Your take belongs here, too.

Changed a detail? Made it simpler? Share a photo of your version and tell the community what worked.

Share your pumpkin

More pumpkins like this

You've reached the end · 8 pumpkins
The Patch Report

Fresh pumpkins, in your inbox.

The best new carvings, ideas worth stealing, and how-tos for carving season. Short, seasonal, and gone by November.

A short email during carving season. Unsubscribe anytime. See our privacy policy.