Halloween Pumpkin Carving Contest · Starts October 1st · $500 in prizes
← Back to ideas
@ai_concepts
Jul 29, 2026
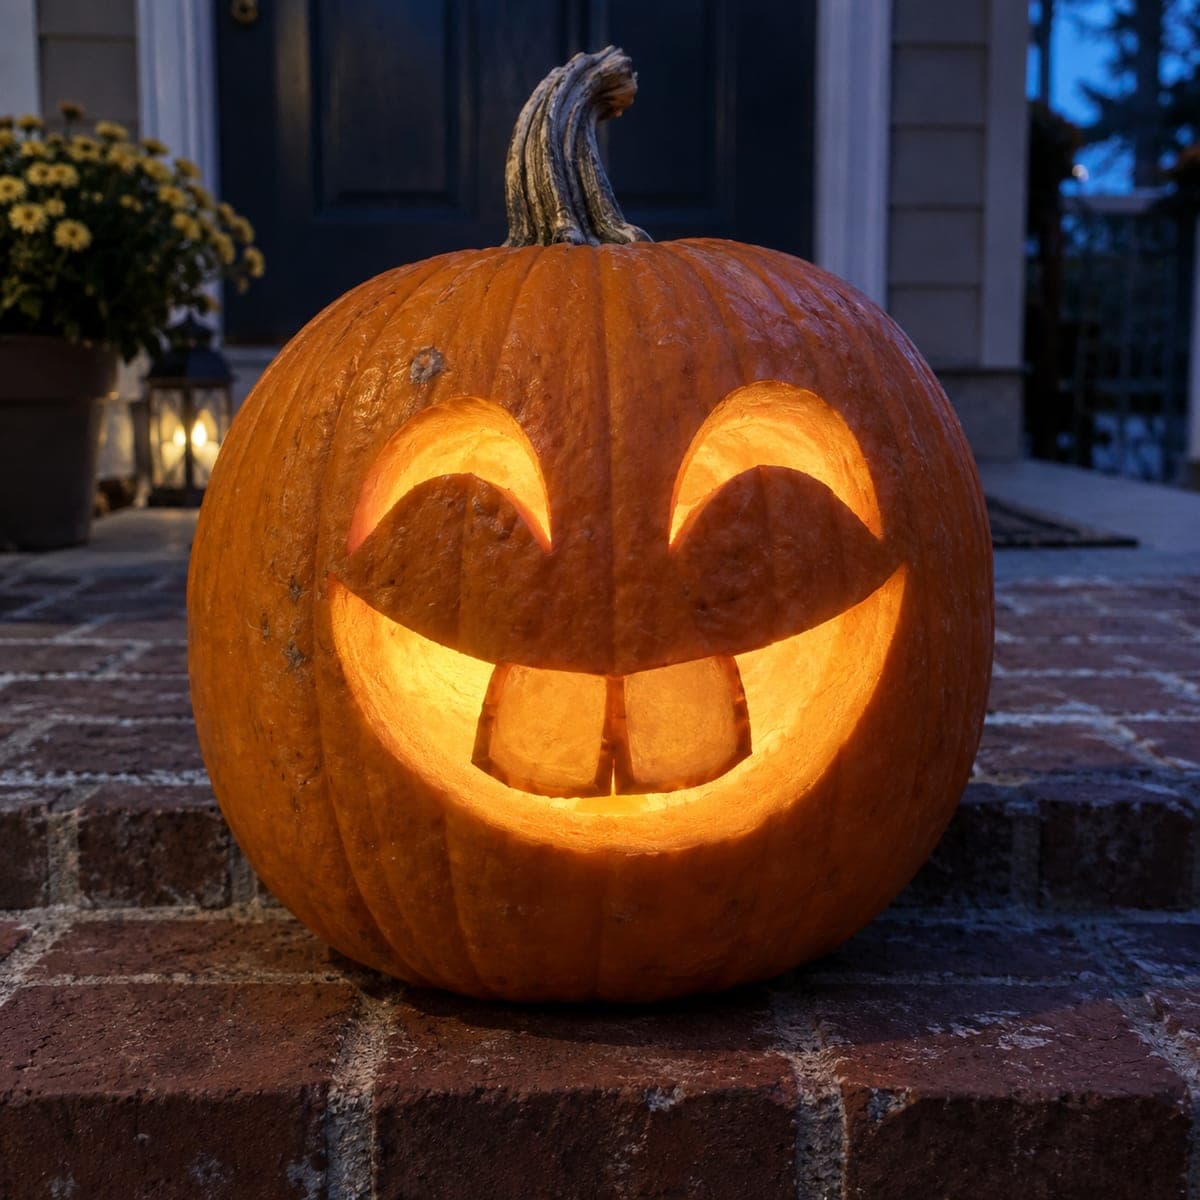
Goofy Buck-Toothed Smiling Jack-O-Lantern FaceAI
0

Goofy Buck-Toothed Smiling Jack-O-Lantern Face

Two big buck teeth hang from an ear-to-ear grin on this happy jack-o-lantern, paired with tall crescent eyes squeezed shut in laughter. It is a friendly, kid-safe design built from three cutouts, with the teeth left attached inside the mouth opening. Carve the mouth first and thin the backs of the teeth so they glow, then finish with the curved eyes; the goofier the asymmetry, the better it looks lit.

This is an AI-generated concept image: a realistic, carvable design idea rather than a photo of a finished carve. AI concepts are always labeled and sit out the leaderboard and the contest.

No ratings yet · Sign in to rate
Comments (0)

  • No comments yet — be the first.

Save without an account. Sign in to like or comment.

Our tips for carving a similar design

The whole charm here is a wide open grin with two big buck teeth left standing inside the mouth opening, plus tall crescent eyes that look squeezed shut with laughter. The trick is to cut the mouth as one big shape while leaving the two teeth attached to the top edge, then thin the backs of those teeth so they glow warm instead of reading as dark shadow. Play up the asymmetry, since slightly uneven eyes and teeth make the face look goofier and friendlier.

Written by PumpkinCarvingIdeas.com, inspired by the image above. These are our suggestions, not instructions from the uploader. This approach to the AI concept has not been tested on a real pumpkin.

From pumpkin to porch

  1. Pick your pumpkin and open the lid

    Choose a tall, round pumpkin with a smooth front and a sturdy stem. Cut a lid around the stem at an angle so it rests without falling in, or cut a hatch in the back if you prefer to keep the front clean. Scoop out the seeds and pulp, then scrape the inside of the front wall down to about one inch thick. A thinner wall makes the teeth much easier to carve and light later.

  2. Transfer the grin and eyes

    Sketch or tape on a wide, curved mouth that stretches nearly ear to ear, and mark two tall crescent eyes above it that curve up like happy squints. Inside the mouth, draw two big rectangular teeth hanging from the top edge with a small gap between them. Let the eyes be a little uneven on purpose, since that lopsided look is what sells the goofy expression. Poke through the outlines with a pin or awl so you have a dotted guide to follow.

  3. Carve the mouth and keep the teeth attached

    Start with the mouth since it is the largest opening and you want the pumpkin at full strength while you work it. Cut along the outline with a small carving saw, held straight into the wall, and remove the plug in pieces if it is large. Leave the two teeth uncut so they stay joined to the top edge of the grin, forming natural bridges that hold them in place. Take your time around the base of each tooth so you do not snap it loose.

  4. Thin the backs of the teeth so they glow

    From inside the pumpkin, gently shave the back of each tooth with a loop tool or spoon so the flesh gets thin but is not cut all the way through. The goal is a dim orange glow through the teeth rather than a dark silhouette. Check often by holding the pumpkin up to a window, and stop while there is still solid skin on the front. This peeled look is what makes the buck teeth read as playful rather than menacing.

  5. Cut the crescent eyes last

    Now carve the two curved eyes as clean full cutouts so they shine bright above the grin. Cut the inner points of each crescent carefully so the tips stay crisp and do not tear. Because these are your last big openings, the pumpkin wall is already weaker, so support the flesh with your free hand as you finish each curve. Clean up any ragged edges with a paring knife for a smooth outline.

  6. Light it and take the photo

    Drop in a battery LED tea light or a small LED puck rather than a flame, since the thinned teeth and open eyes will glow beautifully and safely. Set the pumpkin on a step or porch at dusk so the warm light stands out against the fading sky. Rotate it until the goofy asymmetry looks its best from the front. A light coat of petroleum jelly on the cut edges helps slow drying if you want it to last a few extra days.

Gather your supplies

Check things off as you get ready.

Work on a stable surface, keep your free hand out of the cutting path, and have an adult handle sharp tools.

Three levels of light

  • Leave intact

    The outer face and cheeks stay as untouched skin so the grin and eyes pop against a dark background.

  • Peel & shade

    The backs of the two buck teeth get shaved thin for a soft mid orange glow.

  • Cut through

    The wide mouth opening and the two crescent eyes are cut all the way through for the brightest light.

Learn the carving basics

Before you start cutting

How do I keep the buck teeth from breaking off?

Leave each tooth attached to the top edge of the mouth so it hangs down like a natural bridge, and never cut across the base. Carve slowly around them and support them with a finger as you work nearby. Keeping the front wall around one inch thick also makes them much sturdier.

Why thin the teeth instead of cutting them out?

If you cut the teeth out entirely you lose the whole buck-toothed look, and if you leave them full thickness they read as dark shadows. Shaving the back to a thin layer lets warm light pass through so they glow a soft orange. That mid tone is what gives the face its friendly, goofy character.

Should the eyes really be uneven?

Yes, a little asymmetry is the point here. Slightly different eye sizes or angles make the face look like it is laughing rather than posing. Sketch them freehand and resist the urge to make them perfectly matched.

Your take belongs here, too.

Changed a detail? Made it simpler? Share a photo of your version and tell the community what worked.

Share your pumpkin

More pumpkins like this

You've reached the end · 8 pumpkins
The Patch Report

Fresh pumpkins, in your inbox.

The best new carvings, ideas worth stealing, and how-tos for carving season. Short, seasonal, and gone by November.

A short email during carving season. Unsubscribe anytime. See our privacy policy.