Halloween Pumpkin Carving Contest · Starts October 1st · $500 in prizes
← Back to ideas
@ai_concepts
Sep 14, 2026
Laughing Pumpkin With Heart-Shaped TongueAI
0

Laughing Pumpkin With Heart-Shaped Tongue

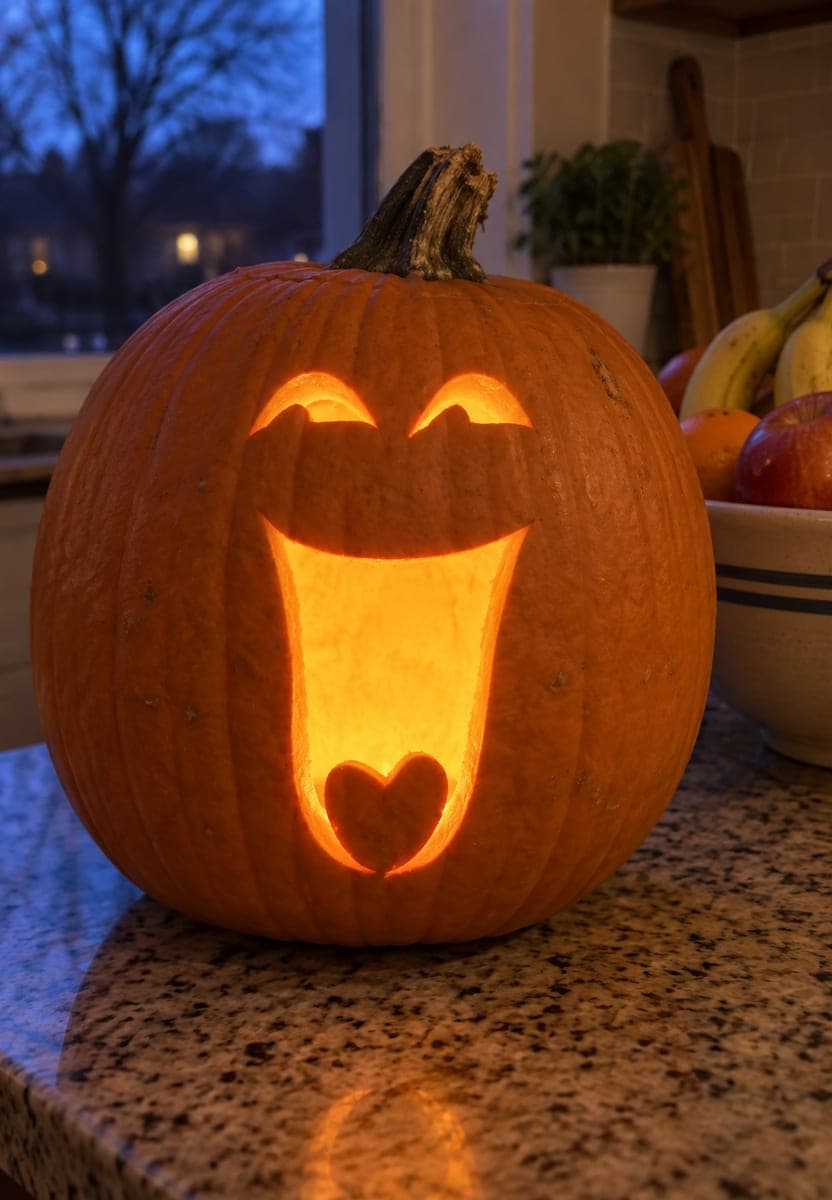
Two narrow squinting eyes taper to points at their ends, and below them a very tall rectangular mouth opening narrows to a small heart shape at its bottom, giving this jack-o-lantern an almost singing expression. The pumpkin carving technique is pure cutout, with both the squinting eyes and the tall mouth pierced all the way through. Cut the heart at the base of the mouth before opening the large rectangular body above it, so the delicate curves of the heart are carved while the wall is still solid. Tall pumpkins with elongated faces suit this design particularly well because the proportions match the tall mouth opening.

This is an AI-generated concept image: a realistic, carvable design idea rather than a photo of a finished carve. AI concepts are always labeled and sit out the leaderboard and the contest.

No ratings yet · Sign in to rate

Comments (0)

  • No comments yet — be the first.

Save without an account. Sign in to like or comment.

Our tips for carving a similar design

The core trick here is a single tall cutout that reads as a wide open, singing mouth, finished with a tiny heart at its base for a tongue. You carve all three shapes as clean pierced openings, but the order matters: the delicate heart goes in first while the pumpkin wall is still solid, then the big mouth opens above it. Two short tapered eye slits over the top complete the friendly laughing look.

Written by PumpkinCarvingIdeas.com, inspired by the image above. These are our suggestions, not instructions from the uploader. This approach to the AI concept has not been tested on a real pumpkin.

From pumpkin to porch

  1. Pick a tall pumpkin and prep it

    Choose a tall, slightly elongated pumpkin so the proportions match the long mouth. Cut a lid from the bottom instead of the top so the stem stays intact, or cut a top lid if you prefer easier access. Scoop out the insides and scrape the front wall where the face goes down to about one inch thick. A thinner wall makes the cutouts easier and lets more light through.

  2. Transfer the face design

    Sketch or print your face with two narrow tapered eye slits and one tall rounded rectangle for the mouth, with a small heart centered at the bottom of the mouth. Tape the pattern on and poke the outlines with a pin or a poker tool. Keep the heart clearly marked so you can carve it before the big opening. Step back and check that everything is centered and level before you cut.

  3. Carve the heart tongue first

    With the wall still solid, carefully cut the small heart at the base of the mouth. Use a small detail saw or a craft knife and take slow, short strokes around the two curved humps and the point. Because the surrounding pumpkin is still firm, the delicate curves hold their shape without cracking. Push the heart piece out gently once it is fully cut.

  4. Open the tall mouth

    Now cut the large rectangular mouth above the heart, leaving a small bridge of pumpkin between the heart and the mouth opening so the tongue stays attached at the bottom. Saw the long sides first, then the top and bottom, and support the piece with your free hand as it comes loose. Removing this big opening last keeps the wall strong while you did the fine work. Clean up the edges with your knife for smooth lines.

  5. Cut the squinting eyes

    Carve the two narrow eye slits above the mouth, tapering each one to a point at the outer ends. Keep them thin and slightly curved so they read as a happy squint. These are small openings, so work slowly and let the pumpkin wall guide your blade. Trim any ragged spots so the light shines through cleanly.

  6. Light it and photograph

    Drop in a battery LED light or a string of LEDs, never a candle, since the tall mouth acts like a chimney and open flames are a fire risk. Set the pumpkin on a flat surface and dim the room to see the glow. Angle the light so it fills the tall mouth and backlights the little heart. Snap your photo at dusk for that warm indoor shine.

Gather your supplies

Check things off as you get ready.

Work on a stable surface, keep your free hand out of the cutting path, and have an adult handle sharp tools.

Three levels of light

  • Leave intact

    The whole outer skin of the pumpkin stays untouched and dark, keeping the face crisp against the orange body.

  • Peel & shade

    Optional: lightly skin-peel a thin outline around the mouth or eyes if you want a soft glowing halo, though the pictured look keeps this minimal.

  • Cut through

    The two tapered eye slits, the tall mouth, and the small heart tongue are cut all the way through for the brightest glow.

Learn the carving basics

Before you start cutting

Why carve the heart before the mouth?

The heart has delicate curves and a fine point that can crack if the surrounding pumpkin is already hollowed and open. Carving it while the wall is still solid gives those curves firm backing to hold their shape. Once the heart is done, you can safely open the big mouth above it.

How do I keep the heart tongue attached?

Leave a small bridge of pumpkin wall connecting the bottom of the mouth opening to the heart so the tongue stays anchored. Plan this bridge before you cut and mark it on your pattern. If the section feels loose, keep the bridge a little wider for strength.

Do I need a tall pumpkin for this?

A tall, elongated pumpkin suits the design best because its height matches the long mouth opening. A rounder pumpkin can work, but the mouth will look shorter and the singing expression less dramatic. Look for a pumpkin with a smooth, even front surface for the face.

Your take belongs here, too.

Changed a detail? Made it simpler? Share a photo of your version and tell the community what worked.

Share your pumpkin

More pumpkins like this

You've reached the end · 8 pumpkins
The Patch Report

Fresh pumpkins, in your inbox.

The best new carvings, ideas worth stealing, and how-tos for carving season. Short, seasonal, and gone by November.

A short email during carving season. Unsubscribe anytime. See our privacy policy.