Halloween Pumpkin Carving Contest · Starts October 1st · $500 in prizes
← Back to ideas
@ai_concepts
Sep 14, 2026
Tilted Laughing Face PumpkinAI
0

Tilted Laughing Face Pumpkin

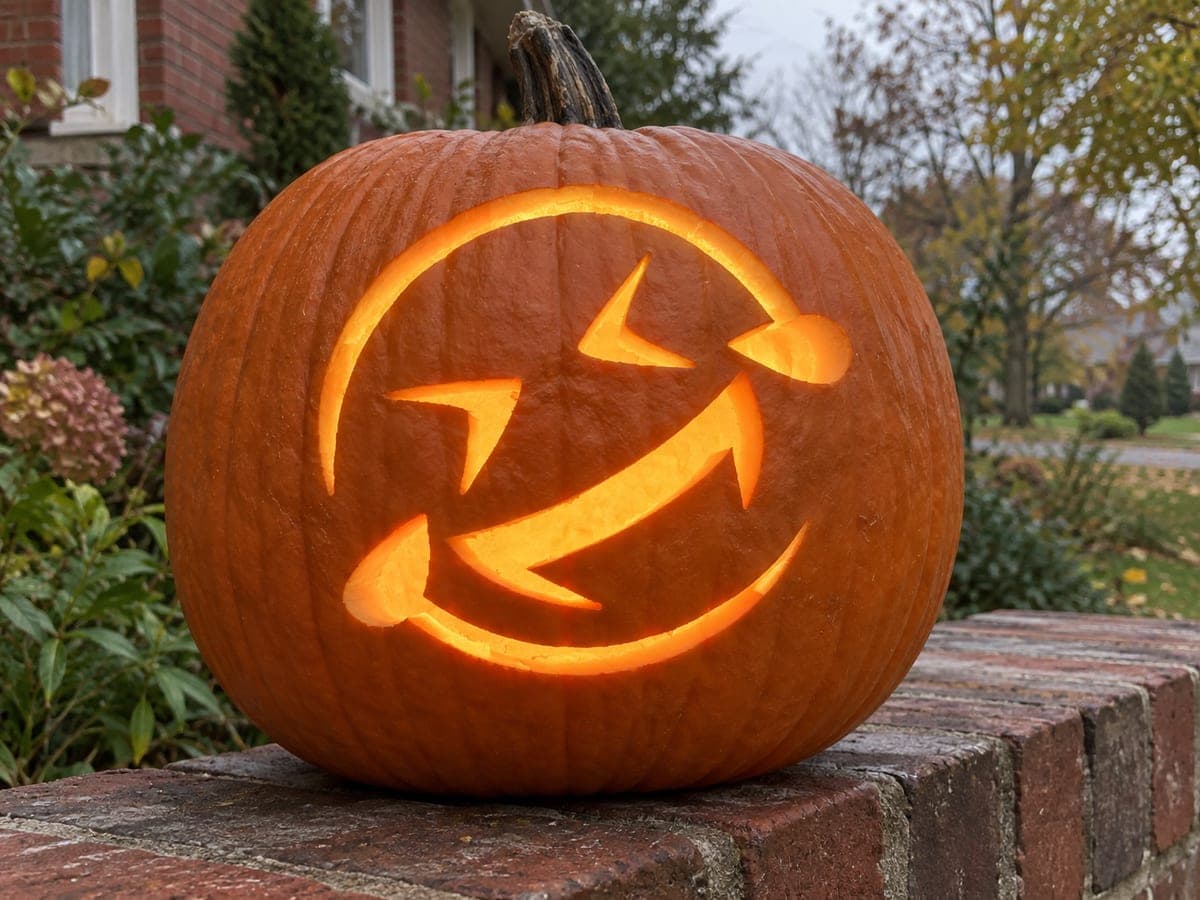
A tilted laughing emoji face is rotated about 45 degrees, with two lightning-bolt-shaped squinting eyes and a wide curved open grin, all set inside a circular scored border that follows the tilt. The circular face outline, eye shapes, and grin opening are all pierced through in this cutout jack-o-lantern pumpkin carving idea. Rotate the pumpkin on your work surface to match the tilt of each element as you cut it, which lets you pull the saw in natural straight strokes rather than fighting the diagonal orientation.

This is an AI-generated concept image: a realistic, carvable design idea rather than a photo of a finished carve. AI concepts are always labeled and sit out the leaderboard and the contest.

No ratings yet · Sign in to rate

Comments (0)

  • No comments yet — be the first.

Save without an account. Sign in to like or comment.

Our tips for carving a similar design

The trick here is the 45 degree tilt, which turns a simple emoji into something playful and dynamic. The whole design is three pierced shapes, two lightning-bolt squinting eyes and a wide curved grin, all sitting inside a scored circular border that follows the same lean. Rotate the pumpkin on your table to match each element so you can pull straight, comfortable saw strokes instead of fighting the diagonal.

Written by PumpkinCarvingIdeas.com, inspired by the image above. These are our suggestions, not instructions from the uploader. This approach to the AI concept has not been tested on a real pumpkin.

From pumpkin to porch

  1. Pick the pumpkin and plan the tilt

    Choose a round, evenly shaped pumpkin with a smooth, flat-ish front panel so the circular border reads cleanly. Since this is a concept design, sketch the face lightly in pencil first to test the tilt before committing. Rotate the pumpkin roughly 45 degrees in your mind and mark where the circle border, eyes, and grin will land. Keep the whole face centered on the front so it faces viewers straight on.

  2. Cut the lid and clean the inside

    Have an adult cut a lid, angling the knife inward so the lid rests on a ledge and does not fall in. Scoop out all the seeds and pulp, then scrape the inside of the front wall down to about one inch thick. A thinner wall is much easier to pierce and lets more light glow through. Save some pulp trimmings in case you want to patch a slip later.

  3. Transfer the design and score the border

    Tape your stencil on at the tilted angle, or draw the leaning circle, two lightning eyes, and curved grin freehand with a washable marker. Poke the outlines with a pin tool or push pin so the pattern stays even. Start by scoring the circular border just through the skin, not all the way through, so it glows dim without weakening the shell. Rotate the pumpkin as you go so each curve is easy to reach.

  4. Cut the eyes

    Switch to a small serrated pumpkin saw and pierce the two lightning-bolt eye shapes all the way through. Turn the pumpkin so each angled leg of the bolt lines up with a natural straight pull toward you. Cut the smaller, tighter zigzag sections slowly and let the saw do the work. Push the pieces out gently from the inside once each shape is fully cut.

  5. Cut the grin last

    The wide curved grin is the biggest opening, so save it for last to keep the pumpkin sturdy while you work. Rotate the pumpkin so the long curve pulls in smooth strokes, and cut the grin in two or three passes rather than one long stroke. Ease out the piece carefully to avoid cracking the thin bridge between the grin and the eyes. Tidy any ragged edges with the saw tip.

  6. Light it and photograph

    Drop in a battery LED light or two, never a candle, and set them low so they wash light up through all three openings. Test in a dark room and add a second LED if the grin looks dim. Position the pumpkin so the tilt faces your camera straight on. Shoot at dusk for the warmest glow against the porch.

Gather your supplies

Check things off as you get ready.

Work on a stable surface, keep your free hand out of the cutting path, and have an adult handle sharp tools.

Three levels of light

  • Leave intact

    The untouched face field around the eyes and grin stays dark, letting the shapes pop.

  • Peel & shade

    The scored circular border glows a soft dim orange to frame the tilted face.

  • Cut through

    The two lightning eyes and the wide grin are pierced through for the brightest light.

Learn the carving basics

Before you start cutting

How do I keep the 45 degree tilt from looking crooked?

Draw the leaning circle first and step back to check it from a few feet away before cutting anything. Keeping the face centered on the front panel matters more than perfect symmetry. Rotate the pumpkin, not your wrist, so each cut stays clean.

Will the thin points of the lightning eyes break?

The sharp zigzag tips are the weakest spots, so cut them slowly with a small saw and light pressure. Keep the front wall around one inch thick for support. Cut the eyes before the large grin so the shell stays strong while you work the fine points.

Since this is a concept image, can I really carve it?

Yes, the design is fully carvable on a real pumpkin. Just keep the front wall thinned and cut the big grin last so nothing sags. The tilt is the only tricky part, and rotating the pumpkin as you cut handles that.

Your take belongs here, too.

Changed a detail? Made it simpler? Share a photo of your version and tell the community what worked.

Share your pumpkin

More pumpkins like this

You've reached the end · 8 pumpkins
The Patch Report

Fresh pumpkins, in your inbox.

The best new carvings, ideas worth stealing, and how-tos for carving season. Short, seasonal, and gone by November.

A short email during carving season. Unsubscribe anytime. See our privacy policy.