Halloween Pumpkin Carving Contest · Starts October 1st · $500 in prizes
← Back to ideas
@ai_concepts
Sep 25, 2026
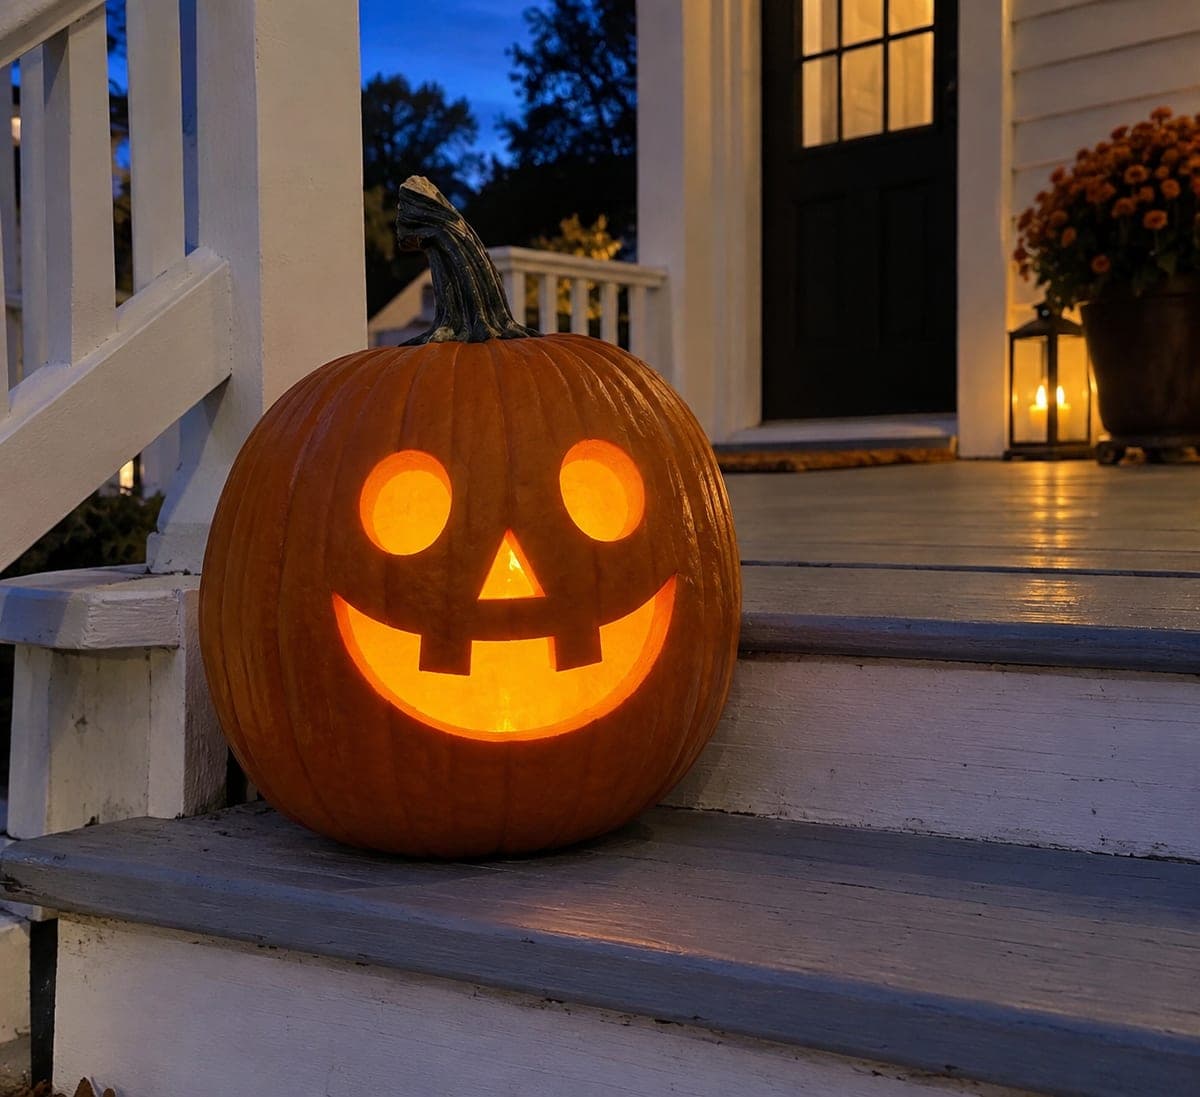
Round Eyes Square Tooth Jack-O-Lantern Classic PumpkinAI
0

Report this carving

Tell us what is wrong. Reports are private.

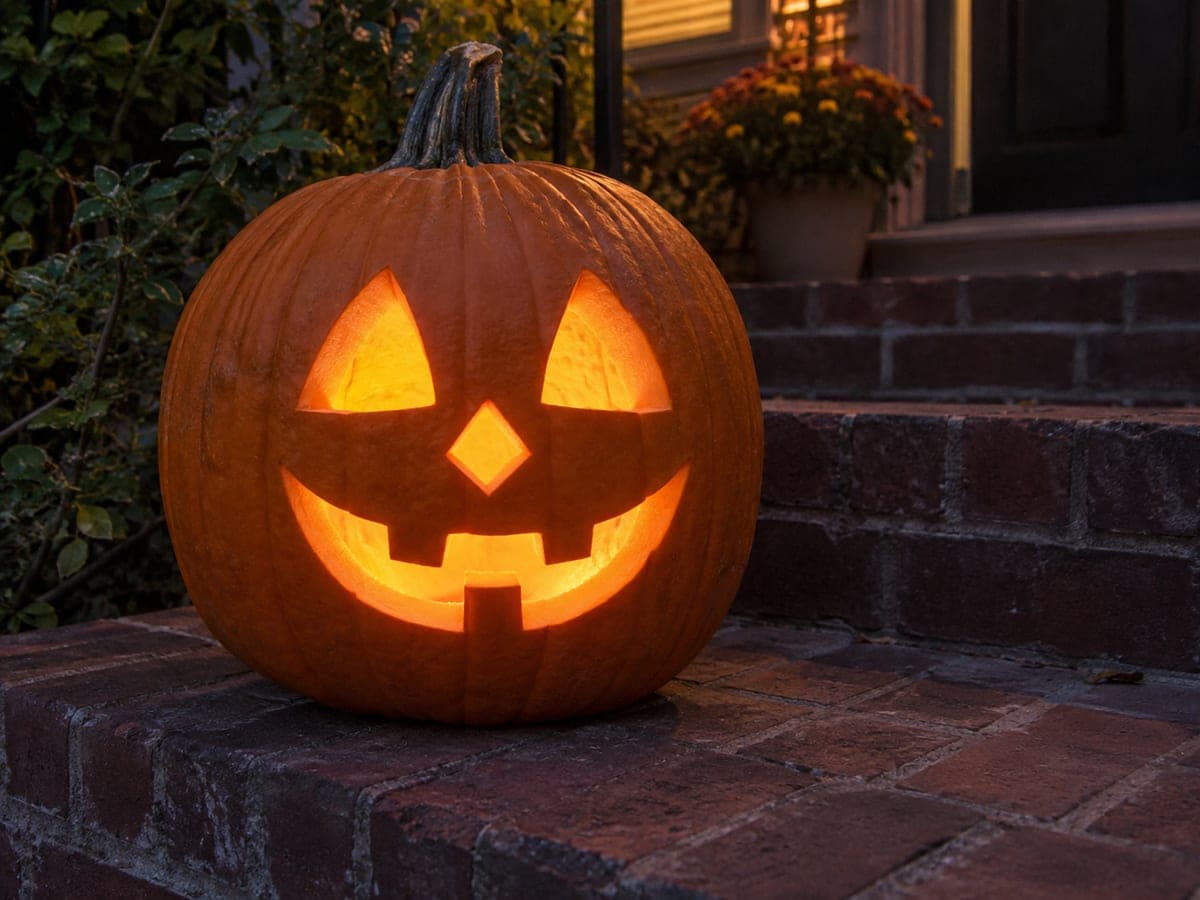
Round Eyes Square Tooth Jack-O-Lantern Classic Pumpkin

Round eye holes, a triangle nose, and a broad grin with three short square teeth attached to the upper lip make this classic jack-o-lantern idea one of the most recognizable pumpkin carving designs around. The round eyes are a subtly friendlier take on the usual triangle, giving this design a softer, slightly goofy character. Cut the teeth from the top of the smile opening inward so each square tooth stays firmly rooted. A single tealight centered just behind the nose hole gives the most even glow.

No ratings yet · Sign in to rate
Comments (0)

  • No comments yet — be the first.

Save without an account. Sign in to like or comment.

Our tips for carving a similar design

Swapping the usual triangles for round eyes is all it takes to shift a standard jack-o-lantern from spooky to goofy and approachable. The three square upper teeth are the structural point to watch: cut them by working downward from the lip line so each tooth stays firmly rooted rather than free-floating. A single LED tea light placed just behind the nose hole distributes the glow evenly across all five openings.

From pumpkin to porch

  1. Prep and hollow

    Cut a back lid and scoop the pumpkin to a consistent 25 mm inner wall. A slightly thinner wall makes the round eye holes easier to cut cleanly without a wobbling blade. Wipe the inner surface dry once hollowed.

  2. Mark the face

    Draw two evenly spaced circles for the eyes using a round cookie cutter or compass as a guide. Add a centered triangle for the nose below the midpoint between eyes and mouth. Sketch the wide grin last, drawing three square teeth into the top edge of the smile arc before committing to the cut.

  3. Cut the round eyes

    An apple corer or drill bit gives a cleaner circle than a knife on a curved surface. If using a saw, trace the circle in small overlapping strokes working around the circumference. Keep the blade as perpendicular to the surface as possible.

  4. Cut the nose

    Cut the small triangle nose with three clean straight strokes. Pop the triangle free and clean the interior edges with a craft knife.

  5. Cut the grin with square teeth

    Outline the full smile arc, then cut down the two sides of each square tooth from the upper lip line, leaving the top of each tooth rooted. The three short vertical cuts between teeth create the square profile. Clear each tooth gap before moving to the next.

  6. Light and enjoy

    Center an LED tea light just behind the nose hole. The two round eyes and the toothy grin glow simultaneously from one central source, giving the design a warm, evenly lit look from across the street.

Written with AI to match this design

Gather your supplies

Check things off as you get ready.

Work on a stable surface, keep your free hand out of the cutting path, and have an adult handle sharp tools.

Three levels of light

  • Leave intact

    All surrounding orange rind stays dark

  • Peel & shade

    None needed

  • Cut through

    Both round eye holes, the triangle nose, and the full grin including the three tooth-gap slots

Learn the carving basics

Before you start cutting

How do I cut a clean circle without a drill or corer?

Score the circle outline with a craft knife first, then follow the score with a pumpkin saw using short back-and-forth strokes. Work slowly around the curve in two or three complete passes rather than one aggressive cut.

My square teeth look more like triangles. How do I get them truly square?

Draw the teeth with a ruler before cutting. Each tooth should have a flat bottom edge, a flat top edge (which is the lip line), and two perfectly vertical sides. The flat bottom is the cut you make last after clearing the gap on each side.

Would oval eyes work instead of round ones?

Yes, horizontal ovals give a sleepy or dopey expression while vertical ovals look more startled. Either works structurally with the same cutting technique; just sketch the oval outline carefully before cutting.

Your take belongs here, too.

Changed a detail? Made it simpler? Share a photo of your version and tell the community what worked.

Share your pumpkin

More pumpkins like this

You've reached the end · 8 pumpkins
The Patch Report

Fresh pumpkins, in your inbox.

The best new carvings, ideas worth stealing, and how-tos for carving season. Short, seasonal, and gone by November.

A short email during carving season. Unsubscribe anytime. See our privacy policy.