Halloween Pumpkin Carving Contest · Starts October 1st · $500 in prizes
← Back to ideas
@ai_concepts
Sep 25, 2026
Classic Round-Eye Jack-O-Lantern Contest PumpkinAI
0

Report this carving

Tell us what is wrong. Reports are private.

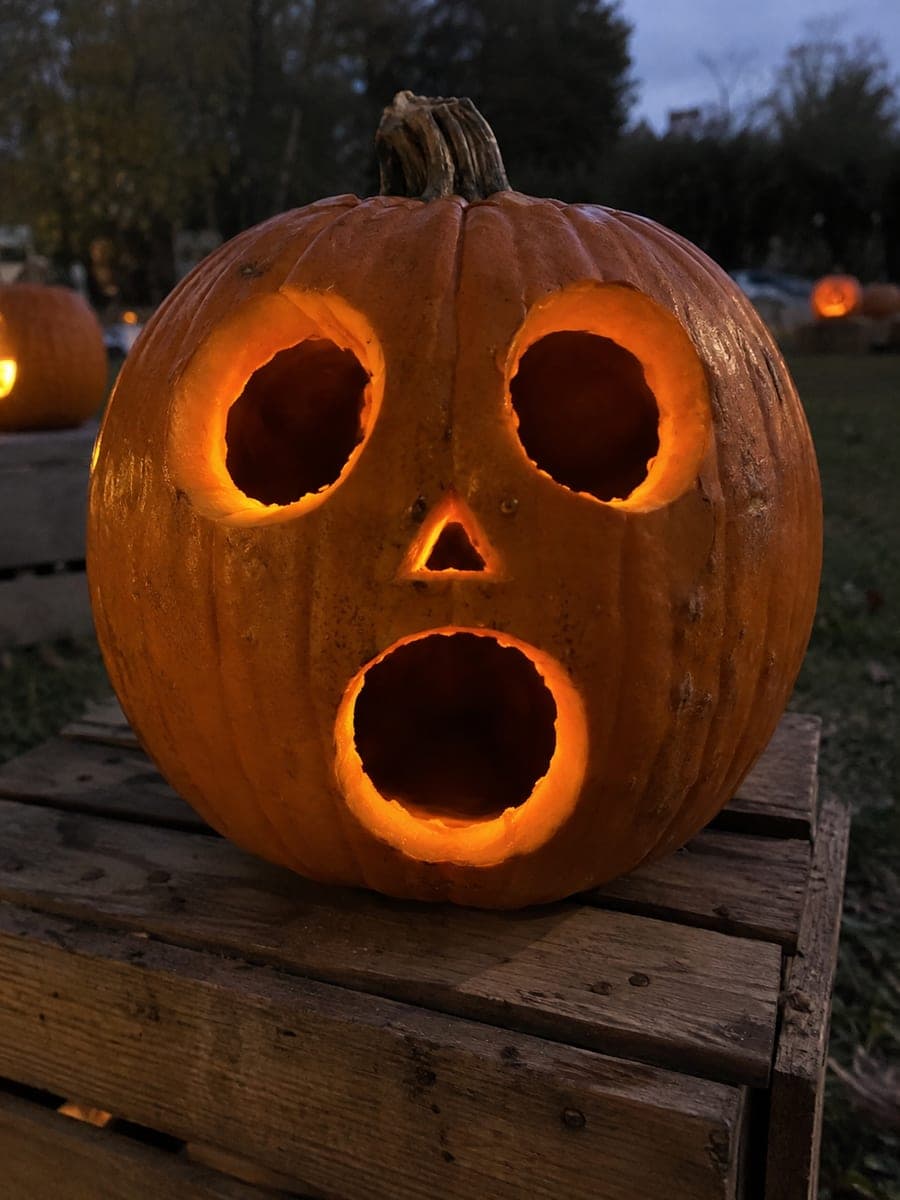
Classic Round-Eye Jack-O-Lantern Contest Pumpkin

Bold round eyes, a triangle nose, and a wide open mouth with broad rind separating each feature give this design immediate visual impact for a pumpkin carving contest at the easy level. Keeping the rind between the eyes, nose, and mouth generous prevents the front face from collapsing or cracking under its own weight. Transfer the pattern by poking evenly spaced pin holes along the outline, then connect the dots with a serrated carving tool. A simple pillar candle placed slightly behind center throws the face into sharp relief.

No ratings yet · Sign in to rate

Comments (0)

  • No comments yet — be the first.

Save without an account. Sign in to like or comment.

Our tips for carving a similar design

Round eyes, a triangle nose, and a broad open mouth with generous rind separating each feature give this design instant visual impact while keeping structural risk low. Wide rind margins between the eyes, nose, and mouth are what prevent the face from collapsing, so they should be treated as a design feature rather than a limitation. A standard carving template transferred via pin holes guarantees even proportions on any sized pumpkin.

From pumpkin to porch

  1. Select and hollow the pumpkin

    Choose a pumpkin with a smooth, relatively flat front face. Cut the lid at an inward angle and scoop the interior to a consistent inch-thick wall. A stable, even wall prevents the blade from breaking through unexpectedly in thin spots.

  2. Transfer the face pattern

    Print a template sized so the mouth spans about half the face width. Tape it to the pumpkin, poke dense pin holes along every outline, and remove the paper. Connect the dots with a fine-tip marker. Double-check that the rind margin between the eyes and the mouth top is at least an inch.

  3. Cut round eyes first

    Use a thin serrated blade or round punch to remove each eye circle cleanly. Short overlapping strokes produce smoother circles than a single continuous cut. Tap each disk free from the inside.

  4. Cut the triangle nose

    Follow the three triangle sides with a thin blade, cutting each straight edge with a single confident stroke if the blade is sharp. The nose is small, so keep cuts precise and avoid wobbling at the corners where two edges meet.

  5. Cut the mouth last

    Trace the outer mouth boundary with the saw, then cut each tooth gap from the gum line to the lip edge. Keep every tooth attached at both ends with a base at least a half inch wide. Remove the mouth piece by tapping inward once all gap cuts are complete.

  6. Light and enter the contest

    Place a pillar candle slightly behind center or a battery LED for safety. A candle positioned slightly back throws the face into sharp relief and creates a warm flickering effect that battery lights do not match. Photograph straight-on at eye level for the contest submission photo.

Written with AI to match this design

Gather your supplies

Check things off as you get ready.

Work on a stable surface, keep your free hand out of the cutting path, and have an adult handle sharp tools.

Three levels of light

  • Leave intact

    All surrounding rind and broad tooth bases stay dark, creating the classic jack-o-lantern silhouette

  • Peel & shade

    None; the design uses open cutouts only

  • Cut through

    Round eyes, triangle nose, and broad-toothed mouth opening, all fully cut through for warm bright light

Learn the carving basics

Before you start cutting

What is the ideal rind margin between the eyes and mouth for this design?

A minimum of three-quarters of an inch between any two aperture edges is the safety threshold, but an inch is better for easy-level carving. The wider the margins, the longer the pumpkin holds its shape and the less likely the face front is to sag or crack during the contest display period.

How do I get perfectly round eyes without a specialty punch tool?

Print a circle of the exact diameter you want, cut it out, tape it to the pumpkin, and trace around it with a marker before removing the paper. Then saw just inside the marker line so the cut edge meets the intended circle. A steady back-and-forth stroke around the curve produces a surprisingly clean circle.

Will this design hold up for a multi-day contest display?

Petroleum jelly rubbed on all cut edges immediately after carving significantly slows moisture loss and extends the design's display life. Keeping the pumpkin in a cool spot indoors between contest viewings further prolongs freshness. Expect three to five days of good display quality with proper care.

Your take belongs here, too.

Changed a detail? Made it simpler? Share a photo of your version and tell the community what worked.

Share your pumpkin

More pumpkins like this

You've reached the end · 8 pumpkins
The Patch Report

Fresh pumpkins, in your inbox.

The best new carvings, ideas worth stealing, and how-tos for carving season. Short, seasonal, and gone by November.

A short email during carving season. Unsubscribe anytime. See our privacy policy.