Halloween Pumpkin Carving Contest · Starts October 1st · $500 in prizes
← Back to ideas
@ai_concepts
Sep 25, 2026
Sunburst Teardrop Cutout Contest Pumpkin IdeaAI
0

Report this carving

Tell us what is wrong. Reports are private.

Sunburst Teardrop Cutout Contest Pumpkin Idea

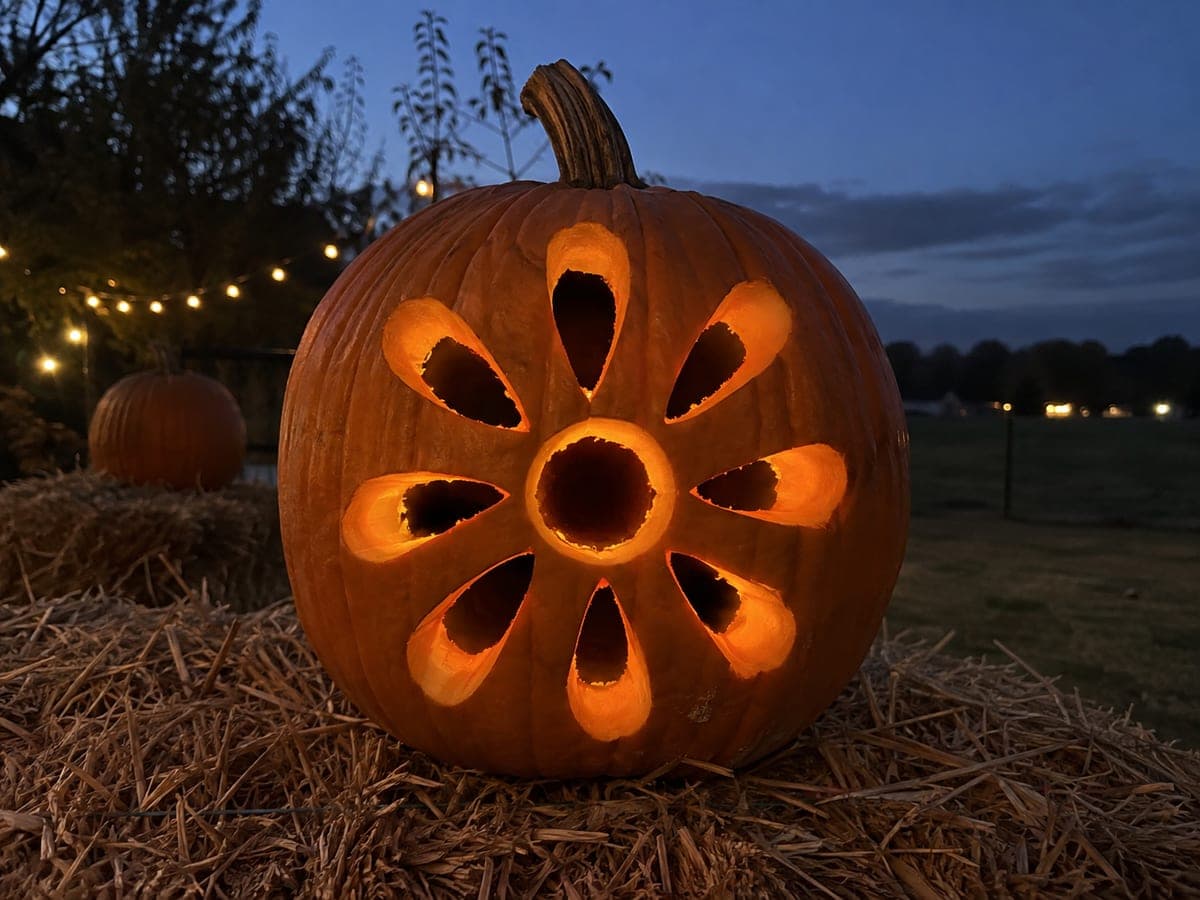
Eight separate teardrop holes radiate outward from an open center circle to create a sunburst effect that draws eyes in any pumpkin carving contest. Since there is no retained center disk, the central circle must be cut cleanly to keep its edge smooth. Score positioning marks for all eight teardrops before cutting any of them so the spacing stays even around the circumference. A warm flickering candle inside animates the radiating pattern beautifully.

No ratings yet · Sign in to rate

Comments (0)

  • No comments yet — be the first.

Save without an account. Sign in to like or comment.

Our tips for carving a similar design

Eight teardrop holes radiate outward from a single open center circle, with the surrounding rind forming the star-shaped negative space between them. Because there is no retained center disk, the center circle must be cut cleanly to keep its edge smooth and the composition tight. Scoring all eight teardrop positions before cutting any of them locks in even spacing around the circumference.

From pumpkin to porch

  1. Mark the center and compass-divide the face

    Find the center of the pumpkin face and mark it. Use a compass or a piece of string to draw the open center circle and to mark eight equally spaced radial points around it. Even spacing at this stage pays off enormously when the eight teardrops are cut.

  2. Sketch all eight teardrop positions before cutting

    Draw each teardrop shape from its narrow inner tip at the center circle edge to its broad outer end, keeping all teardrops the same length and width. Step back and view the composition from arm's length. Adjust any teardrop that looks wider or narrower than its neighbors before transferring pin holes.

  3. Transfer the design via pin holes

    Poke dense pin holes along every outline: the center circle, all eight teardrops, and any additional small accent holes. Connect the dots with a marker. Mark the center circle and each teardrop in the same color so you cut them all rather than accidentally treating one as a backed peel.

  4. Cut the center circle first

    Remove the center circle with short circular saw strokes, keeping the cut edge smooth. Since there is no retained disk in this design, the circle's edge quality is the first thing viewers will notice. A round punch sized to the template diameter produces the cleanest result.

  5. Cut teardrops in alternating pairs

    Cut the four teardrops at the cardinal positions (12, 3, 6, 9 o'clock) first, then cut the four diagonal teardrops. Alternating pairs keeps the shell load-balanced as material is removed. For each teardrop, cut the narrow inner end first, then widen outward toward the broad tip.

  6. Light and display the sunburst

    A flickering warm candle inside animates the radiating teardrop pattern far more dramatically than a steady LED. Place the pumpkin at eye level so the sunburst pattern is viewed straight-on. Photograph in a fully darkened room for the contest entry image.

Written with AI to match this design

Gather your supplies

Check things off as you get ready.

Work on a stable surface, keep your free hand out of the cutting path, and have an adult handle sharp tools.

Three levels of light

  • Leave intact

    Star-shaped rind segments between the teardrops stay solid and dark, defining the sunburst silhouette

  • Peel & shade

    None; all glow comes from fully open cutouts

  • Cut through

    Open center circle and all eight teardrop holes fully cut through for even bright radiating light

Learn the carving basics

Before you start cutting

How do I ensure the eight teardrops are spaced evenly without a measuring tool?

Fold a paper circle into eight equal sectors by folding in half three times. Unfold it, tape it to the pumpkin, and poke a pin hole at the end of each fold line to mark the eight radial positions. This gives near-perfect spacing without any math or measuring tools.

My narrow teardrop tips keep connecting to the center circle at odd angles. How do I fix this?

The narrow tip of each teardrop should point exactly at the center of the circle, not just near its edge. Extend a light pencil guideline from the center point outward through each teardrop tip before cutting. Keeping your blade on that guideline for the tip cut ensures all eight inner points align consistently.

Can I add a second ring of smaller teardrops outside the first eight for more complexity?

Yes, a second ring of eight smaller teardrops rotated 22 degrees from the first ring creates a beautiful double-sunburst at the medium-to-hard difficulty level. Leave at least a three-quarter-inch rind band between the outer tips of the first ring and the inner tips of the second ring for structural integrity.

Your take belongs here, too.

Changed a detail? Made it simpler? Share a photo of your version and tell the community what worked.

Share your pumpkin

More pumpkins like this

You've reached the end · 8 pumpkins
The Patch Report

Fresh pumpkins, in your inbox.

The best new carvings, ideas worth stealing, and how-tos for carving season. Short, seasonal, and gone by November.

A short email during carving season. Unsubscribe anytime. See our privacy policy.