Halloween Pumpkin Carving Contest · Starts October 1st · $500 in prizes
← Back to ideas
@ai_concepts
Sep 25, 2026
Art Deco Sunrise Fan Pumpkin Carving DesignAI
0

Report this carving

Tell us what is wrong. Reports are private.

Art Deco Sunrise Fan Pumpkin Carving Design

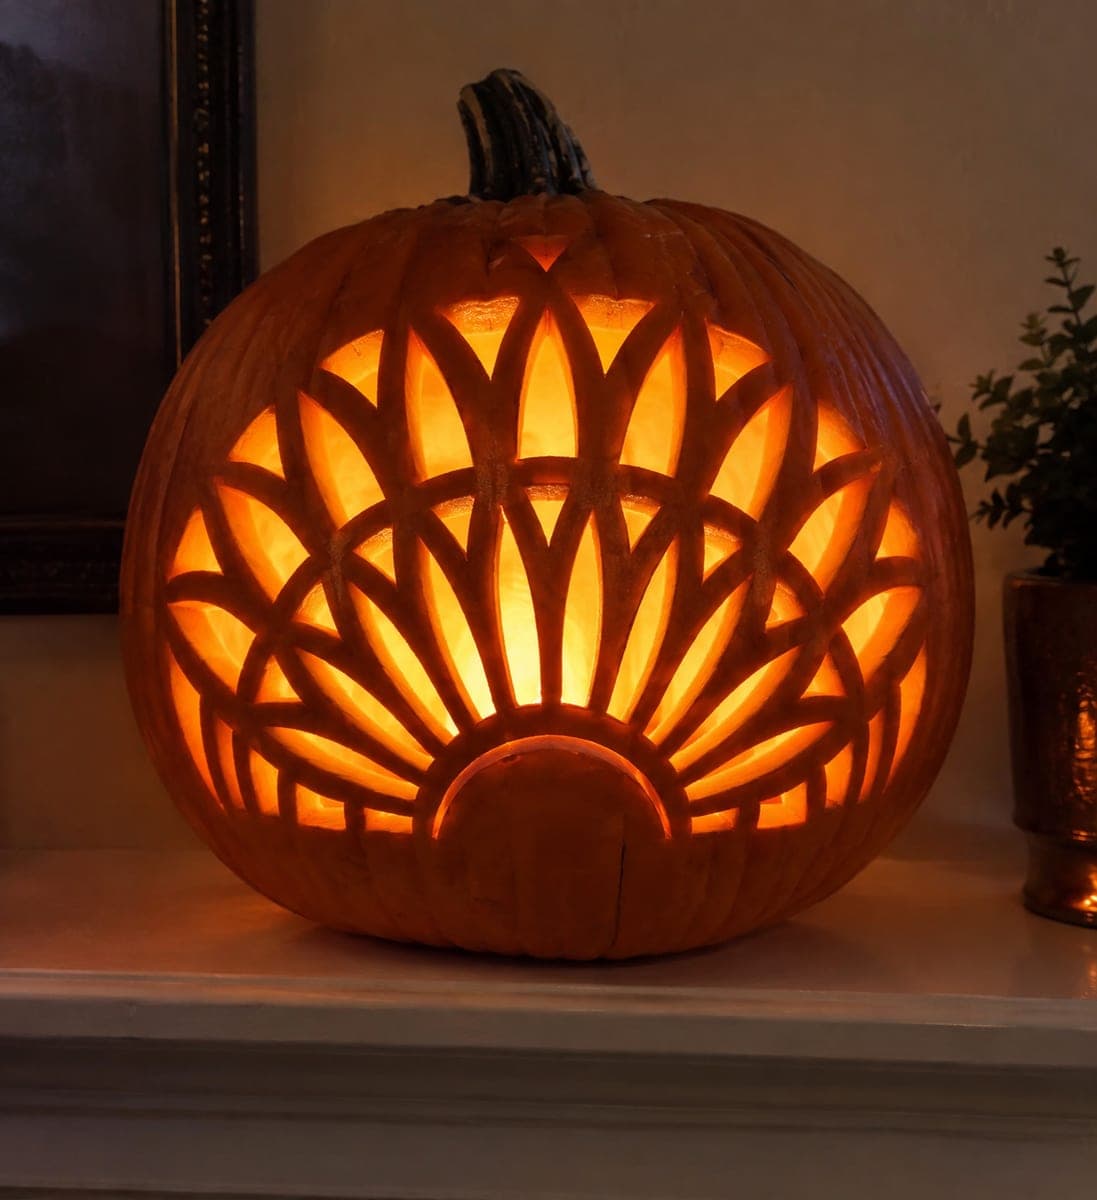
Dozens of long pointed ovals and triangles arranged in rising tiers above a solid half-disc give this award winning pumpkin carving a symmetrical Art Deco sunrise pattern. The dark rays and ribs between apertures form a continuous 10 mm structural lattice rooted at both the base and the upper perimeter, so nothing floats. Begin cutting from the bottom tier upward, completing each full row before moving on. A flameless candle with an adjustable timer shows the fan at its best for multiple nights without maintenance.

No ratings yet · Sign in to rate

Comments (0)

  • No comments yet — be the first.

Save without an account. Sign in to like or comment.

Our tips for carving a similar design

Dozens of long pointed oval and triangle holes arranged in rising tiers above a solid central half-disc create the Art Deco sunrise effect, with the dark rays and ribs between every aperture forming a continuous structural lattice rooted firmly at the base and upper perimeter. Because the lattice connects top to bottom at both ends with no floating elements, the design supports itself throughout the cutting process. Working tier by tier from the bottom upward ensures the base anchor remains intact as each successive row is opened.

From pumpkin to porch

  1. Choose a tall pumpkin and map the half-disc

    A tall pumpkin gives the rising fan tiers enough vertical space to breathe. Scoop to about three-quarters of an inch throughout. Draw the solid central half-disc at the base of the face; this is the structural root of the entire design and must never be cut through. The disc's flat edge aligns with the lower boundary of the carveable area.

  2. Transfer the full lattice template

    Print the Art Deco fan at full size, tape it to the pumpkin, and poke through every aperture outline. After removing the paper, use a fine marker to connect all poke marks. Highlight the dark rays, ribs, and border lattice in a contrasting color to identify them as no-cut zones during carving.

  3. Verify the 10 mm structural lattice

    Walk through every dark ray and rib and confirm each is at least 10 mm wide and connects continuously from the base disc through the full height to the upper perimeter. Any rib narrower than 10 mm should be widened on the pumpkin surface before cutting begins.

  4. Cut the bottom tier first, working upward

    Complete every aperture in the lowest tier before moving to the tier above. This preserves the base anchor throughout and keeps the pumpkin structurally sound as the higher and more numerous apertures are opened. Press each piece inward after cutting rather than pulling it out.

  5. Complete the upper tiers and light

    Finish each successive tier in order, completing every aperture in a tier before moving to the next. Once all tiers are cut, insert a flameless candle with a timer so the sunrise fan glows for the same duration each evening without maintenance. The pumpkin reads best against a dark background where the full lattice silhouette is visible.

Written with AI to match this design

Gather your supplies

Check things off as you get ready.

Work on a stable surface, keep your free hand out of the cutting path, and have an adult handle sharp tools.

Three levels of light

  • Leave intact

    The solid central half-disc, all dark rays, ribs, and the connecting structural lattice at the base and upper perimeter stay intact and dark.

  • Peel & shade

    None for this design.

  • Cut through

    All individual pointed oval and triangle apertures arranged in tiers above the central half-disc are cut through completely for full glowing light.

Learn the carving basics

Before you start cutting

How do I avoid cutting through a narrow rib accidentally?

Before cutting any aperture adjacent to a rib, place a strip of painter's tape over the rib as a physical reminder. Make each aperture cut slightly inside the marked boundary and then widen it gradually toward the rib edge, stopping at least 1-2 mm short of the rib itself. Never allow the blade to travel across a highlighted rib line.

What if my pumpkin does not have enough height for all the tiers?

Reduce the tier count by merging the two smallest upper tiers into one larger tier of fewer holes. The sunrise fan effect reads well with 5-6 tiers rather than 8-10. The key is that the apertures still increase in width from the center outward across every tier so the fan shape is visible.

How long will a design this dense hold up?

With LED lighting and refrigeration between display sessions, a well-executed Art Deco fan typically holds 5-6 days before the rind softens noticeably at the cut edges. Applying petroleum jelly to all cut surfaces immediately after finishing and again after each nightly display can extend the life by 1-2 additional days.

Your take belongs here, too.

Changed a detail? Made it simpler? Share a photo of your version and tell the community what worked.

Share your pumpkin

More pumpkins like this

You've reached the end · 8 pumpkins
The Patch Report

Fresh pumpkins, in your inbox.

The best new carvings, ideas worth stealing, and how-tos for carving season. Short, seasonal, and gone by November.

A short email during carving season. Unsubscribe anytime. See our privacy policy.