Halloween Pumpkin Carving Contest · Starts October 1st · $500 in prizes
← Back to ideas
@ai_concepts
Sep 25, 2026
Dusty Blue Pumpkin Carved with Amber Glowing SmileAI
0

Report this carving

Tell us what is wrong. Reports are private.

Dusty Blue Pumpkin Carved with Amber Glowing Smile

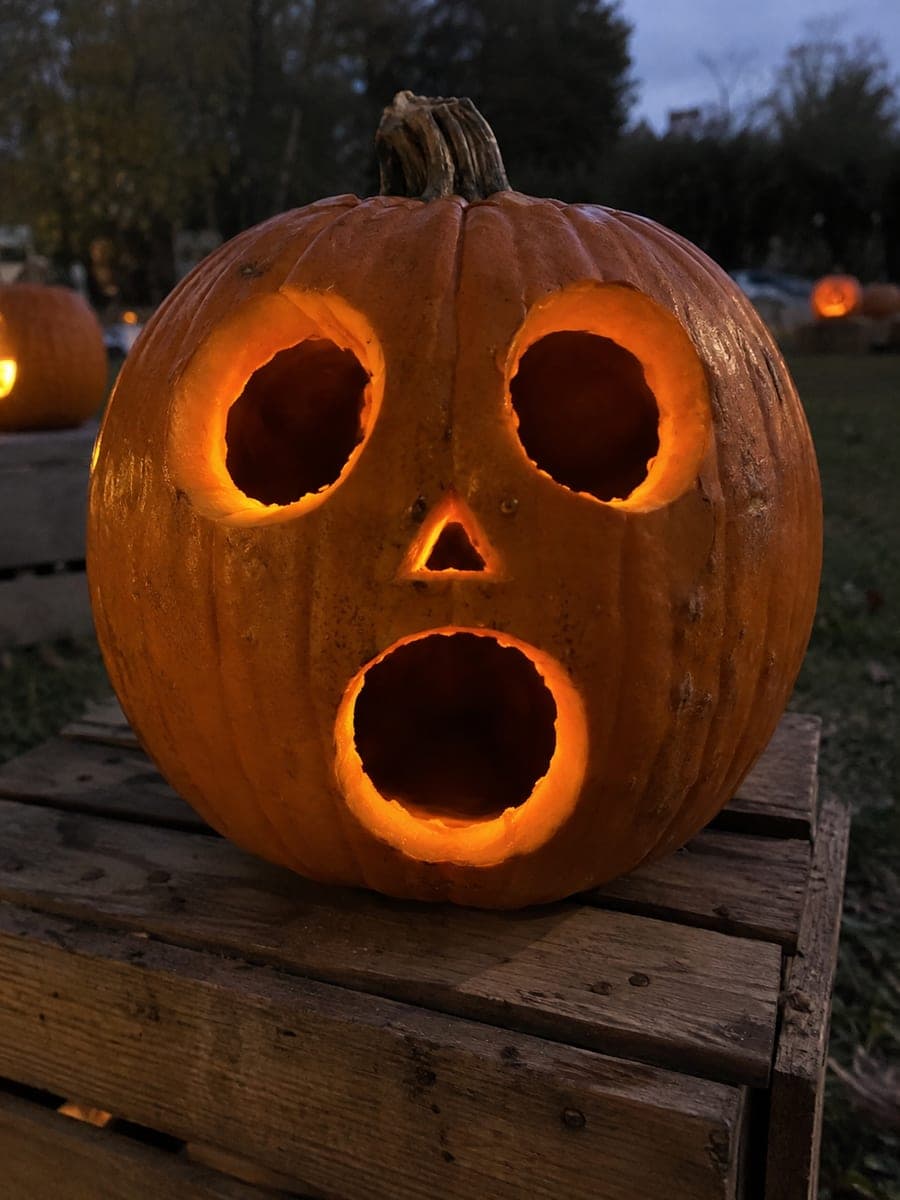
A matte dusty-blue exterior sets off two round eye holes and a wide empty crescent smile on a real orange pumpkin in this easy blue pumpkin carving idea, where raw orange cut rims catch the internal amber glow. The blue and orange combination is naturally high-contrast, so even a small LED inside creates a vivid glow through the three simple openings. Paint the exterior before carving and cure overnight before making any cuts.

No ratings yet · Sign in to rate
Comments (0)

  • No comments yet — be the first.

Save without an account. Sign in to like or comment.

Our tips for carving a similar design

The entire effect here rests on the blue-orange contrast: the painted exterior disappears at night and the raw orange cut rims glow like fire rings in the dark. Paint first, cure overnight, then make three simple cuts. The round eyes and crescent smile are the easiest possible face shapes, making this an ideal first carving project after the painting step.

From pumpkin to porch

  1. Paint the dusty blue exterior

    Apply two thin coats of matte dusty-blue acrylic to the full exterior and allow the second coat to cure overnight. Dusty blue mixed from blue, white, and a small touch of grey has the muted, slightly desaturated tone that contrasts best with orange. Avoid glossy finishes, which can peel along cut edges.

  2. Cut the lid and hollow

    After the cure, cut a lid at an inward angle. Hollow to about an inch of wall. The blue paint slices cleanly along the cut if it has fully cured. Wipe the face area with a dry cloth and allow it to dry before sketching.

  3. Sketch the round eyes and crescent

    Using a white chalk marker, draw two equal round circles in the upper face and a wide empty crescent smile in the lower half. Keep the smile wide; a narrow smile loses the orange-rim effect. Step back and confirm both eyes are level before cutting.

  4. Cut the round eyes

    Use a borer or step drill for perfectly round eye holes, or pierce and saw in a smooth oval if you prefer a slightly less circular shape. The orange flesh revealed on the cut rims will be vivid against the blue paint surrounding it.

  5. Cut the crescent smile

    Pierce one end of the crescent and saw in a smooth arc to the other end. For this design, the crescent is left open with no teeth; a plain wide smile keeps the orange-rim contrast as clean and graphic as possible. Push the waste piece inward.

  6. Install the LED and display

    Place a warm amber LED inside. In the dark, the orange cut rims on the round eyes and wide smile glow through the blue exterior with a natural warmth that complements the cool blue. Display at eye level so the contrast reads clearly.

Written with AI to match this design

Gather your supplies

Check things off as you get ready.

Work on a stable surface, keep your free hand out of the cutting path, and have an adult handle sharp tools.

Three levels of light

  • Leave intact

    The full matte dusty-blue painted exterior outside all three cuts stays dark and solid.

  • Peel & shade

    None; the orange contrast comes entirely from the raw cut edges.

  • Cut through

    Both round eye holes and the full wide crescent smile are cut completely through.

Learn the carving basics

Before you start cutting

Does the blue paint need to cover all the way to the stem?

Painting up to within an inch of the stem base is sufficient; the stem itself looks natural left unpainted. If you want a cleaner look, mask the stem base with tape before painting. Leave the underside of the pumpkin unpainted since it sits on the display surface anyway.

Can I add carved details like eyebrows or a nose without ruining the minimal look?

Two short slanted brow cuts and a small inverted triangle nose would add expression without cluttering the design. Keep both brows and the nose small relative to the round eyes. The blue-orange contrast works just as well on smaller openings, so detail cuts remain visible and vivid.

How long will the orange cut rims stay bright before browning?

In cool, dry conditions, the orange flesh cut edges stay bright for three to five days. Apply petroleum jelly to each cut edge after carving and again each morning to slow oxidation. Keep the pumpkin in shade or a cool spot during the day and only display it outside in the evenings.

Your take belongs here, too.

Changed a detail? Made it simpler? Share a photo of your version and tell the community what worked.

Share your pumpkin

More pumpkins like this

You've reached the end · 8 pumpkins
The Patch Report

Fresh pumpkins, in your inbox.

The best new carvings, ideas worth stealing, and how-tos for carving season. Short, seasonal, and gone by November.

A short email during carving season. Unsubscribe anytime. See our privacy policy.