Halloween Pumpkin Carving Contest · Starts October 1st · $500 in prizes
← Back to ideas
@ai_concepts
Sep 25, 2026
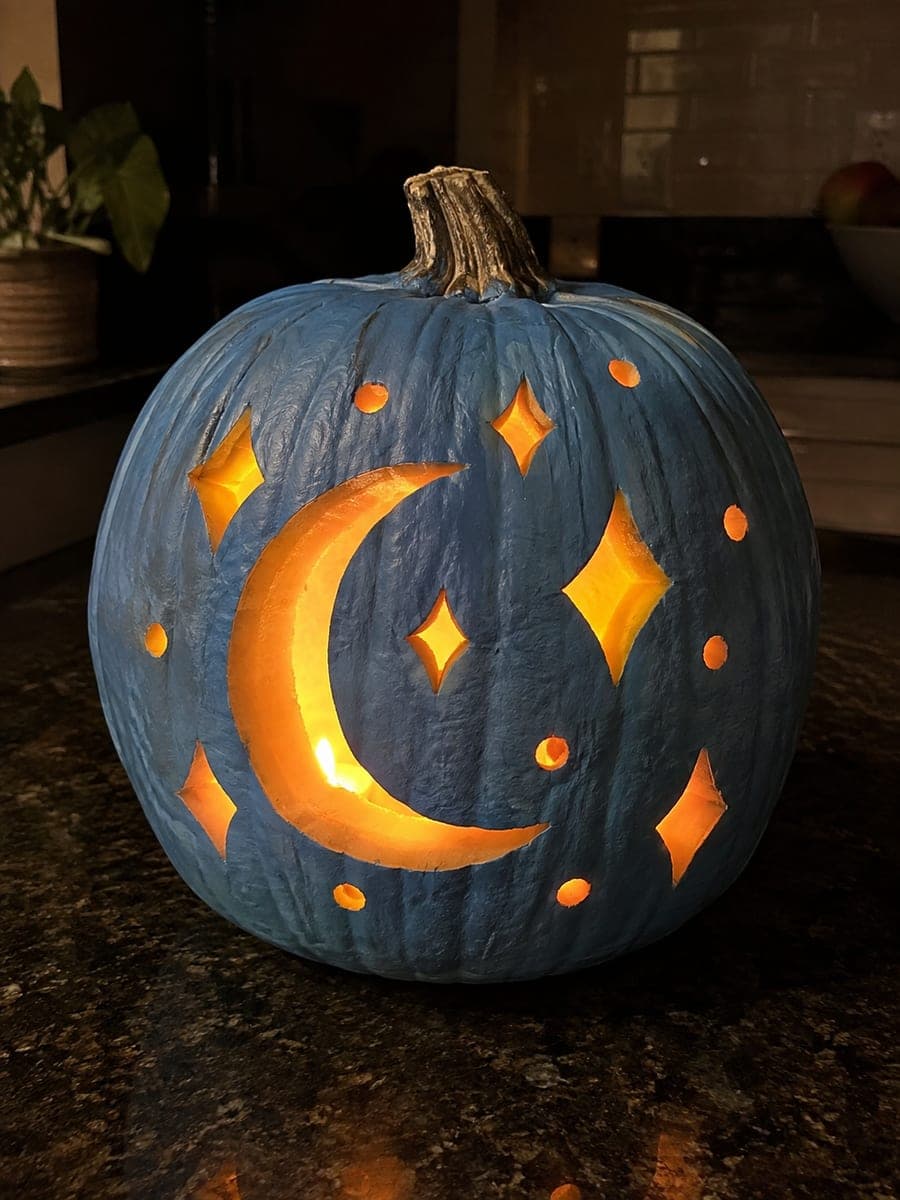
Blue Pumpkin Carved with Crescent Moon and Diamond SparklesAI
0

Report this carving

Tell us what is wrong. Reports are private.

Blue Pumpkin Carved with Crescent Moon and Diamond Sparkles

A large empty crescent moon hole, eight separate diamond sparkle holes, and six round dots are cut through a matte dusty-blue painted rind in this medium blue pumpkin carving idea, with broad original rind kept between all cuts. The crescent moon is the main feature and should be cut first; position it slightly off-center for a more natural celestial feel. Diamond and round holes scatter warm light across the blue surface like a night sky.

No ratings yet · Sign in to rate
Comments (0)

  • No comments yet — be the first.

Save without an account. Sign in to like or comment.

Our tips for carving a similar design

The crescent moon is the anchor: cut it first, slightly off-center for a natural celestial feel, then scatter the diamond and round holes around it like stars. The broad unpainted original rind between every hole maintains the composition's integrity and gives each glowing shape room to read clearly.

From pumpkin to porch

  1. Paint and cure the blue exterior

    Apply two thin coats of matte dusty-blue paint and cure overnight before carving. Cut the lid and hollow to a consistent three-quarter-inch wall. A slightly thinner wall helps the crescent moon edges stay crisp and the diamond holes cut cleanly.

  2. Position the crescent moon

    Using a white chalk marker, sketch the crescent moon in the upper-center of the face, shifted slightly to one side. Draw the outer arc first, then the inner arc, leaving a consistent crescent width. A crescent roughly three inches tall reads clearly from several feet away on a medium pumpkin.

  3. Cut the crescent moon

    Pierce near the widest part of the crescent and saw along the outer arc first, then re-enter and cut the inner arc. The crescent waste piece should pop out as one continuous shape. Clean up any wobbles in the arcs with a few gentle trimming strokes.

  4. Place the diamond sparkle holes

    Mark eight diamond positions scattered around the crescent moon at varied distances and slight angle variations. No two diamonds should align in a row; a random scatter reads as stars, not a pattern. Use a chisel to score the four corners of each diamond before cutting through.

  5. Drill the six round dots

    Use a step drill or borer for the six round dots, placing them in the remaining open spaces between diamonds and away from the moon. Pre-mark each center with a pin. Space every dot at least half an inch from the nearest adjacent diamond or moon edge.

  6. Light and view in low ambient light

    Place a warm amber LED inside. The crescent moon aperture floods with warm light, the diamonds scatter smaller bright points, and the round dots add soft halos. Viewed in low ambient light, the blue exterior recedes and only the glowing celestial shapes remain visible.

Written with AI to match this design

Gather your supplies

Check things off as you get ready.

Work on a stable surface, keep your free hand out of the cutting path, and have an adult handle sharp tools.

Three levels of light

  • Leave intact

    The full dusty-blue painted rind between all cuts, surrounding the moon and every sparkle hole, stays solid and dark.

  • Peel & shade

    None; all light comes from fully cut openings.

  • Cut through

    The large crescent moon hole, all eight diamond sparkle holes, and all six round dot holes are cut completely through.

Learn the carving basics

Before you start cutting

How off-center should I place the crescent moon?

Shifting it roughly a half inch to one side of center is enough to look intentionally placed rather than accidentally off. If you go much farther off-center, the composition can look unbalanced. Sketch it in place and step back before committing; your eye will tell you if it feels right.

Can I make the crescent moon larger than three inches?

Yes, a larger crescent reads even more clearly from a distance and gives more surface area for the warm amber glow to show through the blue rind. Just ensure the diamond and round holes placed around it have enough rind clearance from the moon edges; a half inch between the moon edge and the nearest sparkle hole is the minimum.

How do I get clean, sharp diamond points on the sparkle holes?

Score each of the four corner points with a chisel before sawing. Scoring creates a stop-line for the blade at each point, preventing the cut from overshooting the corner tip. Approach each scored point with the blade from the adjacent side rather than stabbing straight at the tip.

Your take belongs here, too.

Changed a detail? Made it simpler? Share a photo of your version and tell the community what worked.

Share your pumpkin

More pumpkins like this

You've reached the end · 8 pumpkins
The Patch Report

Fresh pumpkins, in your inbox.

The best new carvings, ideas worth stealing, and how-tos for carving season. Short, seasonal, and gone by November.

A short email during carving season. Unsubscribe anytime. See our privacy policy.