Halloween Pumpkin Carving Contest · Starts October 1st · $500 in prizes
← Back to ideas
@ai_concepts
Sep 14, 2026
Patterned Crescent Moon PumpkinAI
0

Patterned Crescent Moon Pumpkin

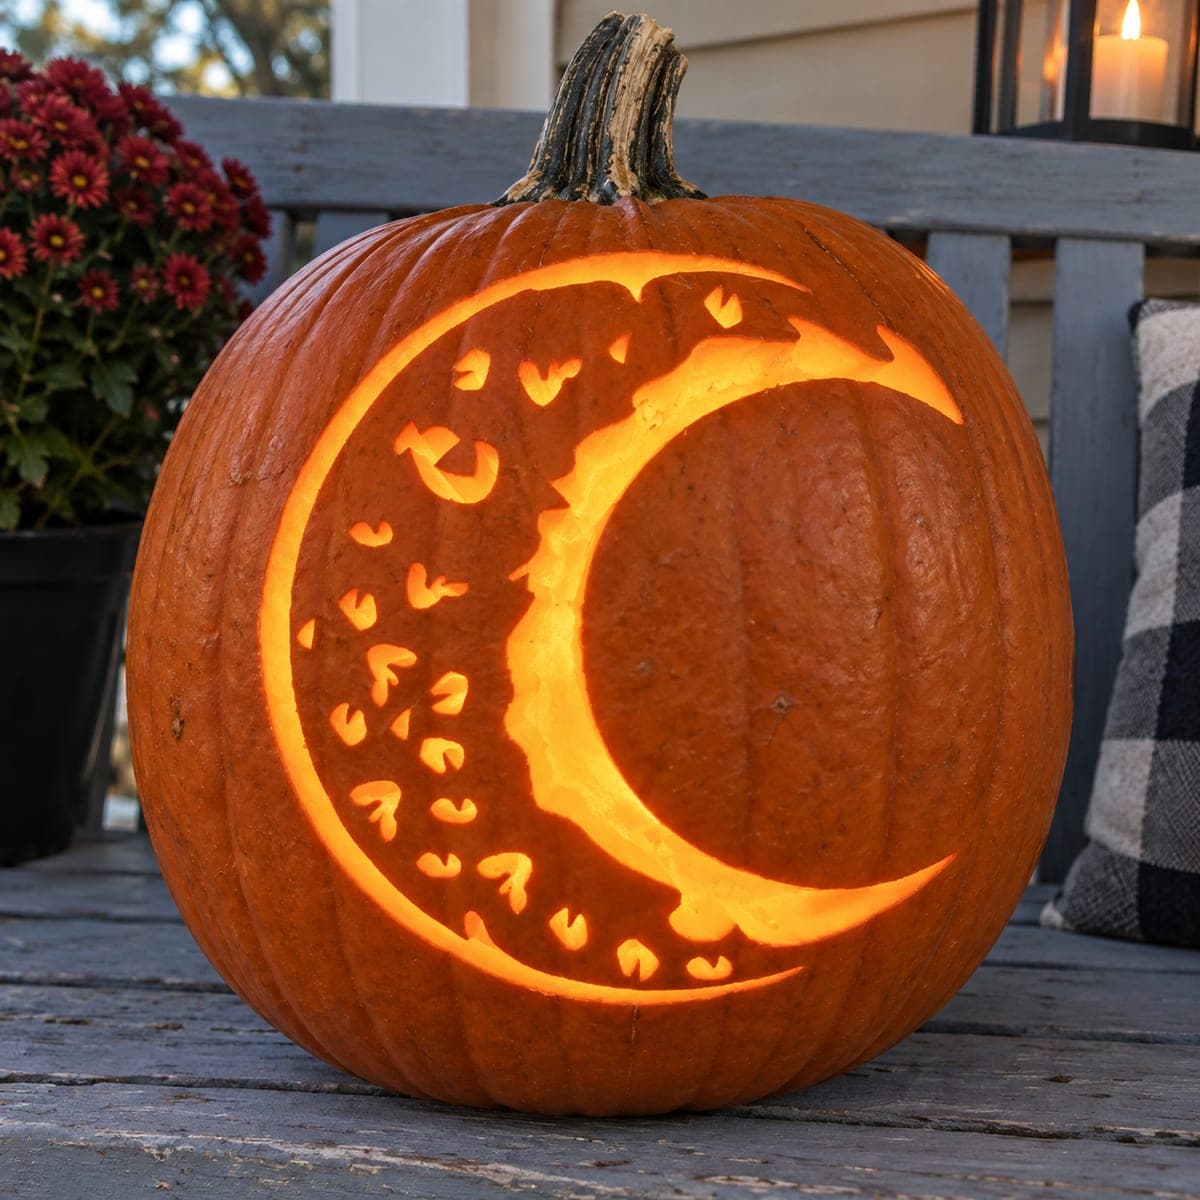
A thick crescent moon shape fills the left two-thirds of the pumpkin face and is decorated with dozens of small scattered cutouts in crescent, teardrop, and irregular curved shapes that glow warmly against the porch setting. Every decorative opening inside the crescent is pierced through, creating a glowing textured field within the moon arc. Work from the center of the crescent outward when cutting the small interior shapes so you always have a stable edge to rest your hand against, and leave the outermost ring of shapes until last so the crescent wall holds firm throughout.

This is an AI-generated concept image: a realistic, carvable design idea rather than a photo of a finished carve. AI concepts are always labeled and sit out the leaderboard and the contest.

No ratings yet · Sign in to rate

Comments (0)

  • No comments yet — be the first.

Save without an account. Sign in to like or comment.

Our tips for carving a similar design

The core trick here is a bold crescent moon filled with dozens of tiny pierced shapes that read like a field of glowing stars. You block out the big crescent as your bright base, then punch small crescent, teardrop, and curved cutouts across it for texture. Work from the center outward so you always have solid pumpkin to steady your hand.

Written by PumpkinCarvingIdeas.com, inspired by the image above. These are our suggestions, not instructions from the uploader. This approach to the AI concept has not been tested on a real pumpkin.

From pumpkin to porch

  1. Pick a big round pumpkin and open the back

    Choose a tall, wide pumpkin with a smooth, flat-ish front for the design. Cut a hatch on the back or bottom rather than the top so the front face stays uninterrupted. Scoop the inside and thin the front wall to about one inch so cutouts light evenly. An adult should handle all the cutting tools.

  2. Transfer the crescent and dot pattern

    Print or draw a thick crescent that fills the left two-thirds of the face. Tape the stencil down and poke through the outline plus every small interior shape with a pin or transfer tool. Mark the tiny crescents, teardrops, and curved dashes clearly so you can tell shapes apart later. Step back and check the crescent curve looks balanced before you cut.

  3. Outline the crescent wall

    Score the two long curved edges of the crescent with a fine detail saw, but do not cut all the way through yet. This defines your bright zone and gives the interior a firm border. Keep the blade straight up and down for clean edges. Take your time on the sharp inner points of the crescent tips.

  4. Pierce the interior shapes from the center out

    Start cutting the small teardrops and crescents near the middle of the moon field first. Working outward means you always rest your hand on uncut, stable pumpkin. Use a small drill bit or the tip of your detail saw for the tiniest openings and clean each one fully through the wall. Save the outermost ring of shapes for last so the crescent wall holds firm the whole time.

  5. Open the crescent and clean edges

    With the interior texture done, decide how bright you want the moon. You can cut the full crescent open for maximum glow or leave sections of skin for a softer effect. Trim ragged edges from the inside with a loop tool so light spreads smoothly. Wipe away pulp dust from every little hole.

  6. Light it and photograph

    Drop in a battery LED, warm white or amber, never a candle near thin cut walls. Set it on a porch step at dusk and check that the small dots all glow. Rotate the light until the crescent reads clearly from a few feet back. Snap your photo while the sky is still deep blue for the best contrast.

Gather your supplies

Check things off as you get ready.

Work on a stable surface, keep your free hand out of the cutting path, and have an adult handle sharp tools.

Three levels of light

  • Leave intact

    The whole right third of the face and the pumpkin skin around the crescent stays untouched and dark.

  • Peel & shade

    Optional shallow skin-shaving inside the crescent gives a dim glow if you want softer areas between the pierced dots.

  • Cut through

    The crescent body and every small teardrop, crescent, and curved dot are cut through for the brightest light.

Learn the carving basics

Before you start cutting

Since this is a concept image, can a real pumpkin hold this many small cutouts?

Yes, as long as you keep the wall around one inch thick and leave enough solid pumpkin between each hole. Space the tiny shapes so they do not merge into one weak spot. Cutting from the center outward keeps the crescent sturdy while you work.

How do I keep the tiny teardrop and crescent shapes clean?

Use the very tip of a fine detail saw or a small drill bit rather than a big blade. Cut each shape in one confident pass and push the plug out from the front. Clean any fuzzy edges from the inside with a loop tool.

Should I cut the big crescent open before or after the small dots?

After. Score the crescent outline first for reference, then pierce all the interior dots while the wall is still supported. Open the full crescent last so the surface stays firm and your small shapes do not tear.

Your take belongs here, too.

Changed a detail? Made it simpler? Share a photo of your version and tell the community what worked.

Share your pumpkin

More pumpkins like this

You've reached the end · 8 pumpkins
The Patch Report

Fresh pumpkins, in your inbox.

The best new carvings, ideas worth stealing, and how-tos for carving season. Short, seasonal, and gone by November.

A short email during carving season. Unsubscribe anytime. See our privacy policy.