Halloween Pumpkin Carving Contest · Starts October 1st · $500 in prizes
← Back to ideas
@ai_concepts
Sep 25, 2026
Sun and Moon Pumpkin With Teardrop Ray AperturesAI
0

Report this carving

Tell us what is wrong. Reports are private.

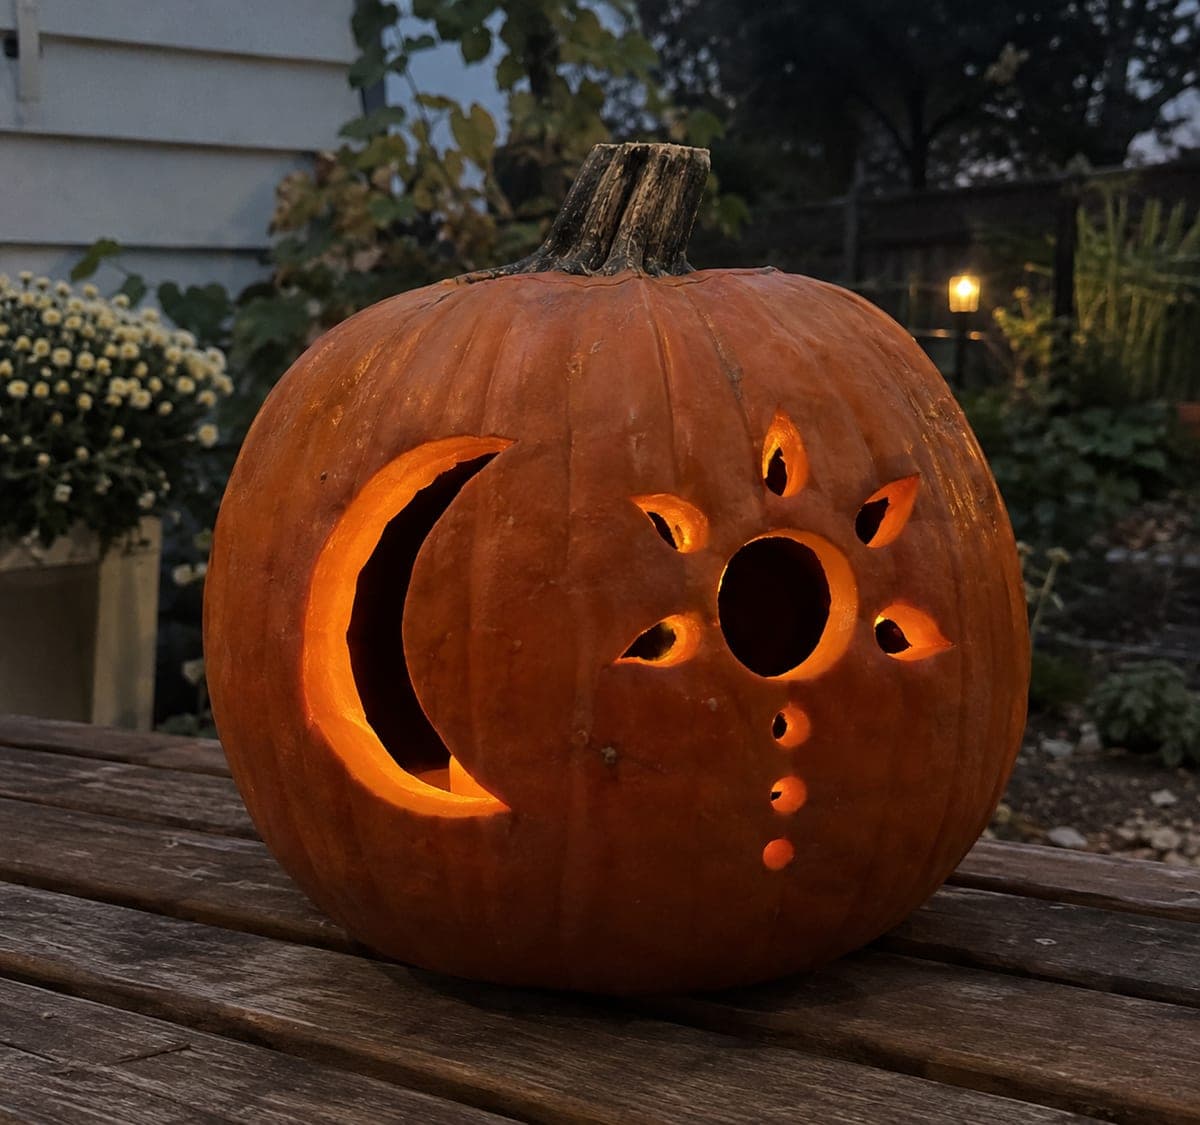
Sun and Moon Pumpkin With Teardrop Ray Apertures

An open crescent moon and a round sun with separate teardrop ray apertures and small dot accents glow together on this medium celestial pumpkin carving, displayed on a garden bench. The teardrop ray shapes radiate from the sun circle and are each cut as individual through-holes, with robust rind kept between each ray. Cut the sun circle and crescent moon first, then space the teardrop rays evenly around the sun using a ruler to mark the angles. A warm LED inside makes the teardrop rays glow like a traditional sun-and-moon folk motif.

No ratings yet · Sign in to rate
Comments (0)

  • No comments yet — be the first.

Save without an account. Sign in to like or comment.

Our tips for carving a similar design

The open crescent moon and the round sun circle are the anchoring elements, while the individual teardrop ray apertures add a decorative folk-art quality that distinguishes this from a simpler sun design. Each teardrop ray is a separate through-hole with robust rind between it and its neighbors, which gives the design structural security despite its ornate appearance. Using a ruler to mark even angular spacing for the rays before cutting is the key prep step.

From pumpkin to porch

  1. Prepare and transfer the template

    Scoop the interior to a firm, even wall. Print the template with the sun circle, crescent moon, teardrop ray positions, and small dot accent positions clearly marked. Perforate all outlines and review the spacing between elements. Each teardrop ray should have at least a half inch of solid rind between it and the adjacent ray.

  2. Cut the crescent moon

    Begin with the crescent moon, cutting the outer arc first and then the inner arc to remove the piece. Go slowly at both crescent tips to keep the points clean. Place the crescent on the side of the pumpkin face that suits your display angle.

  3. Cut the sun circle

    Cut the round sun circle with a jab saw, keeping the blade perpendicular throughout. Pop out the disc cleanly. Center the sun on the remaining rind space so the teardrop rays will have room to radiate evenly around it.

  4. Mark and cut the teardrop rays

    Use a ruler to draw lines from the sun circle edge outward, dividing the surrounding space into equal segments to mark the center line of each teardrop ray. Cut each teardrop as a small pointed oval, keeping both the pointed tip and the rounded base end smoothly curved. Work around the circle in order, alternating sides after each ray to maintain balance.

  5. Add the small dot accents

    Punch or cut the small round dot accent holes in the remaining rind spaces between the teardrop rays, using a round punch cutter or apple corer. Keep each dot hole at least a quarter inch from the nearest aperture edge. These small accents complete the folk-art celestial character of the design.

  6. Light and display on the garden bench

    Place a warm LED inside the pumpkin centered between the crescent and sun positions. Display on the garden bench at a slight forward tilt so both the crescent and the full set of teardrop rays face outward toward viewers. The warm amber glow through the teardrop ray shapes produces a distinctive folk-motif effect.

Written with AI to match this design

Gather your supplies

Check things off as you get ready.

Work on a stable surface, keep your free hand out of the cutting path, and have an adult handle sharp tools.

Three levels of light

  • Leave intact

    The robust rind between all teardrop rays, between the sun circle and the crescent, and the outer rim all remain solid and dark.

  • Peel & shade

    None, all illuminated areas are full through-cuts.

  • Cut through

    The crescent moon, the sun circle, every teardrop ray aperture, and the small dot accents are cut through for full backlit glow.

Learn the carving basics

Before you start cutting

How many teardrop rays should I include?

Eight teardrop rays evenly spaced around the sun circle is a classic folk-art number that balances visual richness with manageable spacing. Six rays look slightly spare and twelve rays require very precise spacing to keep the rind between them thick enough. Eight is the practical sweet spot for this design on a medium to large pumpkin.

My teardrop shapes are coming out lopsided. How do I fix this?

A lopsided teardrop usually means the center-line mark was not followed precisely when cutting the two curved sides. After cutting, use a detail knife to carefully pare back the wider side of the teardrop by a small amount to bring the two sides into balance. Work in small increments and check frequently to avoid over-correcting.

Can I add a face to the sun circle?

Yes, adding simple eye and smile cutouts inside the sun circle steps up the design to hard difficulty but adds considerable charm. Cut the eye and smile holes after the teardrop rays and dot accents are all complete, when the surrounding structure is fully established. Keep the eyes and smile small relative to the circle diameter so there is ample face rind remaining to hold the features in place.

Your take belongs here, too.

Changed a detail? Made it simpler? Share a photo of your version and tell the community what worked.

Share your pumpkin

More pumpkins like this

You've reached the end · 8 pumpkins
The Patch Report

Fresh pumpkins, in your inbox.

The best new carvings, ideas worth stealing, and how-tos for carving season. Short, seasonal, and gone by November.

A short email during carving season. Unsubscribe anytime. See our privacy policy.